Thursday, 28 February 2019

Run your Jenkins pipeline without operating a Jenkins instance

My job is to work on a Jenkins pipeline specific to SAP S/4HANA extensions running on SAP Cloud Platform. See the original blog post here.

Jenkins is a powerful tool for automation, and we heavily rely on the codified pipeline syntax introduced in Jenkins 2.

With regards to operations, we minimized the need for care with the cx-server life-cycle management greatly. Still, you need to run that Jenkins server. This means you’ll need to update the server and plugins (simplified by our life-cycle management), and scale as the number of builds grows. User administration and backups are also required in a productive setup.

Is this really required, or is there an alternative approach?

In this blog post, I’ll introduce a prototype I did to get rid of that long running pet Jenkins instance. Rather, we’ll have cattle Jenkins instances, created and destroyed on demand. “Serverless” Jenkins in the sense that we don’t have to provision the server for Jenkins to run.

The setup described in this post is highly experimental. I encourage you to try this out in a demo project, but be very cautious until further notice to use this on productive code. In this proof of concept, I’ll use a public GitHub repository and the free open-source offering by TravisCI. This setup is not suitable for commercial software.

The pets vs cattle metaphor describes how approaches in managing servers differ. While you care for pets and treat them when they are unwell, cattle can be easily replaced. Your traditional Jenkins server is a pet because it is often configured manually, and replacing it is a major effort. For more background on this metaphor, click here.

Before we’re getting into the technical details, let’s discuss why we would want to try this out in the first place. Running Jenkins on arbitrary CI/CD services, such as TravisCI seems very odd on first sight. On such services you’ll usually invoke your build tools like Maven or npm in a small script, and that will do your build. But in the enterprise world, both inside SAP and in the community, Jenkins has a huge market share. There are many shared libraries for Jenkins, providing pre-made build steps which would be expensive to re-implement for other platforms. Additionally, SAP S/4HANA Cloud SDK Pipeline is a ready to use pipeline based on Jenkins where you as the developer of an SAP S/4HANA extension application do not need to write and maintain the pipeline yourself. This means reduced costs and effort for you, while the quality of your application improves, for example due to the many cloud qualities which are checked out of the box.

image:/images/post-images/2019-02-22/green.png

Let me show you an experiment to see if we can get the best of both worlds. The goal is to get all the quality checks and the continuous delivery that the SAP S/4HANA Cloud SDK Pipeline provides us, without the need for a pet Jenkins server.

How do we do that? The Jenkins project has a project called Jenkinsfile runner. It is a command line tool that basically boots up a stripped-down Jenkins instance, creates and runs a single job, and throws away that instance once the job is done. As you might guess, there is some overhead in that process. This will add about 20 seconds to each build, which I found to be surprisingly fast, considering the usual startup time of a Jenkins server. For convenient consumption, we have packaged Jenkinsfile runner as a Docker image which includes the Jenkins plugins that are required for SAP S/4HANA Cloud SDK Pipeline.

We also utilize the quite new Configuration as Code plugin for Jenkins, which allows to codify the Jenkins configuration as YAML files. As you will see in a minute, both Jenkinsfile runner and Configuration as Code are a perfect match.

If you want to follow along, feel free to use our provided Address Manager example application. You may fork the repository, or create your own repository and activate it on TravisCI.

Based on the existing Address Manager, let’s add a small .travis.yml file to instruct the build:

language: minimal
services:
- docker
script: docker run -v /var/run/docker.sock:/var/run/docker.sock -v ${PWD}:/workspace -v /tmp -e CASC_JENKINS_CONFIG=/workspace/jenkins.yml -e CF_PW -e ERP_PW -e BRANCH_NAME=$TRAVIS_BRANCH ppiper/jenkinsfile-runner

The script line has quite a few things going on, let’s see what is there.

We run a Docker container based on the ppiper/jenkinsfile-runner image. We need to mount the Docker socket, so that our container can spawn sibling containers for tooling such as Maven or the CloudFoundry CLI. We also need to mount the current directory (root of our project) to /workspace, and tell the Jenkins Configuration as Code Plugin where to find the configuration file. We’ll come to that file in a minute. Also be sure to pass your secret variables here. Travis will mask them, so they are not in plain text in your build log. Take note to change the names of the variables according to your requirements. You might wonder that we need a BRANCH_NAME environment variable. This is required for the Pipeline to check if you’re working on the “productive branch”, where a productive deployment to SAP Cloud Platform is supposed to happen. If you omit passing this variable, the pipeline will still run but never in the productive mode, and hence not deploy to SAP Cloud Platform.

You might need some secrets in the build, for example in integration tests or for deployment to SAP Cloud Platform. You can make use of the travis command line tool to encrypt them on your local machine as documented here. Take care that this might add your secret in plain text to the shell history on your machine.

travis encrypt CF_PW=supersecret --add
travis encrypt ERP_PW=alsosupersecret --add

This command will add a line to your .travis.yml file with the encrypted secret value. Be sure to commit this change. Also take note of the name of your variable, which must match the environment parameter, and your Jenkins configuration. You should be aware of this TravisCI document on secrets.

We’ll also need to add a jenkins.yml file to our project. Here we need to configure two shared libraries which are required for the SAP S/4HANA Cloud SDK Pipeline, and the credentials that are required for our pipeline. Be sure not to put your secrets in plain text in here, but use the variables you used before via the travis cli tool. TravisCI will decrypt the password on the fly for you.

jenkins:
  numExecutors: 10
unclassified:
  globallibraries:
    libraries:
    - defaultVersion: "master"
      name: "s4sdk-pipeline-library"
      retriever:
        modernSCM:
          scm:
            git:
              remote: "https://github.com/SAP/cloud-s4-sdk-pipeline-lib.git"
    - defaultVersion: "master"
      name: "piper-library-os"
      retriever:
        modernSCM:
          scm:
            git:
              remote: "https://github.com/SAP/jenkins-library.git"
credentials:
  system:
    domainCredentials:
      - credentials:
          - usernamePassword:
              scope: GLOBAL
              id: "MY-ERP"
              username: MY_USER
              password: ${ERP_PW}
          - usernamePassword:
              scope: GLOBAL
              id: "cf"
              username: P12344223
              password: ${CF_PW}

You might add more configuration to this file as you need it.

Commit both files to your repo and push. If the travis build works, you’ll see the build integration on GitHub.

image:/images/post-images/2019-02-22/in-progress.png

On travis, you can follow the progress of your build live, and get the full text log of your Jenkins build. If all went well, you will be greeted with a green build after a few minutes.

image:/images/post-images/2019-02-22/log.png

Congratulations. You’re running a serverless Jenkins build with all the qualities checked by the SAP S/4HANA Cloud SDK Pipeline, without hosting your own Jenkins instance.

Keep in mind this is a proof of concept at this point. The serverless Jenkins ecosystem is currently evolving, and neither Jenkinsfile runner, nor Configuration as Code are in a mature state as of February 2019. One downside of this approach is that we lose the Jenkins user interface, so we can’t see our pipeline in blue ocean, and we don’t get the nice build summary. We can get the whole log output from TravisCI, so this can be mitigated, but this is arguable not the best user experience.

But on the contrary, we don’t have to care for our pet Jenkins, we don’t need to update plugins or backup the configuration or build logs.

Deal Alert: Grab a White Apple Watch Series 3 for $220 (38mm Only)

A white Apple Smart Watch Series 3

If you’ve been thinking about jumping on the Apple Watch train, you can do it today for a cheaper than ever before. Amazon is selling the white Watch Series 3 for just $220, which is $60 off the normal price.

This deal is only for a specific model, though: the white 38mm version of the Series 3. If you go for the Space Gray model, the price jumps to $250. Similarly, if you have a meaty wrist and ant the 42mm version, expect a price bump—by almost $100, in fact. That’s nuts.

The Series 3 Apple Watch has all of the features that you’d expect from a premium smartwatch. It mirrors notifications from your phone, monitors your heart rate, and helps you keep track of your fitness goals. You can also make calls or control Siri from the Apple watch, and of course, you can use it to check the time.

Keep in mind that Series 3 is the previous generation Apple Watch. If you want to perform ECGs, then you’ll need to wait for the Series 4 Apple Watch to go on sale.

As with any deal, you’ll want to buy this while you can. There are a lot of Apple fans out there, and they’re probably beating you to the deal at this very moment.

Amazon Day Lets Prime Members Choose What Day Packages Arrive

The Five-Camera Nokia 9 Pureview Will Go On Sale Starting March 3rd for $599

How to Calculate a Z-Score Using Microsoft Excel

A Z-Score is a statistical value that tells you how many standard deviations a particular value happens to be from the mean of the entire data set. You can use AVERAGE and STDEV.S or STDEV.P formulas to calculate the mean and standard deviation of your data and then use those results to determine the Z-Score of each value.

What is a Z-Score and what do the AVERAGE, STDEV.S, and STDEV.P functions do?

A Z-Score is a simple way of comparing values from two different data sets. It is defined as the number of standard deviations away from the mean a data point lies. The general formula looks like this:

=(DataPoint-AVERAGE(DataSet))/STDEV(DataSet)

Here’s an example to help clarify. Say you wanted to compare the test results of two Algebra students taught by different teachers. You know the first student got a 95% on the final exam in one class, and the student in the other class scored 87%.

At first glance, the 95% grade is more impressive, but what if the teacher of the second class gave a more difficult exam? You could calculate the Z-Score of each student’s score based on the average scores in each class and the standard deviation of the scores in each class. Comparing the Z-Scores of the two students could reveal that the student with the 87% score did better in comparison to the rest of their class than the student with the 98% score did in comparison to the rest of their class.

The first statistical value you need is the ‘mean’ and Excel’s “AVERAGE” function calculates that value. It simply adds up all of the values in a cell range and divides that sum by the number of cells containing numerical values (it ignores blank cells).

The other statistical value we need is the ‘standard deviation’ and Excel has two different functions to calculate the standard deviation in slightly different ways.

Previous versions of Excel only had the “STDEV” function, which calculates the standard deviation while treating the data as a ‘sample’ of a population. Excel 2010 broke that into two functions that calculate the standard deviation:

  • STDEV.S: This function is identical to the previous “STDEV” function. It calculates the standard deviation while treating the data as a ‘sample’ of a population. A sample of a population might be something like the particular mosquitoes collected for a research project or cars that were set aside and used for crash safety testing.
  • STDEV.P: This function calculates the standard deviation while treating the data as the entire population. An entire population would be something like all mosquitoes on Earth or every car in a production run of a specific model.

Which you choose is based on your data set. The difference will usually be small, but the result of the “STDEV.P” function will always be smaller than the result of the “STDEV.S” function for the same data set. It is a more conservative approach to assume there is more variability in the data.

Let’s Look at an Example

Read the remaining 51 paragraphs

Razer Phone 2 Drops to $500 on March 1st, Android Pie Comes Along for the Ride

What Are USB Gen 1, Gen 2, and Gen 2×2?

The Best Durable Dog Toys for Your Destructive Chewer

What Are NVMe Drives, and Should You Buy One?

Can Smart Thermostats Ruin Your Furnace?

2016-03-31 15.00.05_stomped

It may sound preposterous, but some people are afraid smart thermostats are bad for heating and air conditioning systems. Here’s the good news: You don’t have much to worry about, but there are some important things to keep in mind.

A relatively recent post on Reddit recounted an HVAC technician’s warning about smart thermostats:

“He said he never recommends them and that their company is REGULARLY replacing systems that have failed or prematurely broken down due to the Nest overworking the computing systems/motherboards built in to most HVAC units—even brand new models.”

The technician isn’t completely full of it. If your smart thermostat isn’t wired up correctly, then it can cause problems for your HVAC system. However, his explanation is mostly filled with a lot of FUD (Fear, Uncertainty, and Doubt.)

It’s All About the C Wire, Baby

Every thermostat has a handful of wires connected to it (either four or five) that lead back to the electrical control board of your HVAC system. Each wire is usually responsible for something specific, like one wire is for cooling, and another wire is for heating. Many systems have a “C wire” (or “common wire”), which is dedicated to providing electricity to the thermostat to power the screen and other electronic functions.

IMG_2435_stomped

Older systems usually don’t have a C wire, though, because back then thermostats didn’t require electricity thanks to the fully mechanical operation of mercury-switched thermostats. But today, most modern thermostats have more bells and whistles, which require electricity to run. Thus, the purpose of the C wire.

A C wire isn’t necessarily required for smart thermostats, but it’s highly recommended. And if your thermostat’s wiring includes a C wire, you should connect it to your smart thermostat—most problems that arise due to the smart thermostat happen because there’s no C wire connected to it.

Read the remaining 12 paragraphs

Geek Trivia: Which Cartoonist Coined The Name For Stegosaurus Tail Spikes?

Which Cartoonist Coined The Name For Stegosaurus Tail Spikes?

  1. Gary Larson
  2. Charles Schultz
  3. Bill Watterson
  4. Bill Ward

Think you know the answer?

Apple self-driving car layoffs give hints to division's direction

Apple said on Wednesday it planned to lay off 190 employees in its self-driving car program, Project Titan

Mudrex now brings bots to crypto trade

The Y Combinator-backed startup has created trading bots that allow traders to automate their strategies without knowing how to code.

Chipset innovation: India enters into an elite club, says Aruna Sundararajan

With India's foray into chipset technology driven by a 40-member led startup, Signalchip that has unveiled highly-sophisticated system on chip (SoC) for small cell base stations, the company has become an arch rival to the globally dominant US majors such as Qualcomm, Intel and Broadcom.

How to Find All the Files You’ve Shared in OneDrive

onedrive logo

Microsoft’s OneDrive makes it easy to share and unshare files and folders. But what if you want to see everything you’ve shared, in one simple list? OneDrive can do that easily, and here’s how you get to it.

RELATED: How to Find All the Files You’ve Shared in OneDrive

Log into your account on the OneDrive site. You can also sign in to your Office 365 account and select OneDrive from the app launcher.

The O365 app launcher and app tiles

Note that OneDrive for Business will also show you things people have shared with you in a separate tab, but sadly that’s not an option in a personal OneDrive.

In the menu on the left-hand side, click “Shared.”

The Shared option

All of the files and folders you’ve shared will be displayed.

Read the remaining 5 paragraphs

The Shadow Ghost is a Curvy Little Box That Streams PC Games in 4K

Wednesday, 27 February 2019

Speedy Scala Builds with Bazel at Databricks

Databricks migrated over from the standard Scala Build Tool (SBT) to using the Bazel to build, test and deploy our Scala code. Through improvements in our build infrastructure, Scala compilation workflows that previously took minutes to tens of minutes now complete in seconds. This post will walk you through the improvements we made to achieve that, and demonstrate the concrete speedup each change contributed to the smooth experience using Scala with Bazel at Databricks.

The Databricks Codebase

The Databricks codebase is a Monorepo, containing the Scala code that powers most of our services, Javascript for front-end UI, Python for scripting, Jsonnet to configure our infrastructure, and much more.

The Scala portion is by far the largest, and at time of writing comprises:

  • 1,000,000 lines of Scala code
  • Split over 5500 source files
  • In 600 modules (also known as Targets in Bazel)
  • Deployed as a few dozen different services.

While we appreciate Scala as a programming language, everyone knows that the Scala compiler is slow. Despite recent improvements, some benchmarks put it about 6x slower than the Java compiler when compiling the equivalent code. Compared to most programming languages, it is much easier for Scala compilation times to get out of hand. This was borne out by the feedback in our internal surveys, which specifically called out our Scala code as taking too long to compile:

Building + applying the build take too much time. End up spending a lot of 1-2 minutes time fragments everyday waiting for build/sync

Building scala projects in Bazel (~10-15 min).

Compiling app (~30 seconds). Compiling app tests (~90 seconds)

This feedback from our engineers kicked off a series of projects to do something about these long iteration cycles, which we will present below. As a baseline for discussion, we will compare the experience of working with two modules within our Scala codebase:

  • //common: a general-purpose utility module that doesn’t depend on much (relatively speaking) but is used throughout our codebase.
  • //app: a common webservice, this depends on a large number of other modules (including //common) but isn’t directly used by other Scala modules (we end up deploying it in a docker container).

With the following statistics:

Target # Source Files # Source lines # Transitive Files # Transitive Lines # Transitive Modules
//common 176 22,000 500 50,000 15
//app 48 13,000 1,100 180,000 112

Each of these Scala modules has a number of upstream modules that it depends on. Using Bazel (and sed to clean up some of our legacy-related noise) it is straightforward to visualize the structure of that dependency graph:

bazel query "kind(generic_scala_worker,deps(//common))" --output=graph | tred | dot -Tsvg > common-graph.svg

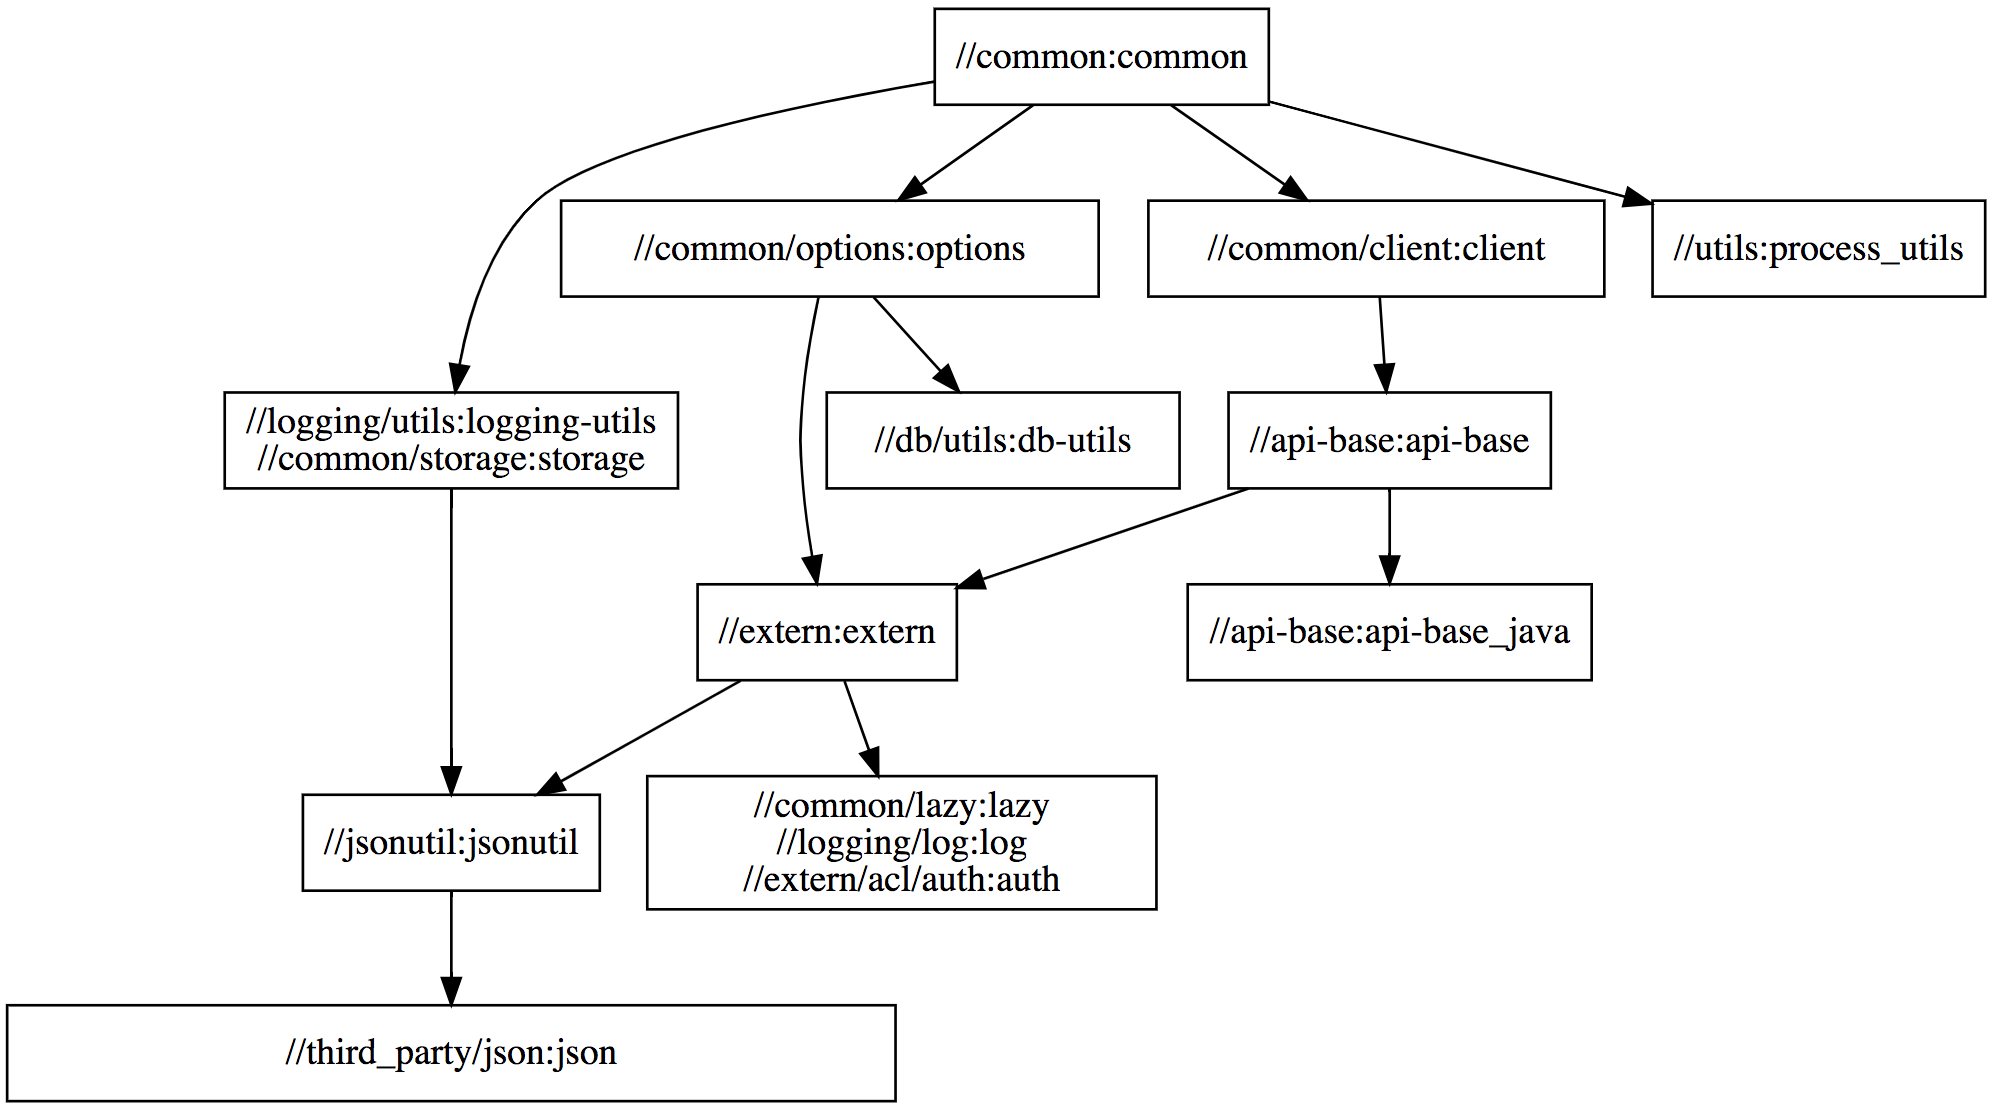
Viewing the structure of //common‘s dependency graph, we can see that some modules such as //common/client:client, //common/options:options, and //utils:process_utils are independent: they do not depend on each other in any way, and thus Bazel will compile them in parallel. On the other hand, other modules like //common:common, //common/options:options, and //db/utils:db-utils do have dependencies on each other, and thus Bazel is forced to compile them sequentially.

The dependency graph for //app is similar, just much larger and too messy to show here. We will use these two modules to demonstrate how our various performance-related efforts impact two primary Scala compilation workflows:

  • Clean builds: these involve re-compiling every Scala module in our codebase, or at least the ones that the module you want depends on. This often happens when you set up a new laptop, or when you change branch using Git and end up modifying tons of files.
  • Delta builds: these involve re-compiling a small number of Scala modules, often a single one, after making a small change, often to a single file. This often happens during iterative development, perhaps adding a single println and seeing what it prints out.

How Bazel Works

Before we discuss concrete performance numbers, it helps to have a basic understanding of what Bazel is.

Bazel is a flexible, general-purpose build tool from Google. Bazel helps you keep track of dependencies between parts of your codebase: when you ask Bazel to compile a module (also called a target), Bazel re-uses already-compiled code where ever possible and parallelizes compilation of modules which do not depend on one another. The end goal is producing the compiled output you asked for as quickly as possible.

At its core Bazel is built around the concept of Targets that live in BUILD files, which themselves live in subfolders in your project folder. A Target is essentially a shell command that takes input files and generates output files, for example:

# spark/conf/nightly/BUILD
genrule(
    name="gen_testing_mode_jsonnet",
    srcs=["testing_mode.py", "main.jsonnet"],
    outs=["main_testing_mode.jsonnet"],
    cmd="python $(location :testing_mode.py) $(location :main.jsonnet) >> $@",
)

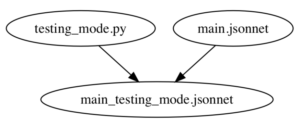
BUILD files like above are written in a subset of the Python language known as Starlark. The above BUILD file defines a single target using the genrule function (Bazel functions are also called rules): that target takes two input files testing_mode.py and main.jsonnet, and runs a shell command in a sandbox to generate a single output file main_testing_mode.jsonnet:

This is similar to how Makefiles work, except written in Python rather than a bespoke Makefile syntax.

The above target can be built using bazel build, which returns the main_testing_mode.jsonnet file listed in the outs array:

$ bazel build //spark/conf/nightly:gen_testing_mode_jsonnet
Target //spark/conf/nightly:gen_testing_mode_jsonnet up-to-date:
  bazel-genfiles/spark/conf/nightly/main_testing_mode.jsonnet

The first time you run bazel build on this target, it will run the cmd given to invoke python on the given inputs. Subsequent runs will simply return the already-built outputfile, unless the one of the inputs to this target (testing_mode.py or main.jsonnet) changed since the last run. This is similar to the venerable Make build tool.

One difference between Bazel and Make is that Bazel lets you define your own helper functions: if you have the same few targets being defined over and over (e.g., maybe every Scala compile target also has a linter you can run, and a REPL you can open), or a few targets that look more-or-less the same (e.g. they all shell out to the Scala compiler in the same way), wrap them in a function to keep your build configuration DRY.

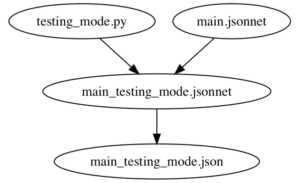
For example, the following target defines a jsonnet_to_json function that internally calls genrule to convert the main_testing_mode.jsonnet file (which we constructed above) into a main_testing_mode.json file that can be used elsewhere:

def jsonnet_to_json(name, src, deps, outs):
    genrule(
        name=name,
        srcs=[...],
        outs=[...],
        cmd="..."
    )

# spark/conf/nightly/BUILD
jsonnet_to_json(
    name="NightlyBuild-json_testing_mode",
    src="main_testing_mode.jsonnet",
    deps=["//jenkins/configuration:jenkins-job-base"],
    outs=["main_testing_mode.json"],
)

While helper functions like jsonnet_to_json make things more convenient, if you dig into the implementation, you will eventually find a shell command similar to the one we saw above that actually runs on the input srcs files to generate the output outs files. The above two targets and the two input files define the following dependency graph:

Bazel itself doesn’t really care what each target does. As long as each target converts input files into output files using a shell command, that’s all Bazel needs. In exchange, Bazel will do everything else: cache generated files if their inputs didn’t change, invalidate the caches when something changes, parallelize shell commands that do not depend on each other, and so on.

Naive Bazel Scala Integration

Bazel does not know anything about Scala by default, but there is an open-source bazel-scala integration in rules_scala that contains a few helper functions (similar to jsonnet_to_json above) to help you compile Scala code by shelling out to the Scala compiler. In essence, it provides a scala_library helper function that can be used as follows:

scala_library(
    name = "jsonutil", # target name
    srcs = glob(["src/main/**/*.scala"]), # source files that will be made available to the compiler
    deps = ["//jsonutil/jars"], # Dependencies available to compiler and runtime
)

You give the scala_library target a list of source files in srcs, any upstream scala_library targets in deps, and it will shell out to the Scala compiler with the necessary command-line flags to compile your sources and give you a compiled jar file, spawning one compiler subprocess per module:

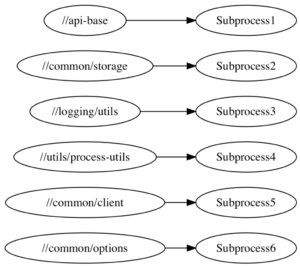
While this does work, performance is a big issue. Shelling out to spawn new compiler subprocesses over and over is inefficient for a variety of reasons:

  • We pay the heavy cost of JVM startup time for every target we compile.
  • The short-lived subprocesses never benefit from the JIT compilation that happens once the JVM has warmed up.
  • We end up with multiple compiler processes running concurrently, hogging the RAM of your laptop.

Using this naive subprocess-spawning compilation strategy, the time taken to compile both //app and //common, Clean and Delta builds, is as follows:

Action Naive
//app (Clean) 1065s
//app (Delta) 26s
//common (Clean) 186s
//common (Delta) 38s

Almost 20 minutes to clean rebuild the //app target, and 3 minutes to clean rebuild //common. Note that this includes some degree of parallelism, as mentioned above.

Even Delta builds, maybe adding a single println, take around 30 seconds. This is pretty slow, and doesn’t include the time needed to do other things in your workflow (running tests, packaging docker containers, restarting services, etc.).

For both targets, and both workflows, this is a tremendously slow experience and would be unacceptable to our engineers who are modifying, recompiling, and testing their code day in and day out.

Long-lived Worker Processes

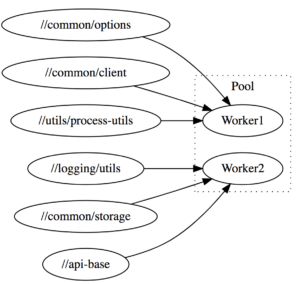
The first big improvement we made to our Scala compilation infrastructure was making use of Bazel’s support for long-lived worked processes. Bazel allows you to make a target use a long-lived worker process, rather than repeatedly shelling out to a subprocess, in order to fully take advantage of technologies like the JVM whose performance starts off poor but improves over time as the JIT compiler kicks in. This allows us to keep our Scala compiler process live, and the JVM hot in-memory, by sharing a pool of worker processes between all modules that need to be compiled:

This results in a significant speedup:

Action Naive Worker
//app (Clean) 1065s 279s
//app (Delta) 26s 9s
//common (Clean) 186s 84s
//common (Delta) 38s 18s

As you can see, by converting our naive subprocess-spawning Bazel-Scala integration to long-lived workers, compile are down 2-4x across the board. Clean compiles of the app now take 5 minutes instead of almost 20 minutes.

By default, Bazel spawns N different workers which allow building N targets in parallel (N is often the number of cores available) each of which compiles modules in a single-threaded fashion. Databricks’ Scala Bazel integration instead shares a single multi-threaded JVM worker process that is able to process a number of modules at once in parallel:

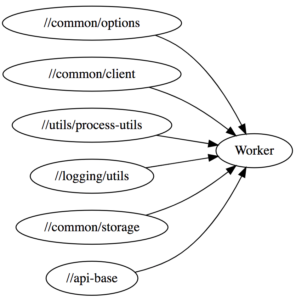
This greatly reduces the memory usage, since Scala compiler processes are heavy-weight and can easily take 1-2 gb of memory each. The initial warm-up is also faster as the JVM quickly reaches the amount of load necessary to JIT optimize the running code.

Upgrading to Scala 2.12

When Databricks was founded in the halcyon days of 2013, Scala 2.10 was the latest version of the language, and it remained the version of Scala used throughout our codebase out of inertia. However, the core Scala team has put in a lot of work to try and improve the performance of the compiler, and by upgrading from 2.10 to Scala 2.12, we should be able to let Databricks engineers enjoy those speedups.

Upgrading from Scala 2.10 to 2.12 was a slow, multi-step process:

  • Prepare 2.12 compatible versions of all our third-party dependencies: some were on old versions, and were only 2.12 compatible on more recent versions.
  • Prepare Bazel helper functions to cross-build modules between Scala 2.10 and 2.12. Greatly simplified, this was just a function with a loop to define different versions of a target and its dependencies:
def cross_scala_library(name, scala_versions, srcs, deps):
    for scala_version in scala_versions:
        scala_library(
            name = name + "_" + scala_version,
            scala_version = scala_version,
            srcs = srcs,
            deps = [dep + "_" + scala_version for dep in deps]
        )

cross_scala_library(
    name = "jsonutil",
    scala_versions = ["2.10", "2.12"],
    srcs = glob(["src/main/**/*.scala"]),
    deps = ["//jsonutil/jars"],
)

  • Incrementally roll out 2.12 support using cross_scala_library across the entire 600-target/million-line codebase, including running all unit and integration tests on Scala 2.12.
  • Deploy 2.12 versions of our various services to production.
  • Remove the old 2.10 support once our 2.12-compiled code was in production and running smoothly.

Most of the work was getting all the build configuration, third-party libraries, etc. lined up correctly to cross-build things; there were relatively few code changes. Here is a sampling of some of the commit logs from that period:

Delete some PropertyCheckConfig customization in our tests since the new version of ScalaCheck doesn’t support it

Remove some overloads that Scala 2.12 doesn’t like due to their ambiguity (Scala’s not meant to allow multiple overloads with default parameters, but I guess 2.10 is a bit sloppy)

Use InternalError instead of NotImplementedError to test fatal exceptions, since the latter is no longer fatal in 2.12

Floating point literals cannot end with a trailing ., so I added a 0 after the .

Necessary changes, but generally pretty small. The whole process took several months of on-and-off work, but went smoothly without any incident.

The exact speedup we got varied greatly. Here’s a benchmark where we compared compilation times of a wide range of modules, before and after the upgrade:

Target 2.10 Compile 2.12 Compile Ratio
//manager 40s 23s 58%
//manager_test 28s 18s 64%
//app:handlers 21s 13s 62%
//elastic 18s 11s 61%
//launcher 13s 8s 61%
//launcher:launcher_test 19s 9s 47%

We saw about a 30-60% reduction in compile times across the board. Test suites seemed to benefit more than non-test modules, probably thanks to the new Java 8 Lambda Encoding that reduces the number of class files generated by our lambda-heavy Scalatest FunSuites. This upgrade also resulted in much smaller compiled .jar files:

Action Naive Worker Scala 2.12
//app (Clean) 1065s 279s 181s
//app (Delta) 26s 9s 6s
//common (Clean) 186s 84s 74s
//common (Delta) 38s 18s 14s

Remote Caching

Bazel by default caches compiled artifacts locally: if you call bazel build on the same target twice, the second run will be almost instant as Bazel simply returns the file that was produced by the first. While this makes Delta builds relatively quick, it doesn’t help for Clean builds, where Bazel still ends up having to compile large portions of your codebase before you can start working on the module you are interested in.

In addition to the local cache, Bazel also has support for Remote Caching. That means that whenever someone generates a file, perhaps the output .jar from the //common module, Bazel will upload it to a central server and make it available for anyone else on the team to download (assuming the inputs and the command generating that file are the same):

That means that each file only needs to get compiled once throughout your engineering organization: if someone already compiled //app on the latest master, you can simply download the generated files onto your laptop without needing to compile anything at all!

Bazel’s remote cache backends are pluggable: Nginx, Google Cloud Storage, Amazon S3, etc. can all be used for the backend storage. At Databricks we utilize a simple multi-level cache with two layers:

  1. An LRU read-through in-memory cache built on top of groupcache
  2. Amazon S3, as an unbounded backing store

The exact speedup that the Remote Cache gives you varies greatly depending on your network latency and throughput, but even on so-so residential WiFi, the gains are substantial:

Action Naive Worker Scala 2.12 Remote Cache
//app (Clean) 1065s 279s 181s 60s
//app (Delta) 26s 9s 6s
//common (Clean) 186s 84s 74s 18s
//common (Delta) 38s 18s 14s

Here, we can see it takes just 1 minute to do a clean “build” of the //app target if the artifacts are already remotely cached, and only 20s to do a clean build of //common. For people on fast office Wifi/Wired connections, it would take even less time.

That means that someone downloading the Databricks monorepo and starting work on our 180,000 line web application can get everything “compiled” and ready to begin development in 60s or less: a huge improvement from the 20 minutes it originally took!

Apart from speeding up Scala compilation, remote caching works with anything: bundling Javascript, building Docker images, constructing tarballs, etc.– all can benefit. And because the remote cache also supports our CI test-running machines, we found usage of the cache greatly reduced the CI time necessary to compile our code before running tests. This saves developers a lot of amount of time waiting for PR validation:

Action Uncached Run Remote Cache
Full Build 70m 10m
Full Test 90m 30m

Overall, this was a huge win all around.

Cloud Devboxes

So far, we have managed to substantially speed up people working with Scala code on their laptops: clean builds are 10-15x faster, and Delta builds are 3-4x faster than before. However, there are many reasons why you may not want to build code on your laptop at all:

  • Laptops are usually limited to 4 cores and 16GB of RAM, while Bazel can parallelize work onto as many cores as you can give it (limited only by Amdahl’s Law).
  • Laptops often have Antivirus, either for security or for compliance, which can seriously degrade performance (especially filesystem IO) via intercepting system calls or performing background scans.
  • Laptops are often physically far away from the rest of your infrastructure: deployments, package repos, remote caches, etc. all live in a data center with fast wired connections, while your laptop sits in an office somewhere else interacting over slow office WiFi.
  • Laptops are filled with other programs that fight for system resources: IntelliJ takes 1-2GB of RAM, Chrome 300mb of RAM per tab, Slack another 1gb, Docker another 1-2GB. This quickly eats into the resources you have to actually do work.
  • Laptops are susceptible to thermal throttling: they could be working at much less than 100% CPU capacity if airflow isn’t good, or the room is hot, or your fans have accumulated dust.

While individually these issues are bearable, together they can add up to significant performance degradation for compiling things on your laptop v.s. compiling things on a dedicated single-purpose machine.

Databricks solves this issue by providing engineers with remote Cloud Devboxes: beefy 16-Core/64GB-RAM Linux VMs hosted on Amazon EC2. These are spun up on-demand, have files efficiently synced over from your laptop, and shut down when not in use. We currently use a custom sync engine that gives us somewhat snappier syncing v.s. rsync/watchdog/watchman, and better IO performance than NFS/SSHFS/Samba.

A new engineer at Databricks simply needs to run devbox/sync command to spin up a new devbox that they can then SSH into and begin using. They can edit files on their laptop using their favorite editor or IDE, and seamlessly run terminal commands over SSH to build/run/test their code on the remote machine, getting the best of both worlds of convenience and performance. These devboxes are hosted in the same AWS region as many of our other development services and infrastructure:

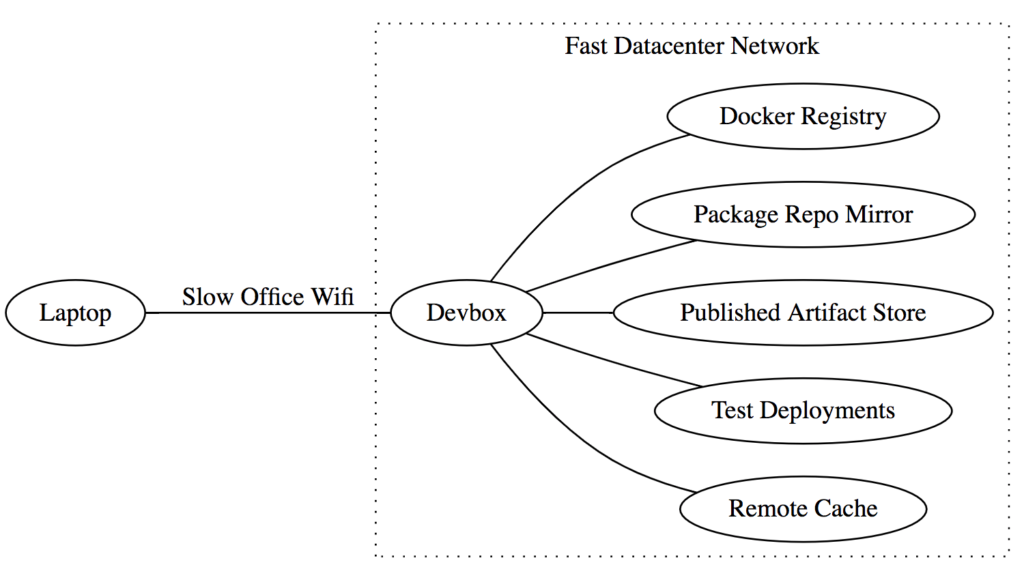
The fast network between the Devbox and other infrastructure means that expensive operations like downloading binaries from the remote cache can be much faster, while the slow network between your laptop and the Devbox isn’t a problem given the small amounts of data typically transferred back and forth over the SSH terminal.

Cloud Devboxes significantly speed up all workflows:

Action Naive Worker Scala 2.12 Remote Cache Devbox (Non-Cached) Devbox (Cached)
//app (Clean) 1065s 279s 181s 60s 100s 2s
//app (Delta) 26s 9s 6s 5s
//common (Clean) 186s 84s 74s 18s 30s 1s
//common (Delta) 38s 18s 14s 7s

Here, we can see that non-cached clean and Delta builds take half as much time as before. Even more impressively, cached builds that download already-compiled artifacts are almost instant, taking barely 1 or 2 seconds! This makes sense when you consider that the bottleneck for cached builds is network throughput and latency, and in-datacenter gigabit networking is going to be orders-of-magnitude faster than your slow office Wifi.

The m5-4xlarge machines that we provide by default cost 0.768$/hr. While that would be expensive to keep running all the time (~550$ a month), an engineer working on it for 20hrs/week (optimistically spending half of their 40hr work week actively coding) would only end up costing about 4$/day, which is definitely worth the significant increase in productivity.

Fine-Grained Incremental Compilation

The last major performance improvement we have made is a fine-grained incremental compilation. While Bazel is able to cache and re-use compiled artifacts on a per-module basis, the Scala incremental compiler (named Zinc) is able to cache and re-use the compiled output of individual files and classes within a module. This further reduces the amount of code you need to compile, especially during iterative development where you are often tweaking methods or adding printlns in a single file.

While the old version of Zinc had a standalone compile-server and command-line interface to it, the current version has lost that capability. Instead, we use the ZincWorker from the Mill Scala build tool for our incremental compilation needs, which is modular enough to simply drop into our Bazel Scala compile worker process. ZincWorker wraps all the messiness of Zinc’s implementation details and provides a relatively straightforward API to call:

def compileMixed(upstreamCompileOutput: Seq[CompilationResult],
                 sources: Seq[os.Path],
                 compileClasspath: Seq[os.Path],
                 javacOptions: Seq[String],
                 scalaVersion: String,
                 scalaOrganization: String,
                 scalacOptions: Seq[String],
                 compilerClasspath: Seq[os.Path],
                 scalacPluginClasspath: Seq[os.Path]): Result[CompilationResult]

Essentially, you give the ZincWorker a list of upstream CompilationResults (which includes both compiled class files as well as metadata “analysis” files), and it incrementally compiles it and returns a new CompilationResult containing the compiled class files and analysis file for this compilation target.

The incremental compilation doesn’t affect clean builds, but it can greatly speed up Delta builds where you are making small changes to a single file:

Action Naive Worker Scala 2.12 Remote Cache Devbox (Non-Cached) Devbox (Cached) Incremental
//app (Clean) 1065s 279s 181s 60s 100s 2s
//app (Delta) 26s 9s 6s 5s 1s
//common (Clean) 186s 84s 74s 18s 30s 1s
//common (Delta) 38s 18s 14s 7s 1s

Here we can see that Delta builds for both //app and //common are now down to 1 second each! That’s about as fast as you could hope for.

Due to rare issues that may turn up in the Zinc incremental compiler (for example #630), we have made incremental compilation opt-in via a command-line flag: SCALA_INCREMENTAL:

# non-incremental compilation
bazel build //app

# incremental compilation
SCALA_INCREMENTAL=true bazel build //app

This way engineers who are iterating on some code can use it, but the vast majority of batch processes, CI builds, and deployment workflows will remain non-incremental. If any issues turn up with the incremental compiler, an engineer can simply drop the SCALA_INCREMENTAL flag to fall back to the tried-and-trusted batch workflow.

Conclusion

Even though our monorepo contains a million lines of Scala, working with code within is fast and snappy. This was not through one silver bullet, but through a series of incremental improvements to chip away at the compile-time problem from a variety of different angles.

When iterating on a single module or test suite, things build and are ready to use in a matter of seconds, not unlike the experience of working with much smaller projects:

$ SCALA_INCREMENTAL=true bazel build //app
INFO: Found 1 target...
Target //app:app up-to-date:
  bazel-bin/app/app_deploy.jar
  bazel-bin/app/app_ijar.jar
INFO: Elapsed time: 2.354s, Critical Path: 1.94s
INFO: 2 processes: 1 darwin-sandbox, 1 worker.
INFO: Build completed successfully, 3 total actions

From the point of view of engineers working on any of our many products and services, the upgrades were almost entirely transparent: things magically got faster without them needing to lift a finger. This lets Web developers focus on web development, cloud infrastructure people can focus on cloud infrastructure, and machine learning experts can focus on machine learning, all simply relying on the simple, stable and performant build infrastructure that everyone shares.

Despite the transparency of the effort, developers did notice and appreciate the changes, and said so on our internal developer surveys:

Dev cycles are pretty fast, and getting faster

I like Bazel and I am learning to love the build cache!

Bazel building across multiple languages is surprisingly fast.

There still are cases where compilation time is problematic: for example, the large 500-file modules of the apache/spark project. Nevertheless, for many engineers, Scala compilation has been reduced from a daily headache to an occasional nuisance.

This work on speeding up Scala compiles itself is part of a larger effort: to improve the productivity of Databricks engineers more broadly: Speeding up Docker workflows, Javascript UI development, CI test runs, etc. In fact, improvements like Cloud Devboxes or Remote Caching are language agnostic, and help speed up all sorts of builds regardless of what specific files you are building.

If you are interested in contributing to our world-class Scala development environment or experiencing what a smooth and productive Scala development is like, you should come work for us!

--

Try Databricks for free. Get started today.

The post Speedy Scala Builds with Bazel at Databricks appeared first on Databricks.

Samsung is Bloating Everything with McAfee—Even Smart TVs

Samsung has a long-running relationship with McAfee. And while it’s bad enough that it bundles this nigh-useless junk on its computers, it’s “extending” this partnership to the S10 and all 2019 Smart TVs.

Of course, this isn’t the first time we’ve seen Samsung throw McAfee on Galaxy smartphones, as it shipped the S8 with the antivirus app installed too. Then it later brought it previous Galaxy devices with an update, which is honestly just disgusting.

Make no mistake here: McAfee is paying Samsung a pile of cash to do this, which is a pretty common practice for all PC makers. It lets McAfee extend its presence, especially for less-savvy users who honestly don’t know you that antivirus apps on Android are nearly useless. Just like with bundled antivirus software on computers, you simply don’t need it. (For Windows machines, Microsoft’s Windows Defender does a great job, and it’s integrated).

But here’s where things are really starting to get out of hand: as of 2019, Samsung will include McAfee on its smart TVs. Straight from the PR:

McAfee extended its contract to have McAfee Security for TV technology pre-installed on all Samsung Smart TVs produced in 2019. Along with being the market leader in the Smart TV category worldwide, Samsung is also the first company to pre-install security on these devices, underscoring its commitment to building security in from the start. McAfee Security for TV scans the apps that run on Samsung smart TVs to identify and remove malware.

Samsung is “the first company to pre-install security on these devices” for good reason: you don’t need it. First off, Samsung’s Smart TVs run its own Tizen OS (which is based on Linux) for which malware is virtually non-existent. So, right out of the gate, it’s inherently a non-issue.

Secondly, the same rule applies to smart TVs that apply to Android, which is basically to be smart about what you install. If you don’t know what it is, then don’t install it. If it’s not from the TV’s official store, don’t install it. Don’t sideload random stuff. Just, you know, use common sense.

While there are documented cases of Android-based smart TVs getting infected with ransomware, installing apps from unofficial stores or websites is nearly always the culprit. So if you don’t do that, then you should be fine. And again, Samsung TVs don’t run Android—they run Tizen.

Read the remaining 5 paragraphs

The Best Wi-Fi Cams with 24/7 Continuous Recording

Gamer Alert: Grab an Xbox One S, Minecraft Creator’s Bundle, and RDR2 for $220

If you’ve been waiting to buy an Xbox One S, now might be the best time to jump on it. Hopefully, you have some free time this year because Massgenie is offering a deal that’s too good to pass up.

Massgenie is offering an Xbox One S, the Minecraft Creators Bundle, and Red Dead Redemption 2 for just $220. If you bought all of these games on Amazon right now, you’d be paying more than $300.

Remember when the Xbox One was priced around $500? Yeah, this deal is so good that it’s almost frustrating. But if you’ve never heard of Massgenie, then there are a few things that you need to know.

Massgenie, like Massdrop, buys items in bulk and sells them at a steep discount. The stipulation here is that a certain number of people need to commit to buying the product, or else nobody gets it. For this Xbox One S deal, the “Power Deal” goal has already been met — enough people have paid for the product, so you just need to put down your money before the deal ends.

But Massgenie has a “first in first out” policy, so you want to put down your money sooner rather than later. Sometimes there isn’t enough inventory to honor every purchase, so people that are late to the game get a full refund instead of the Xbox One S. Hey, at least there’s no risk.

Deal Alert: The SteelSeries Stratus XL Controller for Android is Just $30 Today

The Best Chrome Extensions for Making Gmail Better

Gmail is already pretty great, but with the addition of a few carefully selected Google Chrome extension, you can get it to do so much more. Here are some of our favorites.

We typically don’t recommend using a lot of browser extensions because they can be a privacy nightmare. Still, it’s hard to resist extensions that can significantly improve things for you. We’ve checked out all these extensions ourselves, testing them, looking at their reputations among users, and favoring extensions that make their source code public when possible. Still, you should learn how to make sure Chrome extensions are safe before using them and use them sparingly.

RELATED: The Best Chrome Extensions for Managing Tabs

FlowCrypt

FlowCrypt is an easy way to make sure any message you send from your Gmail account gets encrypted—even attachments!—using PGP encryption. FlowCrypt places a button on the UI that lets you compose a secure message when you click it. Once you and the recipient install FlowCrypt you can send encrypted messages to anyone on your contact list, whether they have FlowCrypt or not. If the recipient has FlowCrypt installed, messages are decrypted automatically when they’re opened on the other end. However, if they don’t have it installed, you have to create a one-time password which you should share not via email, for obvious reasons.

RELATED: Why No One Uses Encrypted Email Messages

Discoverly

Discoverly is like a private eye for Gmail. Anytime you receive an email from an unknown person, it scours the internet, revealing the person’s Twitter, Facebook, Gmail, and even LinkedIn to show you who they are. Discoverly connects all the information from these sites and outs it together for you to see the person’s mutual connections, work info and position, and it even displays their tweets.

Read the remaining 28 paragraphs

Deal Alert: Amazon is Heavily Discounting SD Cards, SSDs, and More

Amazon storage sale

If you’ve been in need of an SD card or an SSD, now’s the time to buy one. Amazon is running a huge sale on memory and storage products. Most of the products on sale are from Sandisk, so you know that they’re reliable and durable.

All of the items in Amazon’s sale are at least 20 percent off, so there aren’t any bad deals in this sale. That being said, we have a few favorites:

Amazon will end this sale by the end of the day, so don’t wait too long to grab that Micro SD card or SSD. You’ll always remember that you got it for a good price as you traverse through years and reading and/or writing.

Wi-Fi Cams Do More Than Just Record Video

Nest Cam

The main purpose of Wi-Fi cameras is to record video, but that’s not the only thing they can do. Modern Wi-Fi cams are sophisticated pieces of hardware and they can do a lot more than simply record video.

RELATED: What You Should Know Before Buying Wi-Fi Cameras

This also means that if you’re in the market for a Wi-Fi cam, there are a lot more features that you’ll want to know about a specific model other than its video quality. Here are features that some Wi-Fi cameras have other than just video recording.

Two-Way Talk

Two-way talk capabilities on the Nest Cam

Pretty much every Wi-Fi camera these days comes with a built-in microphone and speaker so you can use your smartphone and your Wi-Fi cam as walkie talkies of sorts.

The accompanying app on your phone lets you hit a button and start talking through the camera, and the person on the other end can talk back using the microphone on the camera itself. This is especially useful on video doorbells where you can talk to the person who came to your door (rather than actually opening and answering the door), especially if it’s someone who you’re not quite sure about.

Of course, if this intercom isn’t a feature that you’ll use, there’s usually a setting that lets you turn off the microphone and speaker on the camera, but this usually will also prevent video recordings from capturing audio.

Facial Recognition

Nest Hello video doorbell

Read the remaining 11 paragraphs

Five $20 and Under Bathroom Upgrades You Should Buy Right Now

How to See Which Apps Are Tracking Your Location on iPhone

Location services activity

Apps on your iPhone can track your location, but you have to give them access first. Here’s how to check which apps can monitor your GPS location and revoke their access.

As important as privacy is, letting some apps track our location makes them much more useful—and sometimes it’s essential. It’s unreasonable to expect Google Maps to work as it should without Google knowing your location, but does that note-taking app need to know where you are? Maybe, maybe not.

Where you stand on these things is a personal decision, and it’s not one we’re here to argue. We’re here to show how to take control of which apps know your location, and when they’re allowed to track it.

It’s also important to remember that some apps need your location data to do their job. Revoking access to your location can stop some important features from working. Keep that in mind when checking which apps can and cannot access your data.

RELATED: Why Do So Many Apps Ask For Your Location, and Which Ones Really Need It?

How to See Which Apps Are Tracking You

To see a list of apps that have requested access to your location data, open the Settings app and tap “Privacy.”

Open Settings and tap Privacy

Next, tap “Location Services.”

Read the remaining 19 paragraphs

Early Adopter Pain Is Real, But We Need It For Progress

Tech Mahindra to collaborate with TBCASoft for cross-carrier blockchain platform

TBCASoft leads the Carrier Blockchain Study Group (CBSG), a global consortium of telecom carriers. CBSG Consortium members and partners are building blockchain-based services on this platform.

Geek Trivia: What Distinctly Non-Food Item Do Photographers Use In Cereal Ads?

What Distinctly Non-Food Item Do Photographers Use In Cereal Ads?

  1. Glass Dust
  2. Elmer's Glue
  3. White Paint
  4. Polyurethane Spray

Think you know the answer?

How to Remove Underlined Hyperlinks in PowerPoint

powerpoint logo

Inserting a hyperlink in a PowerPoint presentation is great for quick access to external resources relevant to your content. However, the underline that comes with it may distract the audience from the message of the slide. Here’s how to remove it.

Removing the Underline From Hyperlink Text

While PowerPoint doesn’t have a specific option for removing the underline from hyperlink text, there’s a very simple workaround. What we’re going to do is remove the link from the text, place an invisible shape over that text, and then add the link to that shape.

Go ahead and open your presentation, move to the slide that contains the underlined hyperlink text, and locate that text.

underlined hyperlink text

Right-click the text and select “Remove Link” from the list of options.

remove link

Next, head over to the “Insert” tab and click the “Shapes” button.

shapes

Read the remaining 25 paragraphs

Tuesday, 26 February 2019

Jenkins + Alexa: Say Hello to Voice Controlled CI/CD

This is a guest post by Kesha Williams.

Integrating Jenkins with Alexa to launch your pipelines and obtain results about your deployments through voice is easier than you think. Learn how Alexa Champion, Kesha Williams', latest side project teaches Alexa to deploy code to the cloud.

Jenkins with Amazon Alexa

Alexa (named after the ancient library of Alexandria) is Amazon’s Artificial Intelligence (AI) powered intelligent voice assistant that runs in the cloud. Software engineers make Alexa smarter by creating apps, called skills. From the time that I developed my first Alexa skill, I dreamed of deploying my Java projects to the cloud via voice. For me, telling Alexa to deploy my code is the ultimate level of cool! I recently made my dream a reality when I devoted a weekend to developing my newest Alexa skill, DevOps Pal. In this blog, I will show you how I developed DevOps Pal and hopefully inspire you to build your own version.

Why Choose Voice to Deploy Code

Voice-first technology is revolutionizing how we interact with technology because the interaction is simple, frictionless, and time-saving. For me, voice is an easier way to control Jenkins and retrieve results about my deployments without having to touch a keyboard. In this use case, voice is another access point for data and is a way to further automate the process of building, testing, and deploying a Java project to the cloud, improving efficiency.

Continuous Integration and Continuous Delivery (CI/CD)

If you’re working with DevOps, you understand the need for Continuous Integration and Continuous Delivery (CI/CD) to automate the software delivery pipeline in a reproducible way. CI/CD is the practice of continuously building, testing, and deploying code once it’s committed to version control. DevOps and CI/CD provides software engineering teams with confidence in the code being pushed to production and shorter development lifecycles, which in the end produces happier users, clients, and customers.

DevOps Pal Overview

DevOps Pal is a private Alexa for Business skill that is used to kick off a Jenkins pipeline job. Alexa for Business was the perfect way for me to distribute DevOps Pal since I have the ability to enable the skill on an organization-by-organization basis, which gives me complete control over who has access. Once DevOps Pal invokes the job, the pipeline status displays in real-time via the Blue Ocean Pipeline Run Details View Page.

DevOps Pal Architecture

I used several components and tools to create DevOps Pal. Let’s review the architecture in detail.

DevOps Pal Skill Architecture

The flow begins by saying, "Alexa, open DevOps Pal and deploy my code", to the Echo device.

The Echo device listens for the wake word (e.g. Alexa, Echo, Computer, or Amazon), which employs deep learning technology running on the device to recognize the wake word the user has chosen. Once the wake word is detected, what I say is recorded and sent to the Alexa Voice Service (AVS), which uses speech to text and natural language understanding (NLU) to identify my intent. My intent is sent to DevOps Pal; the skill acts accordingly by kicking off the Jenkins job and sending a response back using text-to-speech synthesis (TTS), which makes the response natural sounding.

Let’s explore each component in more detail:

  • Alexa Voice Service (AVS) - I often refer to the Alexa Voice Service as the "Alexa brain that runs in the cloud". The AVS is a suite of services built around a voice-controlled AI assistant. The AVS is flexible enough to allow third parties to add intelligent voice control to any connected product that has a microphone and speaker, so Alexa is not limited to just Echo devices.

  • Alexa Skills Kit (ASK) - ASK is the "SDK" (Software Development Kit) that allows developers to build custom skills for Alexa.

  • Alexa Developer Portal - An Alexa skill includes a voice user interface, or VUI, to understand user intents, and a back-end cloud service to process intents by telling Alexa how to respond. The VUI and the integration with the back-end service is setup and configured through the Alexa Developer Portal.

  • AWS Lambda - A chunk of code that runs in the cloud. Developers can run their code without having to provision or manage servers. Applications created with AWS Lambda are considered to be serverless. Lambda supports several popular languages like Python, Java, Node.js, Go, C#, etc.

  • GitHub - A version control system for the Java project source code.

  • Jenkins on EC2 - I use Jenkins to build, test, and deploy my Java Application Programming Interface (API). Elastic Cloud Computer (EC2) is the virtual server where Jenkins is installed. Jenkins works alongside several other tools:

    1. Maven - A build automation tool for Java projects.

    2. Junit - A testing framework for Java projects.

    3. AWS Command Line Interface (CLI) - This is a command line tool that allows developers to access their Amazon Web Services (AWS) account.

    4. Blue Ocean - This is a plugin for Jenkins that provides an easy to use interface to create and monitor Jenkins pipelines.

  • AWS Elastic Beanstalk - This is an orchestration service that allows developers to deploy and manage web applications in the AWS cloud.

  • Postman - This is an HTTP client for testing APIs and web services.

Voice Interaction Model

The Voice User Interface (VUI) describes the overall conversational flow and is setup via the Alexa Developer Console.

Invocation Name Setup Via Alexa Developer Console

A few important components of the VUI are the Invocation Name (how users launch your skill) and the Intents (phrases a user says to "talk to" or interact with your skill).

Utterances for DeployCodeIntent Via Alexa Developer Console

Specifically, the "DeployCodeIntent" is invoked when a user says one of several phrases (e.g. run jenkins pipeline, run jenkins job, deploy the code, deploy code, or deploy ) or a variation of the phrase like, "deploy my code".

Backend Fulfillment Logic - Endpoint Via Alexa Developer Console

The endpoint is the destination where the skill requests are sent for fulfillment. In this case, the backend logic is an AWS Lambda authored in Python. The business logic in the Python Lambda uses the Jenkins remote access API to trigger the job remotely. The format of the URL to trigger the job is jenkins_url/job/job_name/build. The API call uses BASIC authentication and a Jenkins Crumb passed in the HTTP request header for CSRF protection. Alternatively, since Jenkins 2.96, you can use an API token instead of a Jenkins Crumb and password to authenticate your API call.

Jenkins Job

Jenkins Classic UI

The Jenkins job, 'alexa-cicd', is the job invoked from DevOps Pal. Although, the Jenkins Classic User Interface (UI) is functional, I prefer the Blue Ocean interface because it rethinks the user experience of Jenkins by making it visually intuitive. Blue Ocean is easily enabled via a plugin and leaves the option to continue using the Jenkins Classic UI should you so choose.

Jenkins Blue Ocean Pipeline Run Details View Page

After Alexa kicks off the 'alexa-cicd' job, I navigate to the Pipeline Run Details View Page, which allows me to watch the job status in realtime. This job has four stages: Initialize, Build, Test, and Deploy. The final stage, Deploy, uses the AWS Command Line Interface (CLI) on the Jenkins server to copy the artifact to Amazon Simple Storage Service (S3) and create a new Elastic Beanstalk application version based on the artifact located on S3.

Cool Features to Add

The ability to deploy code with voice is just the beginning. There are several cool features that can easily be added:

  • DevOps Pal can be updated to prompt the user for the specific Jenkins pipeline job name. This adds a level of flexibility that will really empower DevOps teams.

  • Alexa Notifications can be integrated with DevOps Pal to send a notification to the Echo device when the Jenkins job is finished or when it fails. If the job fails, more information about where the job failed and exactly why will be provided. This will prove useful for long running jobs or for getting timely updates regarding the job status.

  • DevOps Pal can be updated to answer direct questions about the real-time status of a specific job.

Want to Learn More

I hope you’ve enjoyed learning more about the architecture of DevOps Pal and deploying code to the cloud using Jenkins and voice. For more detailed steps, I’ve collaborated with Cloud Academy to author a course, AWS Alexa for CI/CD on the subject.

Gamer Deal: Grab a Nintendo Switch Kickstand for $10

The Nintendo Switch has a built-in kickstand, but it’s a little… bad. Thankfully, Target is selling an adjustable metal stand for just $10.

If your brave soul has tried to use the Nintendo Switch’s built-in kickstand, then you know just how wonky it can be. It tilts the screen at an unpleasant angle, and it doesn’t seem to provide a lot of support for the $300 console.

But PowerA’s adjustable kickstands manage to solve this problem. They’re made from a strong metal with rubber grips, so your Switch stays nice and safe. These kickstands are also compact and can be folded up for on-the-go gaming. Right now, Target is selling them for just $10—that’s a neat $5 discount. It even has Mario on i

Like all good deals, this one won’t last long. If you’re in need of a high-quality kickstand for your Nintendo Switch, then now’s the time to take the plunge.


Review Geek Is Looking for a Freelance Product Review Writer

Apple Music is Getting a New Home—Google Home

How to Reply With a Tapback in Messages on iPhone and iPad

Tapback in use

iMessage is one of the biggest lock-ins for owners of iPhones and iPads, and Apple knows it. That’s because it’s pretty great, but there are features you may not be using to their fullest. Tapbacks are one–here’s how to use them.

In fact, you may have never heard of a Tapback, partly because Apple hasn’t done a great job of surfacing the feature. It’s almost invisible to anyone who doesn’t know where to find it, and that’s not conducive to organic feature discovery.

That’s a real shame, too, because much like similar features that allow the “liking” of messages and such on social networks, you can use a Tapback to offer a quick response to a message without having to type one our, or even send a message at all. If all you want to do is send one of six quick responses, a Tapback is right up your street.

Those six responses include a heart, a thumbs-up, a thumbs-down, a pair of exclamation marks, a questions mark, and a “HaHa” for when something amuses you.

So now that you know what the options are, and what a Tapback is, here’s how to use them.

How to Use a Tapback on iPhone and iPad

To use a Tapback, open the Messages app and locate the message that you want to reply to. Once located, tap and hold the blue bubble itself.

Tap and hold a message and then tap the Tapback you require

You will now see a new bubble appear with the six options we just mentioned. Tap the one you want to use, and iMessage sends it to the sender of the original message. Rather than appearing as a new message in the thread, it will instead appear on one corner of the message to which the Tapback is related.

Read the remaining 5 paragraphs

Lenovo’s ThinkVision M14 USB-C Monitor Looks Like a Great Work Trip Companion

Deal Alert: RAVPower Banks and Chargers Are Discounted Today on Amazon

If your phone keeps dying while you’re away from home, then you might want to invest in a mobile power bank. Luckily, some of RAVPower’s best products are discounted on Amazon right now.

In the world of mobile power banks, RAVPower is a confident leader. The company sells high capacity batteries at an extremely affordable price. Of course, a hefty discount makes those prices even more affordable. It’s like icing on the cake.

Even when a good deal like this falls into your lap, it can be difficult to spend almost $30 on a battery. But trust me, keeping your phone alive all day makes this well worth the investment. You’ll wonder why you didn’t buy one sooner.

Energizer’s 18,000 mAh Phone May Be the Most Revolutionary Device of 2019

What Is DHCP (Dynamic Host Configuration Protocol)?

IP4 Dialog with Automatic settings selected

The Dynamic Host Configuration Protocol (DHCP) is integral to networks and controls what IP addresses devices receive so they can communicate with the internet. Usually, IP assignment is automated, but if you need static IPs, familiarity with DHCP is essential.

DHCP Can Handle IP Assignments

Every device that connects to a network needs an IP address. In the early days of networking, users manually assigned themselves an IP address, but that’s a cumbersome task, especially for places with many devices, such as a corporate office. DHCP, in part, automates this process, which makes connecting devices to the network far easier. DHCP servers or routers handle this process based on a set of defined rules. Most routers are set to use a 192.168.0.x range, for instance, so you’ll commonly see IP addresses like this in home networks.

The process is pretty straight forward. When a client (a computer, IOT device, tablet, cell phone, etc.) connects to the network, it sends out a signal (called DHCPDISCOVER) to the DHCP server (or router). The server responds with all the rules and settings for the network and an IP address for use (a DHCPOFFER). The client acknowledges the information and asks permission to use the assigned address (a DHCPREQUEST message). Finally, the DHCP server acknowledges the request, and the client is free to connect to the network.

DHCP Controls the Range of IP Addresses

DHCP start and end address configuration

You can configure DHCP to control the range of IP addresses available for use. If you state that range as starting at 192.168.0.1 and the end as 192.168.0.100, then all available addresses will fall somewhere within that range. You’ll never see a device assigned to 192.168.0.101. Also, bear in mind that the start IP (192.168.0.1 in this example) is reserved for the router. Some routers only list a starting address and then include an option for a maximum number of users (which determines the end address).

The upside to this is you can control how many devices connect to your network simultaneously (no more than 100 in this example). But the downside is if you set the range too small you can unintentionally prevent connection of new devices. To allow for a lower range of IP addresses, DHCP servers only lease out IP addresses to devices.

Dynamically Assigned Addresses are Temporary

When a DHCP server assigns an IP Address, it does so under a lease system. The machine retains this IP address for a set number of days, after which it can try to renew the IP address. If no renewal signal is sent (such as a decommissioned machine), then the DHCP server reclaims the IP address to assign to another device. When the renewal signal is detected, the device retains its IP address for another set of days. This is why your IP address may appear to change from time to time if you use the ipconfig option often.

It’s possible for two devices to end up with the same IP, such as a VM machine that spends most of its time offline. The VM machine won’t be able to send the renew signal, so its IP address will be handed out to another machine. When the VM is brought back up, it still has a record of the old IP address (especially if restored from a snapshot), but it won’t be able to use that IP address since it is taken. Without that permission, it can’t connect to the network until a new IP is assigned. But using dynamic IP addresses should prevent this type of scenario.

Static IP Addresses are Necessary For Some Devices

Read the remaining 5 paragraphs

Logitech Powered Review: Stylish Wireless iPhone Charging for a Premium

What Is SD Express and How Much Faster Is It?

What’s New in Chrome 73, Arriving March 12

Google Chrome dark mode on macOS

Chrome 73 is set to hit the stable channel on March 12, 2019. Google’s new browser update features the beginnings of a built-in dark mode, tab grouping, media key support, and more picture-in-picture powers.

Before we get into the details here, it’s worth noting that none of this is guaranteed. While these features are expected (and even planned) to be part of Chrome 73, there’s always a chance something gets pulled before it hits the stable channel and may not make its way out of the beta (or even dev) channel until Chrome 74 or beyond.

Dark Mode (on Mac, For Now)

Google Chrome dark mode on Windows 10

Dark mode is the new hotness on pretty much everything now, and Google should be bringing it to Chrome 73. This feature is available on macOS Mojave but will be making its way to Windows as well—perhaps in Chrome 74.

The biggest issue here? It looks an awful lot like Incognito Mode, which is probably not a good thing.

To use dark mode on a Mac, you’ll have to launch Chrome with the --force-dark-mode option, like so:

/Applications/Google\ Chrome.app/Contents/MacOS/Google\ Chrome --force-dark-mode

If you can’t wait to get a dark mode fix, however, you can always install one of Google’s new Chrome themes to add a little darkness to your browser in the meantime.

RELATED: Get Your Dark Mode Fix with Google’s New Chrome Theme(s)

Tab Grouping

Read the remaining 29 paragraphs