Tuesday, 30 October 2018

How to Use the Conversation Clean Up Tool in Outlook

Some people like to keep their Outlook folders perfectly controlled, with emails neatly categorized and stored in a logical, minimal folder structure. Most of us aren’t like that, so Microsoft has provided tools to help. One of these tools is the little-known Conversation Cleanup tool, which deletes or moves redundant emails from a conversation. Here’s how it works.
You can run the Conversation Clean Up tool against a single conversation, a folder, or a folder and all of its sub-folders. It looks for emails that are redundant, which mean those that are included in full in another message in the conversation. It then deletes (by default) or moves these emails to another folder, depending on how you’ve set it up. This helps keep your mailbox from being filled with multiple copies of the same message.
First, you need to set the Conversation Clean Up parameters. Head to File > Options > Mail and then scroll down to the “Conversation Clean Up” section.

By default, Conversation Cleanup deletes items, but if you want to move redundant items to a folder instead, you can click “Browse” and choose the folder to which you want to move them. This is handy if you want to double-check for yourself that the messages the tool finds really are redundant. The Conversation Cleanup tool is reliable in our experience, but sometimes there’s no substitute for checking things yourself.

You can probably leave the other default options as they are because they make a lot of sense, but if your situation or preferences are different, go ahead and switch the parameters on or off as you see fit. Once you’ve got the settings the way you want, click “OK” to go back to Outlook.
Now, you need to open the tool. On the “Home” tab, click the “Clean Up” button. The drop-down menu gives you the option to clean up the conversation that’s currently selected in the folder, the whole folder, or the whole folder and all of the sub-folders.
Read the remaining 16 paragraphs
Everything You Need For Your New Kitten

Kittens are pretty awesome. So are cats too. Bringing a new one home is an exciting time but you need to make sure you have the right accessories to keep them content, happy, and well cared for. Here’s a bunch of great bits and pieces for your new kitten to enjoy. Remember though—cats are frequently a little pickier than dogs, so don’t be surprised if it takes time to convince the little devil that you bought them the right thing!
Bowls: Lorde Cat Bowls ($13)

Sure, you can buy some cat bowls that are dirt cheap but the Lorde Cat Bowls will look way better in your kitchen, plus they’re designed to make things easier for your cat. That’s because they’re angled in a specific way so that your cat can get to the food or water easily without the risk of whisker fatigue or a dirty face. The dirty face thing isn’t just a superficial consideration either; many cats are sensitive to cheap plastics and metals—they can have reactions to the material and get a sort of kitty acne (that they then furiously scratch at). This bowl is made of non-porous melamine and should help avoid that whole mess (and resulting expensive vet visit). On top of being non-allergenic, the non-slip legs mean they won’t be chasing the bowl around the floor either.
Remember to keep the food and water bowl separate and a short distance away from each other. Cats prefer things to be laid out like this as they prefer their “prey” and water source separated.
Scratching Post: SmartCat Ultimate Scratching Post ($42)

Cats love to scratch and you, obviously, would rather they didn’t scratch up your furniture, your rugs or your legs. Buy the SmartCat Ultimate Scratching Post and you won’t have to worry about replacing it for a number of years. We checked it out earlier in the year and it really is a pretty amazing feat of construction.
Made from durable fibrous sisal, it feels perfect on your cat’s claws while also being tough and long lasting—even in a multi-cat household you should expect to get years out it. It’s super easy to assemble too, plus there’s no risk of it toppling over thanks to a wide and heavy base.
Alternate Scratching Tree: AmazonBasics Cat Activity Tree with Scratching Posts ($36)

Read the remaining 28 paragraphs
The Best WordPress Website Hosting For Most People

WordPress is a free and open source content management system, usually used for managing a blog, but also used to power large publications (including HowToGeek). While the software itself is free, you’ll still need web hosting so your audience can visit the site. These hosting providers run WordPress on their servers and often manage most (if not all) of the technical work for you.
While you can set up a basic site at wordpress.com, the default one has ads, you can’t put your own ads on their regular plans, and they offer much less flexibility and freedom than a paid hosting provider. Most of them have plans for only a couple bucks a month, so if you’re serious about starting a website, it’s best to look for actual hosting.
What to Look For

Web hosting generally falls into two categories:
Managed hosting is when the hosting provider sets up WordPress (or whatever service) for you and handles all the behind-the-scenes IT stuff. If you’re just getting started setting up a website, it’s best to look for managed hosting.
Shared hosting is when the hosting provider runs your site on the same physical server as other sites and is generally much cheaper than having a dedicated server for your site. Unless you’re expecting millions of visitors to your site, shared hosting is often a cheaper and simple option.
Hosting providers often separate their services into different tiers and offer different products for more money. Usually, they’ll limit how many different WordPress sites you can have, limit your storage space for pictures and videos, and sometimes limit how much traffic your site can get. Be realistic about how much you need, as you can always upgrade to a better plan if the need arises.
What Providers to Consider
There’s no shortage of hosting providers out there, and many of them look pretty similar (and all claim to offer the same services). We’ve put together a list of the industry-leading providers to help you choose the one right for you.
Bluehost
Read the remaining 14 paragraphs
How to Set Your Smarthome Up for a Spooky Halloween

When most people think of Smarthomes, they think of voice-controlled lights and video doorbells. But the gadgets you may already have can be used to take your Halloween decorations to the next level.
When you put up Halloween decorations, you have probably run into one of two problems. Either you always have to leave the plugged-in devices on, or you have to rely on analog timers that are complicated to set and quickly lose time. This especially leads to difficulties if you’re trying to keep everything in sync. And one of the best decorations of Halloween, the jack-o-lantern, can be the most tedious to light and keep lit.
Make Your Jack-O-Lanterns Scarier and Safer

When most people make a jack-o-lantern, they cut a round opening in the top of a pumpkin, dig out the insides and then carve a fun pattern into the side. This creates difficulty in placing a tea light, getting it lit from the top, and hoping it’s bright enough to make the pattern shine.
This year consider starting from the bottom. By cutting the opening from the bottom instead of the top you benefit in having a larger hole to work with, and you place the pumpkin on your light source instead of a light source in your pumpkin.
This trick works even better with a smart light. It’s easy enough to cut a notch in the back of the pumpkin for a power cord. Then you can place a smart light, like a Philips Hue Go, inside. With a Philips Hue light, you can do some fun things you can’t do with a conventional bulb or a candle.
For example, you can change the light to any spooky color you want, or even put different colors on rotation. If you love the flicker of a candle, you can achieve a similar effect for your smart light with an app like OnSwitch (for Android and iOS).
With a little extra work, you could even set up a smart motion sensor or the motion sensing ability of your smart video doorbell to activate or change the jack-o-lantern’s light when people approach.
Read the remaining 27 paragraphs
Geek Trivia: Which Of These Animals Are Able To Effectively “Pause” Their Pregnancies?

Which Of These Animals Are Able To Effectively “Pause” Their Pregnancies? |
|
Think you know the answer? |
|

Simplifying Change Data Capture with Databricks Delta
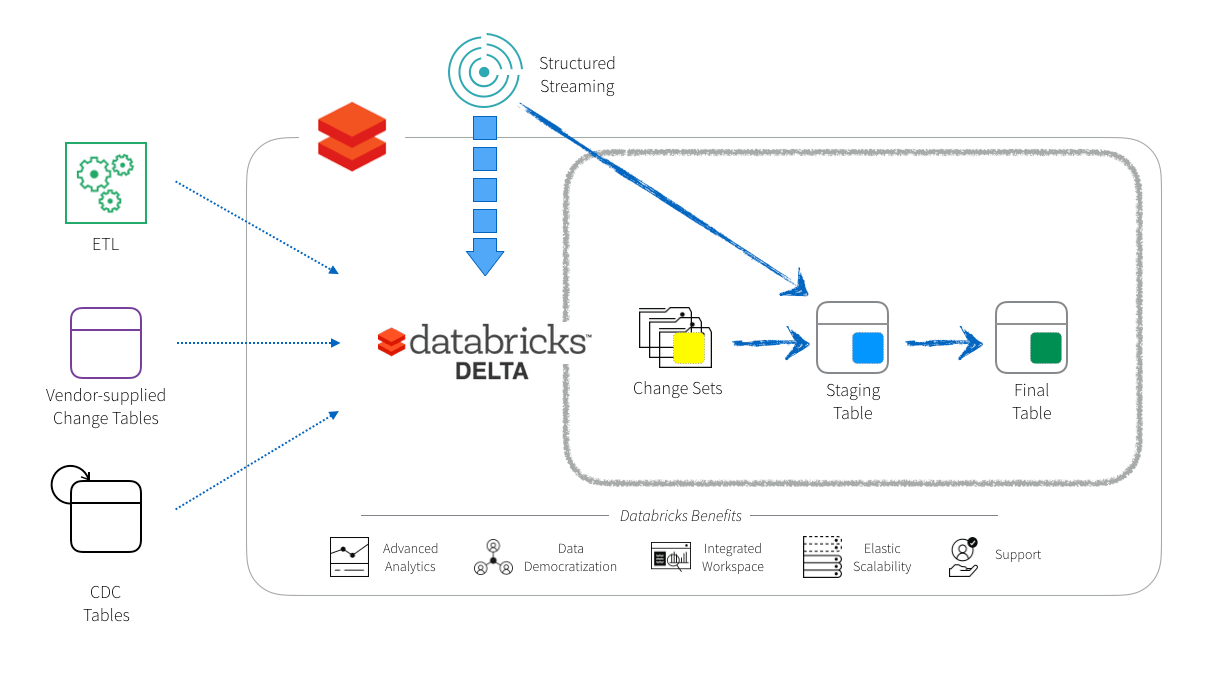
A common use case that we run into at Databricks is that customers looking to perform change data capture (CDC) from one or many sources into a set of Databricks Delta tables. These sources may be on-premises or in the cloud, operational transactional stores, or data warehouses. The common glue that binds them all is they have change sets generated:
- using an ETL tool like Oracle GoldenGate or Informatica PowerExchange,
- from vendor-supplied change tables (e.g., Oracle Change Data Capture), or
- user-maintained database tables that capture change sets using insert/update/delete triggers
and they wish to merge these change sets into Databricks Delta. Based on our experience implementing this use case across both our public and private sector customers, we present a reference architecture for performing CDC using features available today in Databricks Delta.
Background
Change Data Capture, or CDC, in short, refers to the process of capturing changes to a set of data sources and merging them in a set of target tables, typically in a data warehouse. These are typically refreshed nightly, hourly, or, in some cases, sub-hourly (e.g., every 15 minutes). We refer to this period as the refresh period.
The set of changed records for a given table within a refresh period is referred to as a change set. Finally, we refer to the set of records within a change set that has the same primary key as a recordset. Intuitively these refer to different changes for the same record in the final table.
| FLAG | ID | VALUE | CDC_TIMESTAMP |
|---|---|---|---|
| I | 1 | 10 | 2018-01-01 16:02:00 |
| U | 1 | 11 | 2018-01-01 16:02:01 |
| D | 1 | 11 | 2018-01-01 16:02:03 |
| U | 2 | 20 | 2018-01-01 16:02:00 |
| D | 3 | 30 | 2018-01-01 16:02:00 |
Table 1: Change set C for table T at time 2018-01-01 17:00:00
Table 1 shows a sample change set C for a table T at a given time. The change set C has four columns:
- a FLAG indicating whether the change is of type I/U/D (insert /update/delete),
- an ID column uniquely identifying the recordset,
- a VALUE column that changes when the record is updated, and
- a CDC_TIMESTAMP indicating when the record was inserted/ updated/deleted. The target table T has the same schema except for the FLAG column.
In this change set, record ID 1 was inserted, updated, and deleted (rows 1, 2, and 3). As such the record set for ID=1 has three records. Record ID 2 was only updated, and record ID 3 was deleted. It is safe to assume that record ID 2 and 3 was inserted at some point earlier.
CDC before Databricks Delta
Prior to Delta, a sample CDC pipeline some of our customers was: Informatica => Oracle => Spark Nightly Batch Job => Databricks.
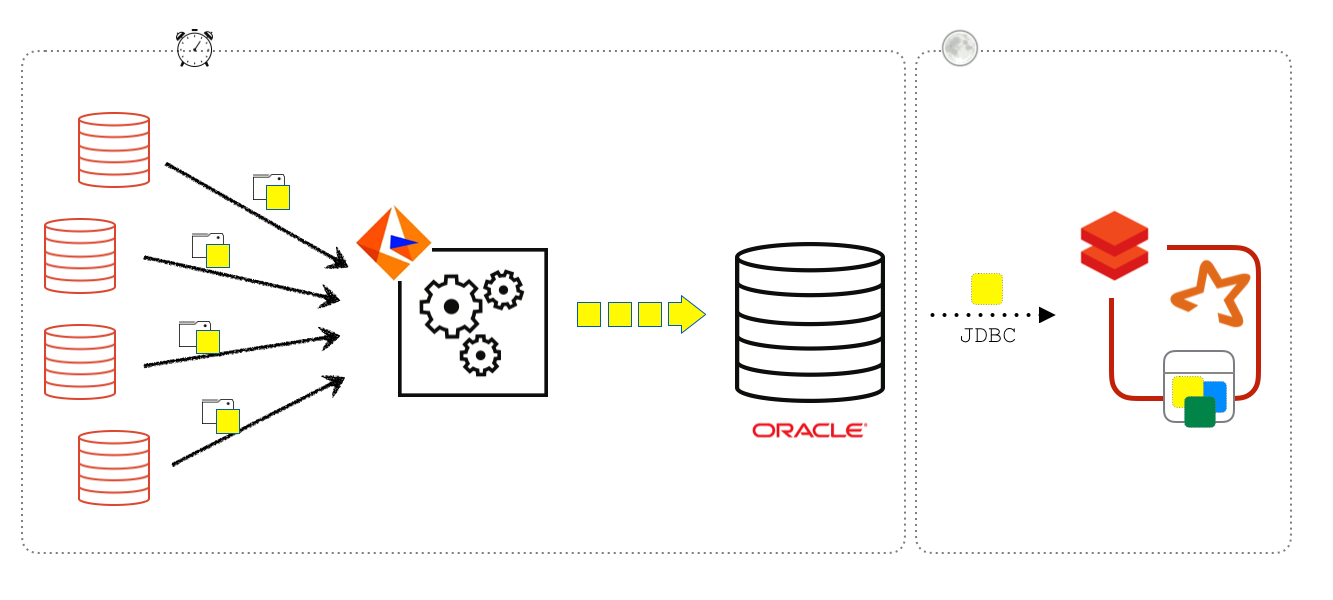
In this scenario, Informatica pushes change sets from over 30 different data sources and consolidates them in an Oracle data warehouse. Approximately once a day, Databricks jobs retrieve these change sets from Oracle, via JDBC, and refresh tables in Databricks. While this scheme was successfully productionized, it had two major drawbacks:
- It added load to an already overloaded Oracle instance, which resulted in constraints on when and how these ETL jobs could run, and
- The refresh rates were at best nightly, due to concurrency limitations of vanilla Parquet tables (prior to Databricks Delta).
CDC with Databricks Delta
With Databricks Delta, the CDC pipeline is now streamlined and can be refreshed more frequently: Informatica => S3 => Spark Hourly Batch Job => Delta. In this scenario, Informatica writes change sets directly to S3 using Informatica’s Parquet writer. Databricks jobs run at the desired sub-nightly refresh rate (e.g., every 15 min, hourly, every 3 hours, etc.) to read these change sets and update the target Databricks Delta table.
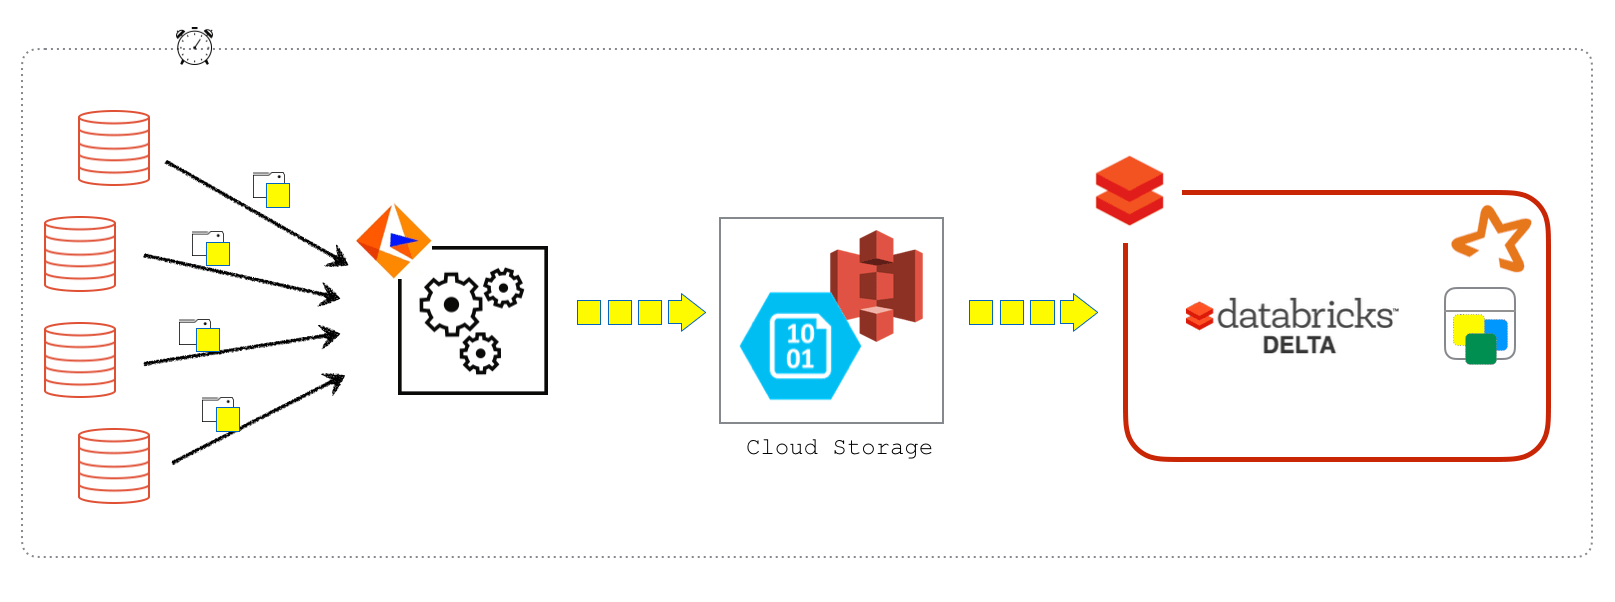
With minor changes, this pipeline has also been adapted to read CDC records from Kafka, so the pipeline there would look like Kafka => Spark => Delta. In the rest of this section, we elaborate on this process, and how we use Databricks Delta as a sink for their CDC workflows.
With one of our customers, we implemented these CDC techniques on their largest and most frequently refreshed ETL pipeline. In this customer scenario, Informatica writes a change set to S3 for each of its 65 tables that have any changes every 15 minutes. While the change sets themselves are fairly small (< 1000 records), their target tables can become quite large. Out of the 65 tables, roughly half a dozen are in the 50m-100m row range, and the rest are smaller than 50m. In Oracle, this pipeline would have run every 15 minutes, keeping in sync with Informatica. In Databricks Delta, we thought this would take close to an hour due to S3 latencies but ended up being pleasantly surprised with a 30 and even 15-minute refresh period depending on cluster size.
While
MERGE INTOwould at first glance appear to be a good approach, for this customer scenario this approach did not meet our customer’s SLAs due to higher than desired latencies and the lack of support to delete (D) records.
Using Insert Overwrite
The basic idea behind this approach is to maintain a staging table that accumulates all updates for a given recordset and a final table that contains the current up-to-date snapshot that users can query.
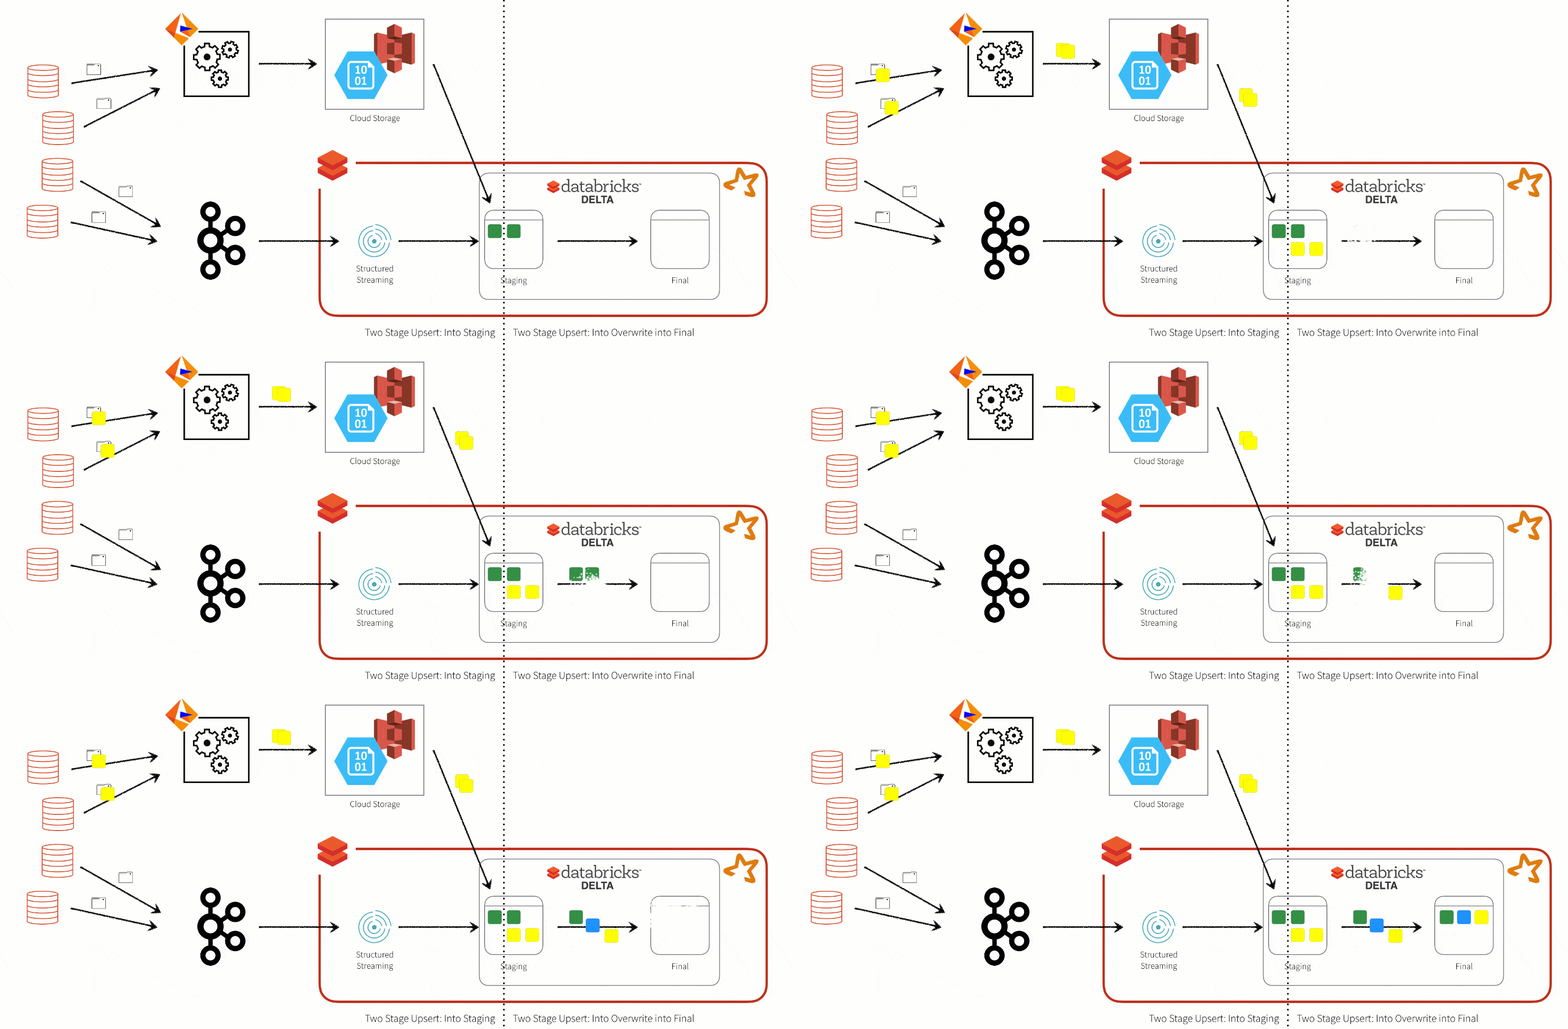
Figure 1: Insert Overwrite Flow from Source to Informatica to Cloud Storage to Databricks Delta
For every refresh period, a Spark job will run two INSERT statements.
- Insert (Insert 1): Read the change sets from S3 or Kafka in this refresh period, and INSERT those changes into the staging table.
- Insert Overwrite (Insert 2): Get the current version of every record set from the staging table and overwrite those records in the final table.
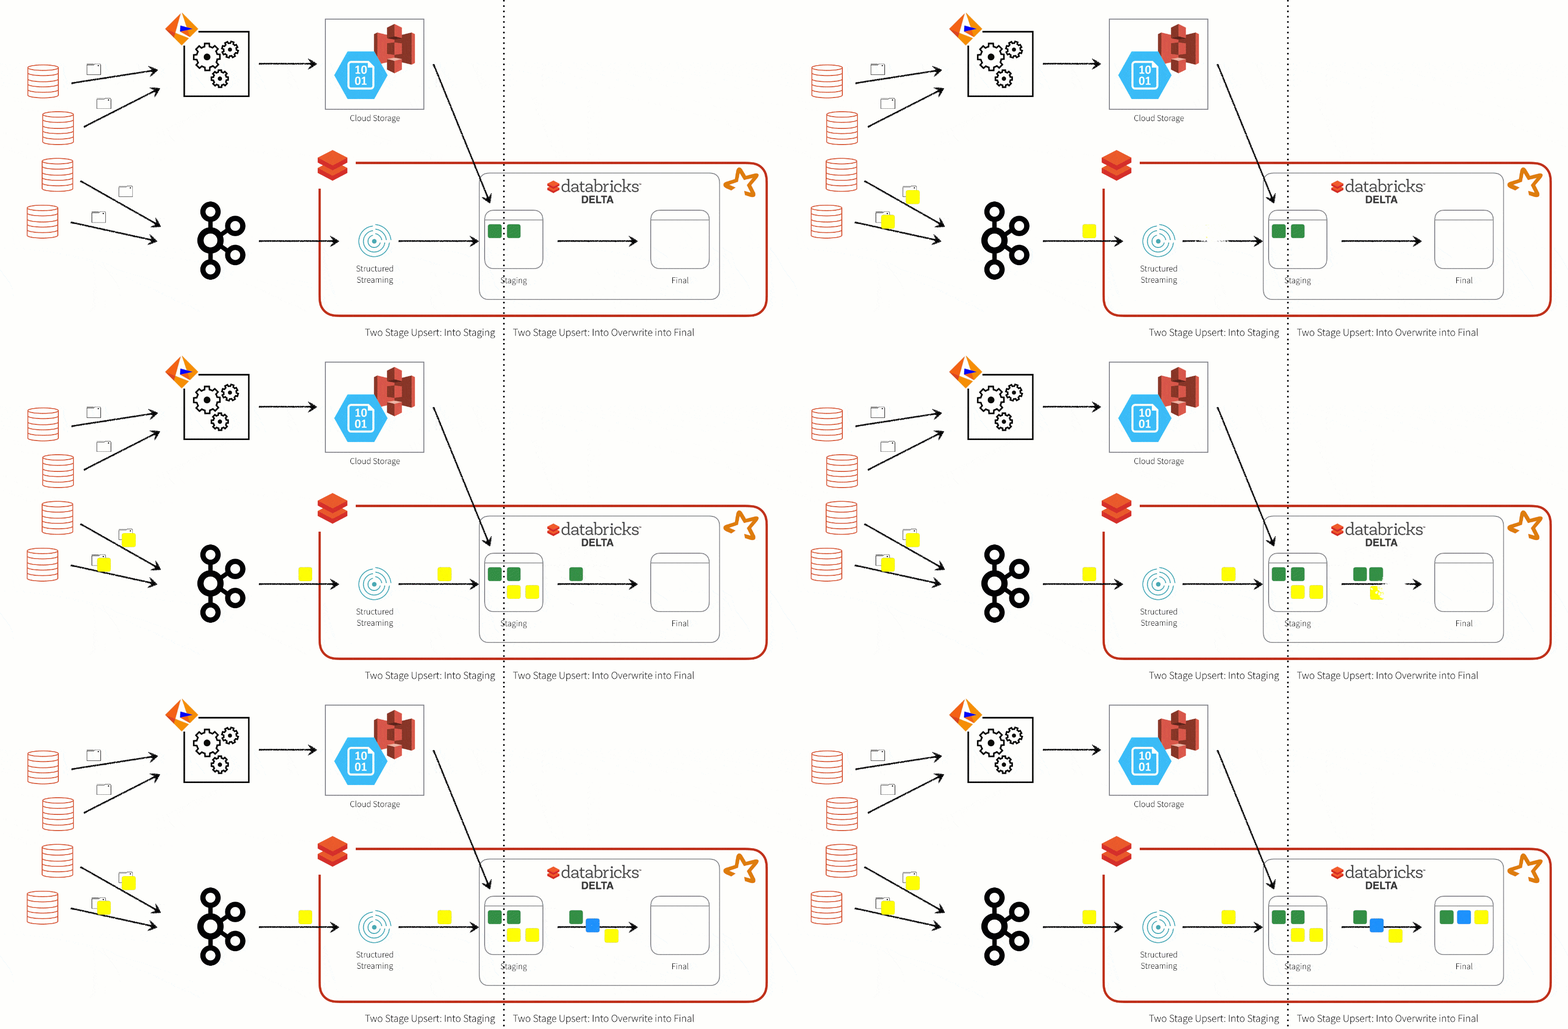
Figure 2: Insert Overwrite Flow from Source to Kafka to Structured Streaming to Databricks Delta
A familiar classification scheme to CDC practitioners is the different Types of handling updates ala slowly changing dimensions (SCDs). Our staging table maps closest to an SCD Type 2 scheme whereas our final table maps closest to an SCD Type 1 scheme.
Implementation
Let’s dive deeper into the two steps, starting with the first insert.
%scala
val changeSets = Array(file1, file2, …)
spark.read.parquet(changeSets :_*).createOrReplaceTempView("incremental")

%sql
INSERT INTO T_STAGING
PARTITION(CREATE_DATE_YEAR)
SELECT ID, VALUE, CDC_TIMESTAMP
 FROM INCREMENTAL
Here, the first cell defines a temporary view over the change sets which is fed to the INSERT INTO in the second cell. The INSERT INTO is fairly straightforward with the exception of the PARTITION clause, so let’s take a moment to unwrap that one.
Recall that in cloud data stores and HDFS, records are stored in files, and the unit of an update is a file. In the case of Databricks Delta, these are Parquet files, as presented in this post. When a record needs to be updated, Spark needs to read and rewrite the entire file. As such, it’s important to localize the updates to as few files as possible. As such, we partition both the staging and the final table by a column that minimizes the number of rows touched during CDC, and provide the partition column in the PARTITION specification (Azure | AWS) so that Databricks Delta can insert the records in the correct partition of T_STAGING.
Next, we look at the second insert.
%sql
INSERT OVERWRITE TABLE T_FINAL
   PARTITION(CREATE_DATE_YEAR)
   SELECT ID, VALUE, CDC_TIMESTAMP
   FROM (
      SELECT A.*,
             RANK() OVER (PARTITION BY ID ORDER BY CDC_TIMESTAMP DESC) AS RNK
        FROM T_STAGING A.*
       WHERE CREATE_DATE_YEAR IN (2018, 2016, 2015)
   ) B
WHERE B.RNK = 1 AND B.FLAG < > 'D'
Let’s start with the inner query that reads from T_STAGING. Recall that the staging table may have any number of inserts, updates, and deletes for a given record set. These changes may come from a given change set (e.g., ID = 1 in Table 1 has 3 changes), or it may come across change sets, as they are inserted into the staging table across multiple refresh periods. The inner RANK along with the outer filter B.RNK=1 and B.FLAG <> 'D' ensures that:
- we only pick the most recent change for a given recordset, and
- where the most recent change is a
'D', we exclude the entire record set from being inserted in the final table, thus achieving the purpose of the delete record.
Next, notice the WHERE CREATE_DATE_YEAR IN ( … ) clause. This along with the PARTITION(CREATE_DATE_YEAR) in the outer query ensures that Databricks Delta will overwrite only these partitions, namely, 2018, 2016, 2015, and the rest are left untouched. It is worth mentioning that while we provided hardcoded values for those partitions above for lucidity, in the actual implementation, those partitions are provided as a Scala list that is dynamically generated from a query to the change sets, such as
val partitionsToOverwrite = spark.sql(“select year(to_date(create_date, "MM/dd/yyyy")) from incremental”)
...
spark.sql(s"""
INSERT OVERWRITE T_FINAL
...
WHERE CREATE_DATE_YEAR IN ( ${partitionsToOverwrite.mkString(",") )
...
""")
Performance
As mentioned above, Databricks Delta enables the CDC pipeline to run concurrently with users querying consistent views of the data. Here, we show two features in Databricks Delta that can be used to optimize both readers and writers.
- Partition Pruning: In the second insert above (i.e., the writers), the query optimizer in Databricks Delta looks at the
PARTITIONspecification and theINlist in theWHEREclause to read and rewrite only those partitions that need to be updated. In practice, this can easily cut the portion of the table touched to a half or, usually, much lower, thus helping the second insert by, both, localizing updates toT_FINAL, and theSELECTquery onT_STAGING. - Data Skipping / ZORDER indexes: Users querying
T_FINALcan range from BI tools to ad-hoc SQL queries. Here, queries may or may not have the partition columnCREATE_DATE_YEARin theWHEREclause. For example,
%sql
SELECT …
FROM T_FINAL
WHERE COL1 = val and COL2 = val
In this case, neither COL1 nor COL2 were part of the partition specification. Users can, however, create a Z-order index on those two columns:
OPTIMIZE T_FINAL ZORDER BY (COL1, COL2)
Underneath, Databricks Delta clusters Parquet files by their Z-values such that queries such as the above touch only those files that, possibly, contain COL1 = val and COL2 = val.
We note two niceties of the Z-order index that expand the list of queries where they can be used
- In the above case, queries that only filter on
COL1(or, only, onCOL2) can also benefit from the index since, unlike, composite indexes in RDBMS, a Z-order index does not bias towards queries that have filters on prefixes of the indexed column list. - If, unlike above, the query also has a filter on the partition column, then both partition pruning and Z-order indexing can be used to drastically reduce the number of files touched at query time.
We refer the reader to this excellent post for details on why and how data skipping and Z-order indexes work with or without partition pruning.
Concurrency
As presented in the earlier post, Databricks Delta adds transactional support to cloud storage. We rely on this support in the following way. While overwriting partitions, Databricks Delta will ensure that in addition to creating new Parquet files, it leaves the old Parquet files around for users who have queries concurrently running on this data. Queries that start after the overwrite completes will pick up the new data. Delta uses a transaction log to reliably point queries to consistent data versions.
Compaction and Cleanup
Over time, both T_STAGING and T_FINAL accumulate stale and unused records. For example, any record in T_STAGING where RANK > 1, or any file in T_FINAL that was marked stale by an overwrite to that file. While this does not affect query correctness, it does degrade both CDC and query performance over time. Thankfully, maintenance tasks such as these are simplified in Databricks Delta. Purging old files in T_FINAL, for example, is as simple as
%sql
VACUUM T_FINAL
Without retention parameters (see VACUUM docs: Azure | AWS), this purges all stale files that are no longer in the transaction log and older than 7 days, which is plenty of time to ensure that there are no concurrent readers accessing those files.
House cleaning on T_STAGING, on the other hand, involves removing all records where RANK > 1. The simplest way to do this is to copy T_FINAL into T_STAGING
%sql
INSERT OVERWRITE T_STAGING SELECT * FROM T_FINAL
Both the above command and the previously shown OPTIMIZE command can be organized into a notebook for maintenance tasks and scheduled to run as a Databricks job.
Productionizing Pipelines
Databricks as a platform helps not only develop and build ETL pipelines but also accelerates time to productionizing these pipelines. Here, we describe two features and an enabling technology in Apache Spark that helped us productionize CDC pipelines.
Configuration Driven Programming
A common design pattern in building large-scale applications is to drive software behavior using configuration (e.g., YAML or JSON-based config files). Spark’s support for SQL plus general-purpose programming languages like Scala and Python is well suited for this design pattern since config can be stored in tables and dynamic SQL constructed to use it. Let’s see how this would work in the CDC context.
First, recall that our CDC pipeline has 65 tables. We keep a CONFIG table, where each row is one of the 65 tables, and the fields help us build the CDC SQL statements.
| TABLE | PARTITION_COLUMN_EXPRESSION | PARTITION_COLUMN_ALIAS | RANK_EXPRESSION | IS_INSERT_ONLY |
|---|---|---|---|---|
| T1 | year(to_date(create_date, “MM/dd/yyyy”)) | create_date_year | PARTITION BY ID ORDER BY CDC_TIMESTAMP DESC | N |
| T2 | year(to_date(transaction_date, “MM/dd/yyyy”)) | transaction_date_year | PARTITION BY ID1, ID2 ORDER BY CDC_TIMESTAMP DESC | N |
| T3 | null | null | null | Y |
| T4 | … | … | … | … |
Table 2 – Configuration table for driving CDC pipeline for a set of tables
To get the config information for a particular table and perform the CDC logic for that table, use the following code.
val hiveDb = “mydb”
val CONFIG_TABLE = “CONFIG”

// Table is a notebook input widget
val table=s"""${dbutils.widgets.get("wTable")}"""
val (partitionColumnExpression, partitionColumnAlias, rankExpression, isInsertOnly) = spark.sql(s"""
SELECT PARTITION_COLUMN_EXPRESSION, PARTITION_COLUMN_ALIAS, RANK_EXPRESSION, IS_INSERT_ONLY
  FROM ${hiveDb}.${CONFIG_TABLE}
 WHERE TABLE_NAME=LOWER('$table')
""").as[(String, String, String, Boolean)].head

...

/*
* Insert 1 above would look like following. Here, the table
* variable is set to T1 or T2 from the config table
*/
spark.sql(s"""
INSERT INTO ${table}_STAGING
PARTITION(${partitionColumnAlias)
SELECT ${projectListFromIncremental}
  FROM INCREMENTAL
""")

...

// Insert 2 could look like
val partitionsToOverwrite = spark.sql(s"""SELECT DISTINCT ${partitionColumnExpression} FROM INCREMENTAL""").as[String].collect

spark.sql(s"""
INSERT OVERWRITE TABLE ${table}_FINAL
PARTITION(${partitionColumnAlias})
SELECT ${projectListFromIncremental}
  FROM (SELECT A.*, RANK() OVER (${rankExpression}) AS RNK
          FROM ${table}_STAGING A.*
         WHERE ${partitionColumnAlias} IN (${partitionsToOverwrite.mkString(“,”) )
  ) B
WHERE B.RNK = 1 AND B.FLAG < > ‘D’
""")
Notebook Workflows and Jobs
Say, the above was implemented in a notebook called ProcessIncremental. We can then use notebook workflows and have a Controller notebook that goes through each of the 65 tables, finds outstanding change sets for them, and calls ProcessIncremental on them.
val startDate = “20180101”
val tables = spark.sql(s"""
SELECT TABLE_NAME
  FROM $hiveDb.$CONFIG_TABLE
""").as[String].collect.map(_.toLowerCase)

tables.foreach { tbl =>
  val processTheseChangeSets = dbutils.notebook.run("GetNextChangeSets", 0, Map(
          "wHiveDb" -> hiveDb,
          "wTable" -> tbl,
          "wStartDate" -> startDate
      )
  )

  if(!processTheseChangeSets.isEmpty) {
    val stats = dbutils.notebook.run("ProcessIncremental", 0, Map(
        "wHiveDb" -> hiveDb,
        "wIncrFiles" -> processTheseChangeSets,
        "wTable" -> tbl)
      )
  )
}
The Controller notebook can be easily scheduled as a job in Databricks to run the CDC pipeline at the desired frequency. Finally, while the above loop is serial, it can be easily changed to a parallel loop using, say, the .par idiom for turning a serial collection to a parallel collection, or, using Scala Futures.
Conclusion
In this blog, we presented a reference architecture for merging into Databricks Delta, change sets captured either by a CDC tool (e.g., Oracle GoldenGate or Informatica PowerExchange), or by change tables maintained by a vendor (e.g., Oracle Change Data Capture), or by change tables maintained by the user using insert/update/delete triggers. We dove into the Spark SQL used to reflect these records in Databricks Delta, two performance considerations (partitioning and z-order indexing), and ancillary considerations such as compaction and cleanup to ensure that the tables queried by end users are optimized for reads. We then saw how Databricks helps accelerates both the development of these ETL pipelines by supporting configuration driven programming, and productionizing these workflows using Notebook Workflows and Jobs.
--
Try Databricks for free. Get started today.
The post Simplifying Change Data Capture with Databricks Delta appeared first on Databricks.
Steam’s Halloween Sale is in Full Effect Until Friday, November 2nd

If you’re into creepy games and are looking to beef up your collection, Steam’s Halloween sale should help round out your catalog. There are some excellent horror titles going for cheap right now.
While there are a slew of games on the list, here are a few of the standout titles that I noticed while scrolling through the list:
- Dying Light (60% off, $16): A de facto first person zombie game, and one of the best games of its type that I’ve personally played. So much fun, and excellent re-playability.
- Left 4 Dead 2 ($80% off, $2): More zombies. More fun.
- Inside (55% off, $9): A dark and gritty side-scrolling puzzle game that’s just a lot of fun to play.
- Limbo (80% off, $2): Like Inside, but different. Very eerie vibe.
- Resident Evil Biohazard (35% off, $19.49): A first person Resident Evil game. Spoopy.
- Fran Bow (75% off, $3.74): A creepy indie title about a girl dealing with mental illness.
- The Evil Within (50% off, $10): Horror survival at its finest. This game throws you directly in a dark and murderous world that is sure to sit well with any horror fan.
But that’s just the tip of the iceberg here—there are a lot of other titles worth checking out, like Vampyr, Friday the 13th, Dad by Daylight, 7 Ways to Die, Prey (which comes highly recommended by several people here at RG/HTG) and a lot more. Rocket League managed to wiggle its way onto the list thanks to the Halloween event.
You can see all these titles and more by heading over to Steam’s Halloween Sale page here. There’s even some free to play stuff on the list if you want something that doesn’t require money.
You Can Now Control Your NVIDIA SHIELD TV with Amazon Echo

The NVIDIA SHIELD TV is the Android TV box. It works well for watching your favorite movies, playing some games, and even as a Plex Server. You’ve been able to control the SHIELD TV with your voice thanks to Google Assistant, but NVIDIA is giving users one more option when it comes to voice commands.
Starting today, SHIELD users can control their streaming box with any of the Amazon Echo speakers, thanks to a new Alexa skill from NVIDIA.
If you don’t have a SHIELD TV—or just want a second one—Amazon and Best Buy are bundling an Amazon Echo Dot (3rd Gen) with any SHIELD TV bought between now and November 10th. If you already have a SHIELD TV, you can get a discount on an Echo Dot (3rd Gen) as part of the SHIELD Rewards program.
How do you link Alexa to your SHIELD TV?
Start by downloading the NVIDIA SHIELD TV Alexa skill. You’ll link your SHIELD TV to Alexa in the Alexa smartphone app by signing in with the same NVIDIA account that you signed into on the SHIELD.
Once that’s done, just select the SHIELD TV and Echo speakers you want to link together. That’s it!
What can you do with Alexa?
Once you get the NVIDIA SHIELD TV skill installed, you’ll be able to power your SHIELD on and off, control volume, open apps, control playback, and open the device settings.
More features
If you like other parts of Amazon’s ecosystem, there’s more great news: the Prime Video app on SHIELD TV now supports Dolby Atmos passthrough. Now, you can hear Jack Ryan’s world all around you if you have a fancy speaker array.
Source: NVIDIA
How to Use Watermarks in a Microsoft Word Document

A watermark is a faded background image that displays behind the text in a document. You can use them to indicate a document’s state (confidential, draft, etc.), add a subtle company logo, or even for a bit of artistic flair. Here’s how to add and manipulate watermarks to your Word document.
How to Insert a Built-In Watermark
With your document open, switch over to the “Design” tab.

In the Page Background group on that tab, click the “Watermark” button.

On the drop-down menu, click any of the built-in watermarks to insert it into your document.
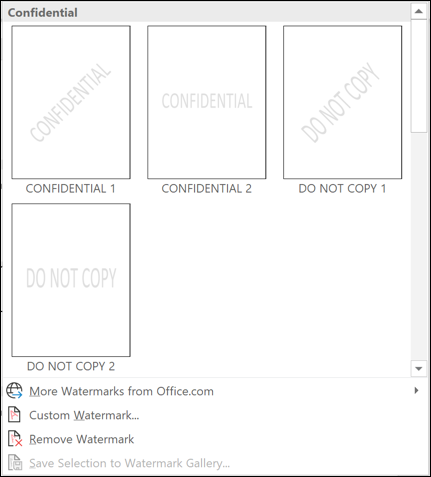
Word places the watermark behind the text.
Read the remaining 27 paragraphs
Monday, 29 October 2018
The Best Sous Vide Accessories For Even Easier Meal Prep

At ReviewGeek, we’re big fans of cooking via the sous vide method. It’s a fantastic way to get precise results and, with a few extra accessories, it’ll be the most dead simple cooking method you use.
RELATED: Anova Precision Cooker Review: Sous Vide Is So Easy, It Almost Feels Like Cheating
Sous vide cooking, also known as using immersion circulation, it’s a super easy way of cooking precisely so that your food is cooked perfectly. The Anova Precision Cooker is our favorite sous vide device. However, you need the right accessories to go alongside so we’ve checked out the best tools to get you started.
In case you’re still unsure about the benefits of sous vide, here’s a quick overview of two of the key advantages of using the method. It means no more undercooked or overcooked meat as everything is cooked just right with no risk of overly dry chicken, for instance. Unlike grilling, stir-frying, or oven baking, or other cooking methods where temperature control is much more difficult, sous vide cooking is precise to the tenth of a degree. The other big advantage is you don’t have to spend tons of time watching things cook. You can step away and leave it to do all the hard work for you. Kind of like a slow cooker but way cooler and way more precise.
Sold? Cool. Grab the Anova Precision Cooker then come back here and we can guide you through the other items you need to reap the full benefits.
A Container: Rubbermaid Commercial Food Storage Container ($19-$33)

It’s possible to use any old pot that’s deep enough but it makes sense to have a dedicated container. Even more so given that plastic is a better insulator, and this kind of cooking is all about good insulation. The Rubbermaid Commercial Food Storage Container is ideal as it’s available in a number of different sizes, and it’s robust. It’s dishwasher safe and made from impact-resistant polycarbonate so it’s ideal for everyday use.
Is it exciting? Not in the slightest but it’ll feel more that way once you’ve started using it to cook tasty food! Besides, the ability to look through the container and see your food cooking gives it a real mad scientist vibe.
A DIY Lid For The Container: Rubbermaid Food Storage Container Lid ($5)
Read the remaining 28 paragraphs
OnePlus 6T Offers In-Display Fingerprint Reader And Flagship Specs For $550

OnePlus has spent years positioning itself as an alternative to Google and Samsung, both for value-seekers and general Android enthusiasts. The company announced its latest endeavor, the OnePlus 6T, in a New York event this morning.
The “T” series implies a mid-year upgrade, a boosted, refined version of the OnePlus 6 that launched back in May. The most obvious upgrade is a 6.3-inch OLED screen that extends nearly to all four bezels, with a surprisingly subtle “teardrop” notch around only the single front-facing camera. The bottom “chin” is surprisingly small, too. It’s a striking look, to be sure, and one that should appeal to the big-screen fans turned off by the much bigger notch on the Pixel 3 XL.

Harder to spot is the new fingerprint scanner, which uses some neat Qualcomm tech to hide beneath the screen panel. It’s not the first phone to use this technology—that distinction goes to Chinese manufacturer Vivo—but it’s the first to be widely available in the US. OnePlus says its sensor can fully unlock the phone through the screen in about a third of a second. This tech might be showing up a lot more in 2019, as most other Android flagships also use Qualcomm’s chipsets.
Other highlights of the design include Android 9.0 software at launch, a top-of-the-line Snapdragon 845 processor, a generous 6GB of RAM and 128GB of storage, and a 3700mAh battery. The more expensive model offers 8GB of RAM and 256GB of storage. Cameras are 16MP and 20MP on the rear configuration, with an impressive 20MP front-facing cam. The company has also highlighted an updated focus on low-light photography with its new “nightscape” mode. The 6T also has a sliding button that quickly switches between loud, vibrate, and silent modes, a rarity on modern phones.

The OnePlus 6T is missing one feature that’s become a standard of high-end devices: wireless charging. (That’s despite an all-glass design that comes in glossy or matte.) It’s also minus a headphone jack, like the OP6, which might take it out of consideration for some demanding users.

Read the remaining 3 paragraphs
The Best Hybrid Smartwatches

Smartwatches are getting more popular, thanks mostly in part to the Apple Watch and various Fitbits. But they have some downsides, like being bulky, sometimes unsightly, and having relatively poor battery life. A “hybrid” smartwatch might be a better option.
A hybrid smartwatch is a watch with electronics on the inside—and by that I mean electronics complex enough to connect to and interact with your phone via Bluetooth—and a conventional watch face on the outside. These gadgets either omit an interactive screen entirely, or else make it much more subtle and easy to ignore. Without the touchscreen and a big battery to power it, hybrid smartwatches can also last much longer on a battery charge and/or be a lot thinner than current smartwatch designs, too. Simplified components allow for a much wider variety of styles in some cases.
We’ve chosen the best hybrid designs among an admittedly limited field at the moment. Our selections cover the best overall model, the best choices for those who want to focus on style or exercise data, and one for those who need to buy their watches on a more strict budget. Check ’em out below.
The Best Overall Hybrid Smartwatch: Withings Steel HR ($180)

Withings was a startup making some of the very first hybrid smartwatch designs. The Steel HR model is actually pretty close to the watch they made for Nokia during their brief time as a subsidiary. It’s a neat little package, including a heart rate monitor on the bottom, a dedicated step goal sub-dial, and a little display at the 12 o’clock position that helps show current heart rate and more complex notification info.
The Steel HR includes both 25-meter water resistance and a rechargeable battery (not a given for this class of device on either count) that lasts for several weeks. But the best part of the Withings design is the software: the iOS and Android app can sync time and notifications, but it also includes an excellent health tracker that keeps track of your steps, sleep cycles, and continuous heart rate during workouts. The Withings API allows it to connect to pretty much any other tracking service, too.
The Steel HR comes in 36mm and 40mm sizes with various case and band options. If you don’t like the screen, the regular model Withings Steel drops it, but unfortunately, you’ll have to do without the heart rate monitor, too.
The Best Fashion Hybrid Smartwatch: Fossil Q Hybrid ($155+)

Read the remaining 13 paragraphs
Here Are All the Games You Can Play on the PlayStation Classic

Retro game consoles are nothing new, but the past couple years have seen big names joining in the fun. Earlier this year, Sony announced the PlayStation Classic: a PlayStation One-looking box, pre-loaded with a bunch of classic games.
Now, we know exactly which games will come in the vintage box. If you’re in the United States, you’ll be able to play:
- Battle Arena Toshinden
- Cool Boarders 2
- Destruction Derby
- Final Fantasy VII
- Grand Theft Auto
- Intelligent Qube
- Jumping Flash
- Metal Gear Solid
- Mr. Driller
- Oddworld: Abe’s Oddysee
- Rayman
- Resident Evil Director’s Cut
- Revelations: Persona
- Ridge Racer Type 4
- Super Puzzle Fighter II Turbo
- Syphon Filter
- Tekken 3
- Tom Clancy’s Rainbow Six
- Twisted Metal
- Wild Arms
The PlayStation Classic will cost $99 with release on December 3, 2018, meaning each game costs roughly $5. That’s a pretty good value, especially when you add in having a nice-looking console on your TV stand.
You can pre-order the PlayStation Classic directly from Sony.
Source: PlayStation.Blog
IAMAI forms committee to promote Augmented and Virtual Reality
What Are WAV and WAVE Files (and How Do I Open Them)?

A file with the .wav or .wave file extension is a Waveform Audio File Format. It’s a container audio file that stores data in segments. It was created by Microsoft and IBM and has become the standard PC audio file format.
Note: WAVE and WAV files (or the .wav and .wave extension) are the same thing. Throughout this article, we’ll be referring to them as WAV files to save a few words.
What Is a WAV File?
A WAV file is a raw audio format created by Microsoft and IBM. The format uses containers to store audio data, track numbers, sample rate, and bit rate. WAV files are uncompressed lossless audio and as such can take up quite a bit of space, coming in around 10 MB per minute with a maximum file size of 4 GB.
RELATED: What Lossless File Formats Are & Why You Shouldn’t Convert Lossy to Lossless
WAV file formats use containers to contain the audio in raw and typically uncompressed “chunks” using the Resource Interchange File Format (RIFF). This is a common method Windows uses for storing audio and video files— like AVI— but can be used for arbitrary data as well.
WAV files are generally going to be much larger than other popular audio file types, like MP3, due to the fact they are typically uncompressed (compression is supported, though). Because of this, they’re mainly used in the professional music recording industry to retain the maximum quality of audio.
RELATED: What Are the Differences Between MP3, FLAC, and Other Audio Formats?
How Do I Open Them?
WAV files are widely used, and because of this, many programs can open them on different platforms—Windows Media Player, Winamp, iTunes, VLC, and QuickTime, to name a few.
Read the remaining 6 paragraphs
How to Create an Apple ID on Your iPhone or iPad

When you’re using any of Apple’s computers, smartphones, or tablets, an Apple ID is integral to not only setting devices up in the first place but getting the best out of them as you use them, too. When you pay a premium to use an ecosystem that “just works,” not having an Apple ID cripples the experience.
Note: For this guide, we are going to make the assumption that you already have an iPhone or iPad up and running, and that you need to create an additional Apple ID. These steps are the same even if you are setting up a new device. When you reach the point of entering your Apple ID, tap “Forgot password or don’t have an Apple ID,” before tapping “Create a Free Apple ID” and following the process.
The whole process starts, as so many do, in the Settings app. If you are signed in to an Apple ID currently, tap it at the top of the screen and then tap “Sign Out,” right at the very bottom.
After you sign out (or if you’re not already signed in), tap “Sign in to your iPhone” at the top of the screen.

Tap the “Don’t have an Apple ID or forgot it” link and then tap the “Create Apple ID” option once the new window pops up.

Now you need to go through the process and give Apple the information it needs to create the account. That includes entering your date of birth and your full name. Once you’ve done that, tap the “Next” button to progress.
Read the remaining 11 paragraphs
The Best Smart Plugs for Your Amazon Echo

If you have an Echo and want to be able to control some appliances around your house, a smart plug can make that happen. Luckily, most smart plugs work with Alexa. Here are the best ones to buy.
Keep in mind that the following smart plugs can all do the basics, like turn on and off remotely from your phone, create timers and schedules, activate scenes, and obviously work with Alexa for voice control. We also only focused on smart plugs that are compact and stackable so that you can fit two to an outlet, which is actually pretty common for smart plugs nowadays—our last pick is an exception to that, but even though it isn’t stackable you can place it on the upper outlet and keep the lower outlet free.
Amazon Smart Plug ($25)

Since we’re talking about smart plugs that work with Alexa, it only seems fitting to discuss Amazon’s own smart plug that sells for $25.
There’s nothing insanely special about it, but the one great thing is that it connects seamlessly to Alexa, since the smart plug is made by the same company—the Alexa app will immediately recognize the smart plug during the setup process and connect it to your home’s Wi-Fi network. From there, it’s instantly ready for voice control. It’s about as convenient as it gets.
It’s not quite the cheapest smart plug on the block (as we’ll prove down below), but if you use Alexa heavily and are wanting to jump on the smart plug train, Amazon’s own smart plug is a good way to go to ensure 100% compatibility with zero headaches or configuration woes.
Sonoff S31 Smart Plug ($19)

It’s not the most well-known smart plug brand on the market, but the Sonoff S31 retails for just $19, making it one of the cheapest options out there. Even better, that low cost doesn’t give you fewer features. In fact, it comes with a really neat feature that we don’t often see in smart plugs.
Read the remaining 14 paragraphs
How to Use Windows Narrator

Windows 10 contains several accessibility settings built in to make it easier and more inclusive for people who have difficulty using all the regular functions of their computers. Narrator is a screen-reading app for people with visual difficulties, but even people without those difficulties might find some of its features useful. Here’s how to enable and use Windows Narrator.
RELATED: How to Manage Accessibility Features in Windows 10
What Is Windows Narrator?
Windows Narrator is a lightweight screen-reading tool. It reads aloud things on your screen—text and interface elements—makes it easier to interact with links and buttons, and even provides descriptions of images. Windows Narrator also is available in 35 languages.
How to Enable Windows Narrator
The easiest way to get to the Narrator settings is to press Windows+Ctrl+N. This opens the Settings app directly to Settings > Ease of Access > Narrator.
From here, switch the toggle switch to the “On” position enable Windows Narrator.

By default, there’s also a keyboard shortcut that enables Windows Narrator immediately—Windows+Ctrl+Enter. And if you’ve ever hit that key combo accidentally and had Narrator surprise you, you can come here to disable that shortcut.
How to Use Windows Narrator
After you enable Narrator, you’re greeted by the QuickStart window, which will give you a brief rundown of how to use Narrator and shows you with some of its functions and commands to get you started. It will pop up every time you start Narrator unless you click the box in the lower left-hand corner. Narrator also immediately begins reading the text of the window to you.
Read the remaining 34 paragraphs
The Best macOS Dock Replacement Apps

Modding the default functionality of your OS with third-party apps is fun. We’ve covered how to set up custom hotkeys for everything imaginable, how to turn your trackpad into a power user’s dream, and even how to replace the default TouchBar completely. Here, we’ll look at how various replacements for Apple’s built-in dock stack up.
Removing the Default Dock
If you intend to replace the dock with a third party program, you’ll probably want to disable the default dock so it doesn’t get in the way. However, there’s no option in the settings to turn it off, and no way to remove it completely. This is because the dock app is responsible for things under the hood other than just running the dock; in fact, Finder won’t even run with the dock disabled.
Instead of disabling it, though, you can turn up the autohide delay to 1000 seconds so that it doesn’t get in your way. To do so, fire up the Terminal and use this command:
defaults write com.apple.dock autohide-delay -float 1000; killall Dock
To get standard dock functionality back, use this command to return it to the default settings:
defaults delete com.apple.dock autohide-delay; killall Dock
This will make your dock take 15 minutes to open, which means it won’t accidentally pop up when you hover over it. If for some reason you want the default dock to show again, you can always press Option+Command+D to open it manually.
And now that you know how to get the built-in dock out of the way let’s talk about those third-party replacements.
TabLauncher

TabLauncher is at the top of our list for packing the most features into a usable dock. It’s fast—often faster to open and close than the default dock—and it separates icons into different tabs, all of which are configurable. It shows previews of windows before you open them, too, which is a nice feature.
Read the remaining 18 paragraphs
Geek Trivia: The Original Name Europeans Assigned The Hawaiian Islands Was?
The Original Name Europeans Assigned The Hawaiian Islands Was? |
|
Think you know the answer? |
|
Sunday, 28 October 2018
How Reva founder Chetan Maini is trying to redefine the future of urban transport
The Best Yoga Mat Bags For Your Mat, Accessories, And More

Your gym bag is great for a water bottle and some accessories, but yoga mats are long, bulky, and require their own bag—so here are our top picks!
Whatever your bag preference, and whatever your needs, we’ve found a yoga bag for you. Do you like tote bags? Backpacks? Perhaps you want something more stylish, or maybe more functional. Our list of best yoga bag roundups covers it all, so read on to find the best bag for you.
Best Yoga Tote Bag: YogiiiTote ($24)

Tote bags are great for tossing your random belongings all into one spot. With the YogiiiTote, you can have room to throw your keys, phone, water, towel, and yoga mat into the same tote bag with room to spare. Because it’s designed to fit a yoga mat, it is longer than most tote bags so the mat won’t fall out. Plus, its shape is straight on one side and slightly curved on the other to ensure the security of your items.
With this bag, you can comfortably carry your mat without it knocking your shoulder or sitting uncomfortably under your arm. And while the main opening of the YogiiiTote has room for your mat plus other items, there’s even a smaller pocket and a zippered pocket so you can separate and organize your items. Choose between 7 different colors with this simple-looking bag. Just note that mats ½ inches or more in thickness may be too big for the YogiiiTote.
If you want a tote bag, but you don’t want your mat sticking out of the top of the tote, check out this LUCKAYA Yoga Mat, which holds the strapped mat horizontally instead.
Best Yoga Backpack: Aurorae ($35)

Carrying around a yoga mat can be an inconvenience, especially if you favor hands-free mobility. This Aurorae Yoga Mat Backpack gives you that freedom when you put your yoga mat vertically into the side holder (where a bottle holder usually goes) and strap it in. And because your mat is held on the outside of the bag, you have so much room on the inside to put other items.