There is no shortage of things to do when you are a landlord, ranging from staying up to date with leases and dealing with tenant repair requests. When you have more than one property, this is magnified and it can lead to important tasks being forgotten. Luckily, there are a number of helpful technologies that can make everything a little bit simpler. Many landlords have already streamlined their business through the use of technology, saving them both time and money. Here’s how technology can help to improve your rental property business. Incorporate The CloudThere’s certainly a lot of paperwork that comes with managing a property; tenant leases, maintenance requests, rent collection, and so on. This is a lot of paperwork to manage just to run a rental property business on a daily basis, which is why many landlords are incorporating cloud services. With cloud services, a number of landlord and tenant processes can be done remotely. It’s a lot easier to finalize a lease when electronic document transfers and signings are possible. There’s no need to worry about finding a convenient time for both parties to meet, sign leases, and exchange documents. Cloud services also reduce the space needed to ...
Read More on Datafloq
Tuesday, 31 March 2020
Data Science with Azure Databricks at Clifford Chance
Guest blog by Mirko Bernardoni (Fiume Ltd) and Lulu Wan (Clifford Chance)
With headquarters in London, Clifford Chance is a member of the “Magic Circle” of law firms and is one of the ten largest law firms in the world measured both by number of lawyers and revenue.
As a global law firm, we support clients at both the local and international level across Europe, Asia Pacific, the Americas, the Middle East and Africa. Our global view, coupled with our sector approach, gives us a detailed understanding of our clients’ business, including the drivers and competitive landscapes.
To achieve our vision of becoming the global law firm of choice we must be the firm that creates the greatest value for our clients. That means delivering service that is ever quicker, simpler, more efficient and more robust. By investing in smart technology and applying our extensive legal expertise, we can continually improve value and outcomes for clients, making delivery more effective, every time
Data Science and Legal
Artificial intelligence is growing at a phenomenal speed and is now set to transform the legal industry by mining documents, reviewing and creating contracts, raising red flags and performing due diligence. We are enthusiastic early adopters of AI and other advanced technology tools to enable us to deliver a better service to our clients.
To ensure we are providing the best value to our clients, Clifford Chance created an internal Data Science Lab, organised similar to a startup inside the firm. We are working with, and as part of the Innovation Lab and Best Delivery Hub in Clifford Chance where we deliver initiatives helping lawyers do their daily work.
Applying data science to the lawyer’s work comes with many challenges. These include handling lengthy documents, working with a specific domain language, analysing millions of documents and classifying them, extracting information and predicting statements and clauses. For example, a simple document classification can become a complex exercise if we consider that our documents contain more than 5,000 words.
Data Science Lab process
The process that enables the data science lab to work at full capacity can be summarised in four steps:
- Idea management. Every idea is catalogued with a specific workflow for managing all progression gates and stakeholder’s interaction efficiently. This focuses us on embedding the idea in our existing business processes or creating a new product.
- Data processing. It is up to the Data Science Lab to collaborate with other teams to acquire data, seek the necessary approvals and transform it in such a way that only the relevant data with the right permission in the right format reaches the data scientist. Databricks with Apache SparkTM — we have an on-premise instance for filtering and obfuscating the data based on our contracts and regulations — allows us to move the data to Azure efficiently. Thanks to the unified data analytics platform, the entire data team — data engineers and data scientists — can fix minor bugs in our processes.
- Data science. Without Databricks it would be incredibly expensive for us to conduct research. The size of the team is small, but we are always looking to implement the latest academic research. We need a platform that allows us to code in an efficient manner without considering all the infrastructure aspects. Databricks provides a unified, collaborative environment for all our data scientists, while also ensuring that we can comply with the security standards as mandated by our organisation.
- Operationalisation. The Databricks platform is used to re-train the models and run the ETL process which moves data into production as necessary. Again, in this case, unifying data engineering and data science was a big win for us. It reduces the time to fix issues and bugs and helps us to better understand the data.
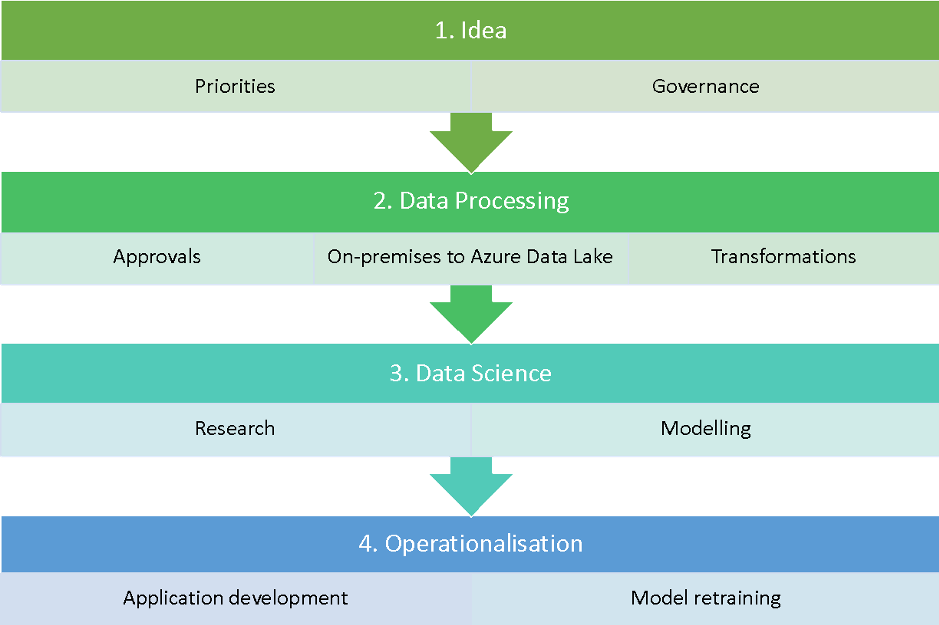
Workflow process for Data Science Lab
Data Science Lab toolkit
The Data science Lab requirements for building our toolkit are:
- Maintain high standards of confidentiality
- Build products as quickly as possible
- Keep control of our models and personalisation
- Usable by a small team of four members with mixed skills and roles
These requirements drove us to automate all of our processes and choose the right platforms for development. We had to unify data engineering and data science while reducing costs and time required to be operational.
We use a variety of third-party tools, including Azure Cloud, open-source and in-house build tools for our data stack:
- Spark on-premise installation for applying the first level of governance on our data (such as defining what can be copied in the cloud)
- Kafka and Event Hub are our transport protocol for moving the data in Azure
- Databricks Unified Data Analytics Platform for any ETL transformation, iterate development and test our built-in models
- MLflow to log models’ metadata, select best models and hyperparameters and models deployment
- Hyperopt for model tuning and optimisation at scale
- Azure Data Lake with Delta Lake for storing our datasets, enabling traceability and model storage
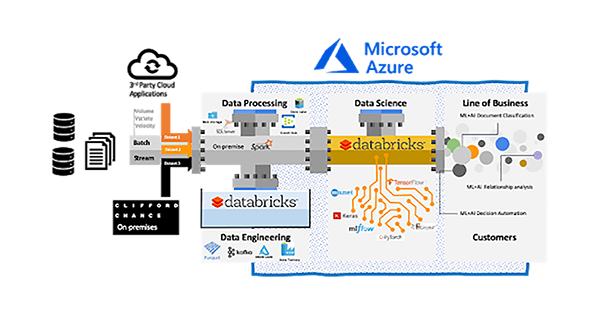
Data Science Lab data ingestion and elaboration architecture
An example use case: Document classification
Having the ability to automatically label documents speed ups many legal processes when thousands or millions of documents are involved. To build our model, we worked with the EDGAR dataset, which is an online public database from the U.S. Security and Exchange Commission (SEC). EDGAR is the primary system for submissions by companies and others required to file information with the SEC.
The first step was to extract the documents from filings and find entries that are similar in size to our use case (more than 5,000 words) and extract only the relevant text. The process took multiple iterations to get a usable labelled dataset. We started from more than 15 million files and selected only 28,445 for creating our models.
What was novel about our approach was applying chunk embedding inspired from audio segmentation. This entailed, dividing a long document into chunks and mapping to numeric space to achieve chunk embeddings. For more details, you can read our published paper here: Long-length Legal Document Classification.
On the top of long short-term memory (LSTM), we employed an attention mechanism to enable our model to assign different scores to different parts across the whole document. Throughout the entire architecture of the model, a set of hyperparameters, comprising embedding dimension, hidden size, batch size, learning rate and weight decay, play vital roles either in determining the performance of the model or the time to be consumed on training the model.
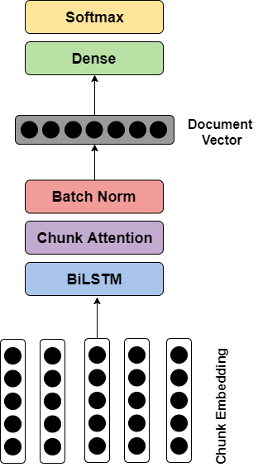
Model architecture
Even though we can narrow down candidate values for each hyperparameter to a limited range of values, the total number of combinations is still massive. In this case, implementing a greedy search over the hyperparameter space is unrealistic, but here Hyperopt makes life much easier. What we only need to do is to construct the objective function and define the hyperparameter space. Meanwhile, all the results generated during the training are stored in MLflow. No model evaluations are lost.
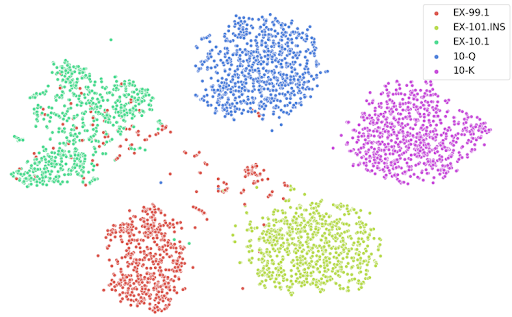
t-SNE plot of projections of document embeddings, using Doc2Vec + BiLSTM
Conclusion
The Clifford Chance Data Science Lab team is able to deliver end-user applications and academic research with a small team and limited resources. This has been achieved through automating processes and using a combination of Azure Cloud, Azure Databricks, MLflow and Hyperopt.
In the use case above, we achieved an F1 score greater than 0.98 on our document classification task with long-length documents. This is assisting multiple projects where we are dealing with huge numbers of files that require classification.
Looking forward, we plan to further automate our processes to reduce the workload of managing product development. We are continuing to optimise our processes to add alerting and monitoring. We plan to produce more scientific papers and contribute to the MLflow and Hyperopt open-source projects in the near future so we can share our specific use cases.
--
Try Databricks for free. Get started today.
The post Data Science with Azure Databricks at Clifford Chance appeared first on Databricks.
AWS Machine Learning Solves Unique Problems

Sponsored by:
 AWS offers the broadest and deepest set of tools for your business to create impactful machine learning solutions faster. That’s why tens of thousands of customers, from the largest enterprises to the hottest startups, choose AWS Machine Learning – more than any other cloud platform.
10 Minutes from pandas to Koalas on Apache Spark
This is a guest community post from Haejoon Lee, a software engineer at Mobigen in South Korea and a Koalas contributor.
pandas is a great tool to analyze small datasets on a single machine. When the need for bigger datasets arises, users often choose PySpark. However, the converting code from pandas to PySpark is not easy as PySpark APIs are considerably different from pandas APIs. Koalas makes the learning curve significantly easier by providing pandas-like APIs on the top of PySpark. With Koalas, users can take advantage of the benefits of PySpark with minimal efforts, and thus get to value much faster.
A number of blog posts such as Koalas: Easy Transition from pandas to Apache Spark, How Virgin Hyperloop One reduced processing time from hours to minutes with Koalas, and 10 minutes to Koalas in Koalas official docs have demonstrated the ease of conversion between pandas and Koalas. However, despite having the same APIs, there are subtleties when working in a distributed environment that may not be obvious to pandas users. In addition, only about ~70% of pandas APIs are implemented in Koalas. While the open-source community is actively implementing the remaining pandas APIs in Koalas, users would need to use PySpark to work around. Finally, Koalas also offers its own APIs such as to_spark(), DataFrame.map_in_pandas(), ks.sql(), etc. that can significantly improve user productivity.
Therefore, Koalas is not meant to completely replace the needs for learning PySpark. Instead, Koalas makes learning PySpark much easier by offering pandas-like functions. To be proficient in Koalas, users would need to understand the basics of Spark and some PySpark APIs. In fact, we find that users using Koalas and PySpark interchangeably tend to extract the most value from Koalas.
In particular, two types of users benefit the most from Koalas:
- pandas users who want to scale out using PySpark and potentially migrate codebase to PySpark. Koalas is scalable and makes learning PySpark much easier
- Spark users who want to leverage Koalas to become more productive. Koalas offers pandas-like functions so that users don’t have to build these functions themselves in PySpark
This blog post will not only demonstrate how easy it is to convert code written in pandas to Koalas, but also discuss the best practices of using Koalas; when you use Koalas as a drop-in replacement of pandas, how you can use PySpark to work around when the pandas APIs are not available in Koalas, and when you apply Koalas-specific APIs to improve productivity, etc. The example notebook in this blog can be found here.
Distributed and Partitioned Koalas DataFrame
Even though you can apply the same APIs in Koalas as in pandas, under the hood a Koalas DataFrame is very different from a pandas DataFrame. A Koalas DataFrame is distributed, which means the data is partitioned and computed across different workers. On the other hand, all the data in a pandas DataFrame fits in a single machine. As you will see, this difference leads to different behaviors.
Migration from pandas to Koalas
This section will describe how Koalas supports easy migration from pandas to Koalas with various code examples.
Object Creation
The packages below are customarily imported in order to use Koalas. Technically those packages like numpy or pandas are not necessary, but allow users to utilize Koalas more flexibly.
import numpy as np
import pandas as pd
import databricks.koalas as ks
A Koalas Series can be created by passing a list of values, the same way as a pandas Series. A Koalas Series can also be created by passing a pandas Series.
# Create a pandas Series
pser = pd.Series([1, 3, 5, np.nan, 6, 8])
# Create a Koalas Series
kser = ks.Series([1, 3, 5, np.nan, 6, 8])
# Create a Koalas Series by passing a pandas Series
kser = ks.Series(pser)
kser = ks.from_pandas(pser)
Best Practice: As shown below, Koalas does not guarantee the order of indices unlike pandas. This is because almost all operations in Koalas run in a distributed manner. You can use Series.sort_index() if you want ordered indices.
>>> pser
0    1.0
1    3.0
2    5.0
3    NaN
4    6.0
5    8.0
dtype: float64
>>> kser
3    NaN
2    5.0
1    3.0
5    8.0
0    1.0
4    6.0
Name: 0, dtype: float64
# Apply sort_index() to a Koalas series
>>> kser.sort_index()
0    1.0
1    3.0
2    5.0
3    NaN
4    6.0
5    8.0
Name: 0, dtype: float64
A Koalas DataFrame can also be created by passing a NumPy array, the same way as a pandas DataFrame. A Koalas DataFrame has an Index unlike PySpark DataFrame. Therefore, Index of the pandas DataFrame would be preserved in the Koalas DataFrame after creating a Koalas DataFrame by passing a pandas DataFrame.
# Create a pandas DataFrame
pdf = pd.DataFrame({'A': np.random.rand(5),
                    'B': np.random.rand(5)})
# Create a Koalas DataFrame
kdf = ks.DataFrame({'A': np.random.rand(5),
                    'B': np.random.rand(5)})
# Create a Koalas DataFrame by passing a pandas DataFrame
kdf = ks.DataFrame(pdf)
kdf = ks.from_pandas(pdf)
Likewise, the order of indices can be sorted by DataFrame.sort_index().
>>> pdf
          A         B
0  0.015869  0.584455
1  0.224340  0.632132
2  0.637126  0.820495
3  0.810577  0.388611
4  0.037077  0.876712
>>> kdf.sort_index()
          A         B
0  0.015869  0.584455
1  0.224340  0.632132
2  0.637126  0.820495
3  0.810577  0.388611
4  0.037077  0.876712
Viewing Data
As with a pandas DataFrame, the top rows of a Koalas DataFrame can be displayed using DataFrame.head(). Generally, a confusion can occur when converting from pandas to PySpark due to the different behavior of the head() between pandas and PySpark, but Koalas supports this in the same way as pandas by using limit() of PySpark under the hood.
>>> kdf.head(2)
          A         B
0  0.015869  0.584455
1  0.224340  0.632132
A quick statistical summary of a Koalas DataFrame can be displayed using DataFrame.describe().
>>> kdf.describe()
              A         B
count  5.000000  5.000000
mean   0.344998  0.660481
std    0.360486  0.195485
min    0.015869  0.388611
25%    0.037077  0.584455
50%    0.224340  0.632132
75%    0.637126  0.820495
max    0.810577  0.876712
Sorting a Koalas DataFrame can be done using DataFrame.sort_values().
>>> kdf.sort_values(by='B')
          A         B
3  0.810577  0.388611
0  0.015869  0.584455
1  0.224340  0.632132
2  0.637126  0.820495
4  0.037077  0.876712
Transposing a Koalas DataFrame can be done using DataFrame.transpose().
>>> kdf.transpose()
          0         1         2         3         4
A  0.015869  0.224340  0.637126  0.810577  0.037077
B  0.584455  0.632132  0.820495  0.388611  0.876712
Best Practice: DataFrame.transpose() will fail when the number of rows is more than the value of compute.max_rows, which is set to 1000 by default. This is to prevent users from unknowingly executing expensive operations. In Koalas, you can easily reset the default compute.max_rows. See the official docs for DataFrame.transpose() for more details.
>>> from databricks.koalas.config import set_option, get_option
>>> ks.get_option('compute.max_rows')
1000
>>> ks.set_option('compute.max_rows', 2000)
>>> ks.get_option('compute.max_rows')
2000
Selecting or Accessing Data
As with a pandas DataFrame, selecting a single column from a Koalas DataFrame returns a Series.
>>> kdf['A']  # or kdf.A
0    0.015869
1    0.224340
2    0.637126
3    0.810577
4    0.037077
Name: A, dtype: float64
Selecting multiple columns from a Koalas DataFrame returns a Koalas DataFrame.
>>> kdf[['A', 'B']]
          A         B
0  0.015869  0.584455
1  0.224340  0.632132
2  0.637126  0.820495
3  0.810577  0.388611
4  0.037077  0.876712
Slicing is available for selecting rows from a Koalas DataFrame.
>>> kdf.loc[1:2]
          A         B
1  0.224340  0.632132
2  0.637126  0.820495
Slicing rows and columns is also available.
>>> kdf.iloc[:3, 1:2]
          B
0  0.584455
1  0.632132
2  0.820495
Best Practice: By default, Koalas disallows adding columns coming from different DataFrames or Series to a Koalas DataFrame as adding columns requires join operations which are generally expensive. This operation can be enabled by setting compute.ops_on_diff_frames to True. See Available options in the docs for more detail.
>>> kser = ks.Series([100, 200, 300, 400, 500], index=[0, 1, 2, 3, 4])
>>> kdf['C'] = kser


...
ValueError: Cannot combine the series or dataframe because it comes from a different dataframe. In order to allow this operation, enable 'compute.ops_on_diff_frames' option.
# Those are needed for managing options
>>> from databricks.koalas.config import set_option, reset_option
>>> set_option("compute.ops_on_diff_frames", True)
>>> kdf['C'] = kser
# Reset to default to avoid potential expensive operation in the future
>>> reset_option("compute.ops_on_diff_frames")
>>> kdf
          A         B    C
0  0.015869  0.584455  100
1  0.224340  0.632132  200
3  0.810577  0.388611  400
2  0.637126  0.820495  300
4  0.037077  0.876712  500
Applying a Python Function to Koalas DataFrame
DataFrame.apply() is a very powerful function favored by many pandas users. Koalas DataFrames also support this function.
>>> kdf.apply(np.cumsum)
          A         B     C
0  0.015869  0.584455   100
1  0.240210  1.216587   300
3  1.050786  1.605198   700
2  1.687913  2.425693  1000
4  1.724990  3.302404  1500
DataFrame.apply() also works for axis = 1 or ‘columns’ (0 or ‘index’ is the default).
>>> kdf.apply(np.cumsum, axis=1)
          A         B           C
0  0.015869  0.600324  100.600324
1  0.224340  0.856472  200.856472
3  0.810577  1.199187  401.199187
2  0.637126  1.457621  301.457621
4  0.037077  0.913788  500.913788
Also, a Python native function can be applied to a Koalas DataFrame.
>>> kdf.apply(lambda x: x ** 2)
          A         B       C
0  0.000252  0.341588   10000
1  0.050329  0.399591   40000
3  0.657035  0.151018  160000
2  0.405930  0.673212   90000
4  0.001375  0.768623  250000
Best Practice: While it works fine as it is, it is recommended to specify the return type hint for Spark’s return type internally when applying user defined functions to a Koalas DataFrame. If the return type hint is not specified, Koalas runs the function once for a small sample to infer the Spark return type which can be fairly expensive.
>>> def square(x) -> ks.Series[np.float64]:
...     return x ** 2
>>> kdf.apply(square)
          A         B         C
0  0.405930  0.673212   90000.0
1  0.001375  0.768623  250000.0
2  0.000252  0.341588   10000.0
3  0.657035  0.151018  160000.0
4  0.050329  0.399591   40000.0
Note that DataFrame.apply() in Koalas does not support global aggregations by its design. However, If the size of data is lower than compute.shortcut_limit, it might work because it uses pandas as a shortcut execution.
# Working properly since size of data <= compute.shortcut_limit (1000)
>>> ks.DataFrame({'A': range(1000)}).apply(lambda col: col.max())
A    999
Name: 0, dtype: int64
# Not working properly since size of data > compute.shortcut_limit (1000)
>>> ks.DataFrame({'A': range(1001)}).apply(lambda col: col.max())
A     165
A     580
A     331
A     497
A     829
A     414
A     746
A     663
A     912
A    1000
A     248
A      82
Name: 0, dtype: int64
Best Practice: In Koalas, compute.shortcut_limit (default = 1000) computes a specified number of rows in pandas as a shortcut when operating on a small dataset. Koalas uses the pandas API directly in some cases when the size of input data is below this threshold. Therefore, setting this limit too high could slow down the execution or even lead to out-of-memory errors. The following code example sets a higher compute.shortcut_limit, which then allows the previous code to work properly. See the Available options for more details.
>>> ks.set_option('compute.shortcut_limit', 1001)
>>> ks.DataFrame({'A': range(1001)}).apply(lambda col: col.max())
A    1000
Name: 0, dtype: int64
Grouping Data
Grouping data by columns is one of the common APIs in pandas. DataFrame.groupby() is available in Koalas as well.
>>> kdf.groupby('A').sum()
                 B    C
A
0.224340  0.632132  200
0.637126  0.820495  300
0.015869  0.584455  100
0.810577  0.388611  400
0.037077  0.876712  500
See also grouping data by multiple columns below.
>>> kdf.groupby(['A', 'B']).sum()
                     C
A        B
0.224340 0.632132  200
0.015869 0.584455  100
0.037077 0.876712  500
0.810577 0.388611  400
0.637126 0.820495  300
Plotting and Visualizing Data
In pandas, DataFrame.plot is a good solution for visualizing data. It can be used in the same way in Koalas.
Note that Koalas leverages approximation for faster rendering. Therefore, the results could be slightly different when the number of data is larger than plotting.max_rows.
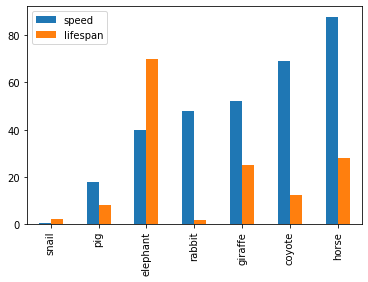
See the example below that plots a Koalas DataFrame as a bar chart with DataFrame.plot.bar().
>>> speed = [0.1, 17.5, 40, 48, 52, 69, 88]
>>> lifespan = [2, 8, 70, 1.5, 25, 12, 28]
>>> index = ['snail', 'pig', 'elephant',
...          'rabbit', 'giraffe', 'coyote', 'horse']
>>> kdf = ks.DataFrame({'speed': speed,
...                     'lifespan': lifespan}, index=index)
>>> kdf.plot.bar()
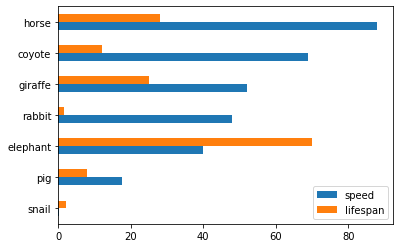
Also, The horizontal bar plot is supported with DataFrame.plot.barh()
>>> kdf.plot.barh()
Make a pie plot using DataFrame.plot.pie().
>>> kdf = ks.DataFrame({'mass': [0.330, 4.87, 5.97],
...                     'radius': [2439.7, 6051.8, 6378.1]},
...                    index=['Mercury', 'Venus', 'Earth'])
>>> kdf.plot.pie(y='mass')

Best Practice: For bar and pie plots, only the top-n-rows are displayed to render more efficiently, which can be set by using option plotting.max_rows.
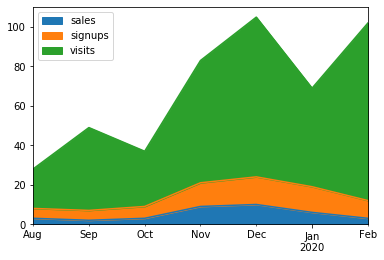
Make a stacked area plot using DataFrame.plot.area().
>>> kdf = ks.DataFrame({
...     'sales': [3, 2, 3, 9, 10, 6, 3],
...     'signups': [5, 5, 6, 12, 14, 13, 9],
...     'visits': [20, 42, 28, 62, 81, 50, 90],
... }, index=pd.date_range(start='2019/08/15', end='2020/03/09',
...                        freq='M'))
>>> kdf.plot.area()
Make line charts using DataFrame.plot.line().
>>> kdf = ks.DataFrame({'pig': [20, 18, 489, 675, 1776],
...                     'horse': [4, 25, 281, 600, 1900]},
...                    index=[1990, 1997, 2003, 2009, 2014])
>>> kdf.plot.line()
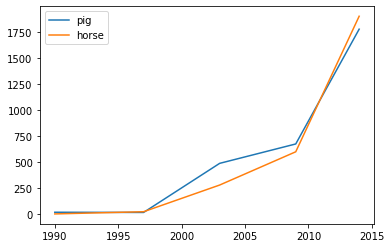
Best Practice: For area and line plots, the proportion of data that will be plotted can be set by plotting.sample_ratio. The default is 1000, or the same as plotting.max_rows. See Available options for details.
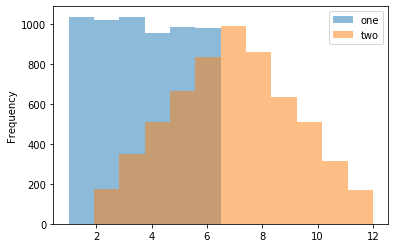
Make a histogram using DataFrame.plot.hist()
>>> kdf = pd.DataFrame(
...     np.random.randint(1, 7, 6000),
...     columns=['one'])
>>> kdf['two'] = kdf['one'] + np.random.randint(1, 7, 6000)
>>> kdf = ks.from_pandas(kdf)
>>> kdf.plot.hist(bins=12, alpha=0.5)
Make a scatter plot using DataFrame.plot.scatter()
>>> kdf = ks.DataFrame([[5.1, 3.5, 0], [4.9, 3.0, 0], [7.0, 3.2, 1],
...                     [6.4, 3.2, 1], [5.9, 3.0, 2]],
...                    columns=['length', 'width', 'species'])
>>> kdf.plot.scatter(x='length', y='width', c='species', colormap='viridis')

Missing Functionalities and Workarounds in Koalas
When working with Koalas, there are a few things to look out for. First, not all pandas APIs are currently available in Koalas. Currently, about ~70% of pandas APIs are available in Koalas. In addition, there are subtle behavioral differences between Koalas and pandas, even if the same APIs are applied. Due to the difference, it would not make sense to implement certain pandas APIs in Koalas. This section discusses common workarounds.
Using pandas APIs via Conversion
When dealing with missing pandas APIs in Koalas, a common workaround is to convert Koalas DataFrames to pandas or PySpark DataFrames, and then apply either pandas or PySpark APIs. Converting between Koalas DataFrames and pandas/PySpark DataFrames is pretty straightforward: DataFrame.to_pandas() and koalas.from_pandas() for conversion to/from pandas; DataFrame.to_spark() and DataFrame.to_koalas() for conversion to/from PySpark. However, if the Koalas DataFrame is too large to fit in one single machine, converting to pandas can cause an out-of-memory error.
Following code snippets shows a simple usage of DataFrame.to_pandas().
>>> kidx = kdf.index
>>> kidx.to_list()

...
PandasNotImplementedError: The method `pd.Index.to_list()` is not implemented. If you want to collect your data as an NumPy array, use 'to_numpy()' instead.
Best Practice: Index.to_list() raises PandasNotImplementedError. Koalas does not support this because it requires collecting all data into the client (driver node) side. A simple workaround is to convert to pandas using to_pandas().
>>> kidx.to_pandas().to_list()
[0, 1, 2, 3, 4]
Native Support for pandas Objects
Koalas has also made available the native support for pandas objects. Koalas can directly leverage pandas objects as below.
>>> kdf = ks.DataFrame({'A': 1.,
...                     'B': pd.Timestamp('20130102'),
...                     'C': pd.Series(1, index=list(range(4)), dtype='float32'),
...                     'D': np.array([3] * 4, dtype='int32'),
...                     'F': 'foo'})
>>> kdf
     A          B    C  D    F
0  1.0 2013-01-02  1.0  3  foo
1  1.0 2013-01-02  1.0  3  foo
2  1.0 2013-01-02  1.0  3  foo
3  1.0 2013-01-02  1.0  3  foo
ks.Timestamp() is not implemented yet, and ks.Series() cannot be used in the creation of Koalas DataFrame. In these cases, the pandas native objects pd.Timestamp() and pd.Series() can be used instead.
Distributing a pandas Function in Koalas
In addition, Koalas offers Koalas-specific APIs such as DataFrame.map_in_pandas(), which natively support distributing a given pandas function in Koalas.
>>> i = pd.date_range('2018-04-09', periods=2000, freq='1D1min')
>>> ts = ks.DataFrame({'A': ['timestamp']}, index=i)
>>> ts.between_time('0:15', '0:16')


...
PandasNotImplementedError: The method `pd.DataFrame.between_time()` is not implemented yet.
DataFrame.between_time() is not yet implemented in Koalas. As shown below, a simple workaround is to convert to a pandas DataFrame using to_pandas(), and then applying the function.
>>> ts.to_pandas().between_time('0:15', '0:16')
                             A
2018-04-24 00:15:00  timestamp
2018-04-25 00:16:00  timestamp
2022-04-04 00:15:00  timestamp
2022-04-05 00:16:00  timestamp
However, DataFrame.map_in_pandas() is a better alternative workaround because it does not require moving data into a single client node and potentially causing out-of-memory errors.
>>> ts.map_in_pandas(func=lambda pdf: pdf.between_time('0:15', '0:16'))
                             A
2022-04-04 00:15:00  timestamp
2022-04-05 00:16:00  timestamp
2018-04-24 00:15:00  timestamp
2018-04-25 00:16:00  timestamp
Best Practice: In this way, DataFrame.between_time(), which is a pandas function, can be performed on a distributed Koalas DataFrame because DataFrame.map_in_pandas() executes the given function across multiple nodes. See DataFrame.map_in_pandas().
Using SQL in Koalas
Koalas supports standard SQL syntax with ks.sql() which allows executing Spark SQL query and returns the result as a Koalas DataFrame.
>>> kdf = ks.DataFrame({'year': [1990, 1997, 2003, 2009, 2014],
...                     'pig': [20, 18, 489, 675, 1776],
...                     'horse': [4, 25, 281, 600, 1900]})
>>> ks.sql("SELECT * FROM {kdf} WHERE pig > 100")
   year   pig  horse
0  1990    20      4
1  1997    18     25
2  2003   489    281
3  2009   675    600
4  2014  1776   1900
Also, mixing Koalas DataFrame and pandas DataFrame is supported in a join operation.
>>> pdf = pd.DataFrame({'year': [1990, 1997, 2003, 2009, 2014],
...                     'sheep': [22, 50, 121, 445, 791],
...                     'chicken': [250, 326, 589, 1241, 2118]})
>>> ks.sql('''
...     SELECT ks.pig, pd.chicken
...     FROM {kdf} ks INNER JOIN {pdf} pd
...     ON ks.year = pd.year
...     ORDER BY ks.pig, pd.chicken''')
    pig  chicken
0    18      326
1    20      250
2   489      589
3   675     1241
4  1776     2118
Working with PySpark
You can also apply several PySpark APIs on Koalas DataFrames. PySpark background can make you more productive when working in Koalas. If you know PySpark, you can use PySpark APIs as workarounds when the pandas-equivalent APIs are not available in Koalas. If you feel comfortable with PySpark, you can use many rich features such as the Spark UI, history server, etc.
Conversion from and to PySpark DataFrame
A Koalas DataFrame can be easily converted to a PySpark DataFrame using DataFrame.to_spark(), similar to DataFrame.to_pandas(). On the other hand, a PySpark DataFrame can be easily converted to a Koalas DataFrame using DataFrame.to_koalas(), which extends the Spark DataFrame class.
>>> kdf = ks.DataFrame({'A': [1, 2, 3, 4, 5], 'B': [10, 20, 30, 40, 50]})
>>> sdf = kdf.to_spark()
>>> type(sdf)
pyspark.sql.dataframe.DataFrame
>>> sdf.show()
+---+---+
|  A|  B|
+---+---+
|  1| 10|
|  2| 20|
|  3| 30|
|  4| 40|
|  5| 50|
+---+---+
Note that converting from PySpark to Koalas can cause an out-of-memory error when the default index type is sequence. Default index type can be set by compute.default_index_type (default = sequence). If the default index must be the sequence in a large dataset, distributed-sequence should be used.
>>> from databricks.koalas import option_context
>>> with option_context(
...         "compute.default_index_type", "distributed-sequence"):
...     kdf = sdf.to_koalas()
>>> type(kdf)
databricks.koalas.frame.DataFrame
>>> kdf
   A   B
3  4  40
1  2  20
2  3  30
4  5  50
0  1  10
Best Practice: Converting from a PySpark DataFrame to Koalas DataFrame can have some overhead because it requires creating a new default index internally – PySpark DataFrames do not have indices. You can avoid this overhead by specifying the column that can be used as an index column. See the Default Index type for more detail.
>>> sdf.to_koalas(index_col='A')
    B
A
1  10
2  20
3  30
4  40
5  50
Checking Spark’s Execution Plans
DataFrame.explain() is a useful PySpark API and is also available in Koalas. It can show the Spark execution plans before the actual execution. It helps you understand and predict the actual execution and avoid the critical performance degradation.
from databricks.koalas import option_context

with option_context(
        "compute.ops_on_diff_frames", True,
        "compute.default_index_type", 'distributed'):
    df = ks.range(10) + ks.range(10)
    df.explain()
The command above simply adds two DataFrames with the same values. The result is shown below.
== Physical Plan ==
*(5) Project [...]
+- SortMergeJoin [...], FullOuter
   :- *(2) Sort [...], false, 0
   :  +- Exchange hashpartitioning(...), [id=#]
   :     +- *(1) Project [...]
   :        +- *(1) Range (0, 10, step=1, splits=12)
   +- *(4) Sort [...], false, 0
      +- ReusedExchange [...], Exchange hashpartitioning(...), [id=#]
As shown in the physical plan, the execution will be fairly expensive because it will perform the sort merge join to combine DataFrames. To improve the execution performance, you can reuse the same DataFrame to avoid the merge. See Physical Plans in Spark SQL to learn more.
with option_context(
        "compute.ops_on_diff_frames", False,
        "compute.default_index_type", 'distributed'):
    df = ks.range(10)
    df = df + df
    df.explain()
Now it uses the same DataFrame for the operations and avoids combining different DataFrames and triggering a sort merge join, which is enabled by compute.ops_on_diff_frames.
== Physical Plan ==
*(1) Project [...]
+- *(1) Project [...]
   +- *(1) Range (0, 10, step=1, splits=12)
This operation is much cheaper than the previous one while producing the same output. Examine DataFrame.explain() to help improve your code efficiency.
Caching DataFrame
DataFrame.cache() is a useful PySpark API and is available in Koalas as well. It is used to cache the output from a Koalas operation so that it would not need to be computed again in the subsequent execution. This would significantly improve the execution speed when the output needs to be accessed repeatedly.
with option_context("compute.default_index_type", 'distributed'):
    df = ks.range(10)
    new_df = (df + df).cache()  # `(df + df)` is cached here as `df`
    new_df.explain()
As the physical plan shows below, new_df will be cached once it is executed.
== Physical Plan ==
*(1) InMemoryTableScan [...]
   +- InMemoryRelation [...], StorageLevel(...)
      +- *(1) Project [...]
         +- *(1) Project [...]
            +- *(1) Project [...]
               +- *(1) Range (0, 10, step=1, splits=12)
InMemoryTableScan and InMemoryRelation mean the new_df will be cached – it does not need to perform the same (df + df) operation when it is executed the next time.
A cached DataFrame can be uncached by DataFrame.unpersist().
new_df.unpersist()
Best Practice: A cached DataFrame can be used in a context manager to ensure the cached scope against the DataFrame. It will be cached and uncached back within the with scope.
with (df + df).cache() as df:
    df.explain()
Conclusion
The examples in this blog demonstrate how easily you can migrate your pandas codebase to Koalas when working with large datasets. Koalas is built on top of PySpark, and provides the same API interface as pandas. While there are subtle differences between pandas and Koalas, Koalas provides additional Koalas-specific functions to make it easy when working in a distributed setting. Finally, this blog shows common workarounds and best practices when working in Koalas. For pandas users who need to scale out, Koalas fits their needs nicely.
Get Started with Koalas on Apache Spark
You can get started with trying examples in this blog in this notebook, visit the Koalas documentation and peruse examples, and contribute at Koalas GitHub. Also, join the koalas-dev mailing list for discussions and new release announcements.
References
- “10 minutes to Koalas” in Koalas documentation
- “Options and setting” in Koalas documentation
- “API Reference” in Koalas documentation
- “10 minutes to pandas” in pandas documentation
- “API Reference” in pandas documentation
- “Quick Start” in Apache Spark documentation
- Missing common APIs of Koalas in Github repository
- Missing DataFrame APIs of Koalas in Github repository
- Missing Series APIs of Koalas in Github repository
- Missing Index APIs of Koalas in Github repository
- Missing GroupBy APIs of Koalas in Github repository
- Missing Window APIs of Koalas in Github repository
- The code snippets written in Jupyter Notebook
--
Try Databricks for free. Get started today.
The post 10 Minutes from pandas to Koalas on Apache Spark appeared first on Databricks.
All IITs told to give plans for combating Covid-19 in two days
HRD secretary asks institutes to draw up short and medium-term technology plans
Shutdown has given time to organize resources, tech: K Vijay Raghavan, Principal Scientific Advisor
Specific solutions are being planned for the old, poor and those without access to phone, says K Vijay Raghavan, India's principal scientific advisor and co-chair of the Covid-19 R&D task force
Monday, 30 March 2020
How Blockchain Technology Improves Liquidity in the Real Estate Industry?
Real estate is one of the vastly spread industries which is currently facing a bit of downfall due to the many challenges involved with the business. One of the major challenges among them is “illiquidity”. In the traditional real estate business, the properties and assets such as stocks, bonds, etc, cannot be easily sold or converted into cash. This makes the process long, tedious and ends up in solid loss. This is where “Tokenization” comes into play. Tokenization is set to be the hope for future investors that reduces illiquidity and also many other challenges involved, ensuring a smooth, successful business. The demand and popularity for tokenized assets are rapidly growing by each day, and it is believed to disrupt the real estate industry.
What is tokenization? How asset tokenization improves liquidity than ever before?
Tokenization is the process of converting assets into digitized tokens which are sold in exchange for other digital currencies or fiat money. The tokenized assets represent the value of an individual property or a basket of properties. The tokens are backed by blockchain technology, which helps control, secure, verify transactions and completely protect the investor’s interest with a chain of blocks coded with cryptography.
As mentioned earlier, tokenization ...
Read More on Datafloq
How Blockchain Will Transform Artificial Intelligence in 2020
Blockchain and Artificial Intelligence are two of the biggest technology trends for 2020 but their full potentials are far from being fully explored. Yet, experts continue to research into what capabilities a fusion of both technologies would have.What is Artificial Intelligence Artificial Intelligence is a computerized technology that aims to mimic and surpass human intelligence through algorithms. The strength of AI is machine learning, through which AI systems can optimize processes by automatically connecting patterns within data, without being explicitly programmed. AI is the affirmative answer to Alan Turing's question in 1950: can machines think? AI has recorded so much success and has found applications in many industries from transportation to finance, agriculture to healthcare, and many others, powering innovations in IoT, image recognition, predictive analytics, etc. Yet, it is believed that its full potentials are still ahead of us, yet unexplored. What is Blockchain? The first bitcoin block was mined in January 2009, on the back of the global financial crisis that rocked the previous year. It heralded a new technology that would be a major talking point within a few years of its existence. However, the blockchain idea was conceived way back in 1991, in the works ...
Read More on Datafloq
Read More on Datafloq
Introducing the Azure Key Vault Credentials Provider for Jenkins
Azure Key Vault is a product for securely managing keys, secrets and certificates.
I’m happy to announce two new features in the Azure Key Vault plugin:
-
a credential provider to tightly link Jenkins and Azure Key Vault.
-
huge thanks to Jie Shen for contributing this
-
-
integration with the configuration-as-code plugin.
These changes were released in v1.8 but make sure to run the latest version of the plugin, there has been some fixes since then.
Some advantages of using the credential provider rather than your own scripts:
-
your Jenkins jobs consume the credentials with no knowledge of Azure Key Vault, so they stay vendor-independent.
-
the provider integrates with the ecosystem of existing Jenkins credential consumers, such as the Slack Notifications plugin.
-
credential usage is recorded in the central Jenkins credentials tracking log.
-
Jenkins can use multiple credentials providers concurrently, so you can incrementally migrate credentials to Azure Key Vault while consuming other credentials from your existing providers.
Note: Currently only secret text credentials are supported via the credential provider, you can use the configuration-as-code integration to load the secret from Azure Key Vault into the System Credential Provider to work around this limitation.
Getting started
Install the Azure Key Vault plugin
Then you will need to configure the plugin.
Azure authentication
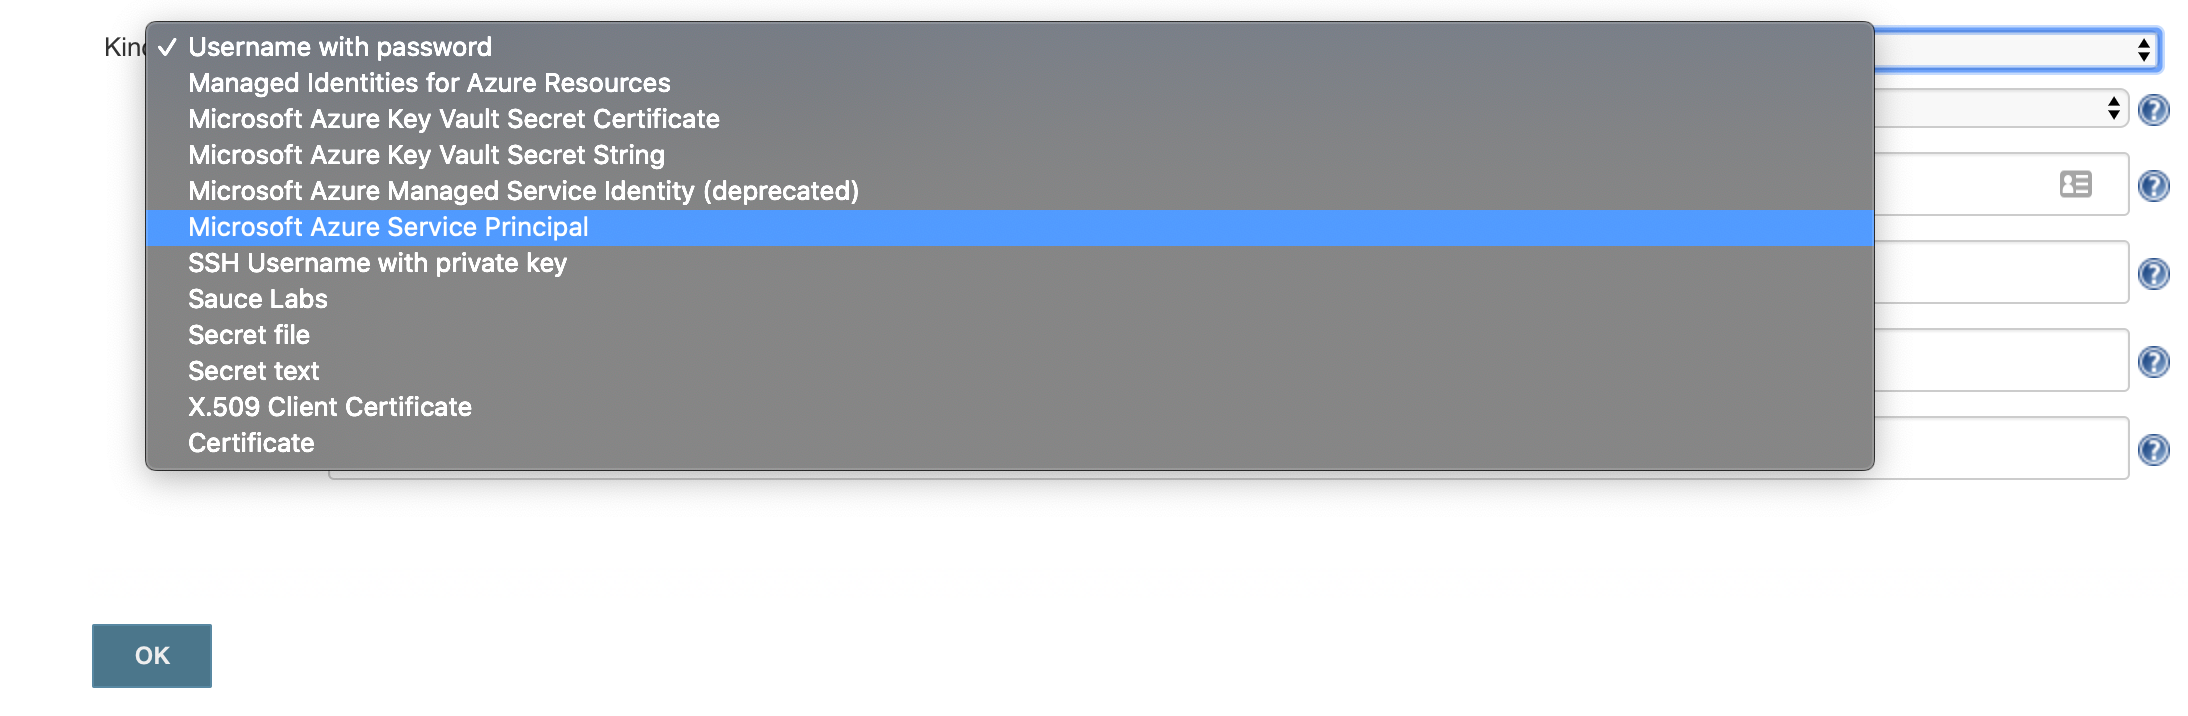
There’s two types of authentication you can use 'Microsoft Azure Service Principal' or 'Managed Identities for Azure Resources'
The easiest one to set this up quickly with is the 'Microsoft Azure Service Principal',
$ az ad sp create-for-rbac --name http://service-principal-name
Creating a role assignment under the scope of "/subscriptions/ff251390-d7c3-4d2f-8352-f9c6f0cc8f3b"
  Retrying role assignment creation: 1/36
  Retrying role assignment creation: 2/36
{
  "appId": "021b5050-9177-4268-a300-7880f2beede3",
  "displayName": "service-principal-name",
  "name": "http://service-principal-name",
  "password": "d9d0d1ba-d16f-4e85-9b48-81ea45a46448",
  "tenant": "7e593e3e-9a1e-4c3d-a26a-b5f71de28463"
}
If this doesn’t work then take a look at the Microsoft documentation for creating a service principal.
Note: for production 'Managed Identities for Azure Resources' is more secure as there’s no password involved and you don’t need to worry about the service principal’s password or certificate expiring.
Vault setup
You need to create a vault and give your service principal access to it:
RESOURCE_GROUP_NAME=my-resource-group
az group create --location uksouth --name $RESOURCE_GROUP_NAME

VAULT=my-vault # you will need a unique name for the vault
az keyvault create --resource-group $RESOURCE_GROUP_NAME --name $VAULT
az keyvault set-policy --resource-group $RESOURCE_GROUP_NAME --name $VAULT \
  --secret-permissions get list --spn http://service-principal-name
Jenkins credential
The next step is to configure the credential in Jenkins:
-
click 'Credentials'
-
click 'System' (it’ll appear below the Credentials link in the side bar)
-
click 'Global credentials (unrestricted)'
-
click 'Add Credentials'
-
select 'Microsoft Azure Service Principal'
-
fill out the form from the credential created above, appId is 'Client ID', password is 'Client Secret'
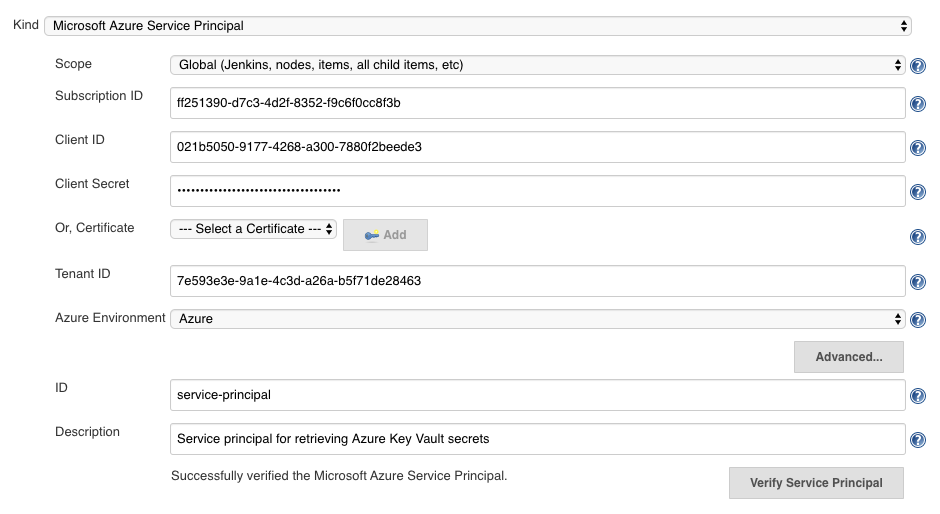
-
click 'Verify Service Principal', you should see 'Successfully verified the Microsoft Azure Service Principal'.
-
click 'Save'
Jenkins Azure Key Vault plugin configuration
You now have a credential you can use to interact with Azure resources from Jenkins, now you need to configure the plugin:
-
go back to the Jenkins home page
-
click 'Manage Jenkins'
-
click 'Configure System'
-
search for 'Azure Key Vault Plugin'
-
enter your vault url and select your credential

-
click 'Save'
Store a secret in Azure Key Vault
For the step after this you will need a secret, so let’s create one now:
$ az keyvault secret set --vault-name $YOUR_VAULT --name secret-key --value my-super-secretCreate a pipeline
Install the Pipeline plugin if you don’t already have it.
From the Jenkins home page, click 'New item', and then:
-
enter a name, i.e. 'key-vault-test'
-
click on 'Pipeline'
-
add the following to the pipeline definition:
Jenkinsfile (Declarative Pipeline)
pipeline {
  agent any
  environment {
    SECRET_KEY = credentials('secret-key')
  }
  stages {
    stage('Foo') {
      steps {
        echo SECRET_KEY
        echo SECRET_KEY.substring(0, SECRET_KEY.size() - 1) // shows the right secret was loaded, don't do this for real secrets unless you're debugging
      }
    }
  }
}You have now successfully retrieved a credential from Azure Key Vault using native Jenkins credentials integration.
configuration-as-code integration
The Configuration as Code plugin has been designed as an opinionated way to configure Jenkins based on human-readable declarative configuration files. Writing such a file should be easy without being a Jenkins expert.
For many secrets the credential provider is enough, but when integrating with other plugins you will likely need more than string credentials.
You can use the configuration-as-code plugin (aka JCasC) to allow integrating with other credential types.
configure authentication
As the JCasC plugin runs during initial startup the Azure Key Vault credential provider needs to be configured before JCasC runs during startup.
The easiest way to do that is via environment variables set before Jenkins starts up:
export AZURE_KEYVAULT_URL=https://my.vault.azure.net
export AZURE_KEYVAULT_SP_CLIENT_ID=...
export AZURE_KEYVAULT_SP_CLIENT_SECRET=...
export AZURE_KEYVAULT_SP_SUBSCRIPTION_ID=...
export AZURE_KEYVAULT_SP_SUBSCRIPTION_ID=...
See the azure-keyvault documentation for other authentication options.
You will now be able to refer to Azure Key Vault secret IDs in your jenkins.yaml file:
credentials:
  system:
    domainCredentials:
      - credentials:
        - usernamePassword:
            description: "GitHub"
            id: "jenkins-github"
            password: "${jenkins-github-apikey}"
            scope: GLOBAL
            username: "jenkinsadmin"
Thanks for reading, send feedback on twitter using the tweet button in the top right, any issues or feature requests use GitHub issues.
AR, VR and new-age tech companies gain ground amid Covid-19 outbreak
Companies like Imaginate and Queppelin are now seeing unprecedented demand for VR, AR and mixed reality technology from companies in India and abroad.
Sunday, 29 March 2020
How countries are using technology to fight coronavirus
Asian countries have used a range of technologies in their fight against the pandemic, raising questions about excessive surveillance and the violation of citizens’ privacy.
Saturday, 28 March 2020
Hospitals put in place video consultations, tele-ICUs to ensure continuity of medical care
On Wednesday, the health ministry issued guidelines on telemedicine. By then, top hospitals like Max Healthcare, Fortis, Manipal and Aster Hospitals had rolled out video consultations.
Technology adoption gets new life in Covid-19 times
With the young discovering old ways to connect and the old connecting with the new, the Covid-19 outbreak has turned some assumptions about technology and the demographics of the Internet on its head.
A Complete Guide to Corona Virus Protection
Recently, xian wang a business men travelled to Italy for business meet. Upon arrival to his native land found issue with breathing and coughing. Later, he was diagnosed with corona virus and was sent to quarantine zone for treatment. Then the business men realize he has came in contact with Covid-19 affected people, during the trip.
Corona virus is airborne infectious & contaminated diseases. The disease spread from one human to other by air, physical touch. The disease has no vaccine developed at this stage. It is essential we take precautionary measure to protect ourselves from the deadly disease.
The following preventive steps should be taken to ensure protection against Covid-19.
Avoid social gathering or meeting someone in group. Here there are chance virus will spread from one person to the anotherMaintain personal hygiene. Wash your hand frequently with disinfectant or sanitiser.Cover your body air intake system such as nose & mouth. Use only high quality N95 mask that comes with filter & respirator. Disposable surgical mask do provide protection against Covid-19 virus but to certain extent. Follow proper procedures for wearing the mask. Avoid moving out of house, only when required. Avoid using public ...
Read More on Datafloq
Friday, 27 March 2020
The Employee of Tomorrow will be a Digital Employee
The Coronavirus crisis has many organisations struggling with the new reality. All of a sudden, entire offices had to shift to remote work, although they might not have been ready for it. However, ‘never waste a good crisis’ is a famous saying, and despite these challenging times, it also offers new opportunities for organisations.
For years, I have been saying that the organisation of tomorrow is a data organisation. This means that organisations have to datafy their business processes and customer touchpoints and use analytics, blockchain, AI and other emerging information technologies to make their business more agile, efficient and customer-centric.
The current crisis has shown that now, more than ever before, this has become crucial for organisations. After all, organisations with a digital mindset and a data-driven culture will be able to easily switch to a remote-working organisation (if they hadn’t done so already). There are great examples of fully remote companies, including Zapier, Edgar, Stripe, GitLab and Toptal, who also excel in being a data organisation.
The Rise of the Digital Employee
Becoming a remote organisation means that your employees should become a digital employee. This requires a shift in mindset and, more importantly, a change in culture. The idea is that ...
Read More on Datafloq
Data Exfiltration Protection with Azure Databricks
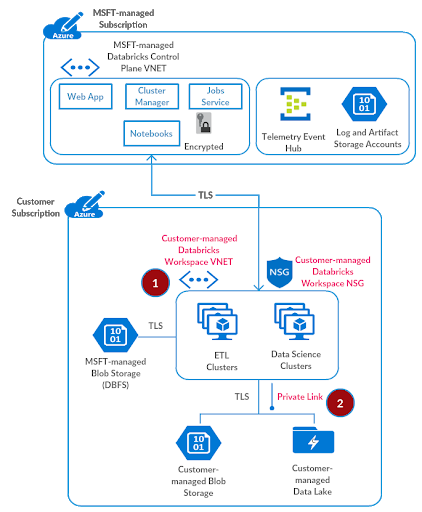
In the previous blog, we discussed how to securely access Azure Data Services from Azure Databricks using Virtual Network Service Endpoints or Private Link. Given a baseline of those best practices, in this article we walkthrough detailed steps on how to harden your Azure Databricks deployment from a network security perspective in order to prevent data exfiltration.
As per wikipedia: Data exfiltration occurs when malware and/or a malicious actor carries out an unauthorized data transfer from a computer. It is also commonly called data extrusion or data exportation. Data exfiltration is also considered a form of data theft. Since the year 2000, a number of data exfiltration efforts severely damaged the consumer confidence, corporate valuation, and intellectual property of businesses and national security of governments across the world. The problem assumes even more significance as enterprises start storing and processing sensitive data (PII, PHI or Strategic Confidential) with public cloud services.
Solving for data exfiltration can become an unmanageable problem if the PaaS service requires you to store your data with them or it processes the data in the service provider’s network. But with Azure Databricks, our customers get to keep all data in their Azure subscription and process it in their own managed private virtual network(s), all while preserving the PaaS nature of the fastest growing Data & AI service on Azure. We’ve come up with a secure deployment architecture for the platform while working with some of our most security-conscious customers, and it’s time that we share it out broadly.
High-level Data Exfiltration Protection Architecture
We recommend a hub and spoke topology styled reference architecture. The hub virtual network houses the shared infrastructure required to connect to validated sources and optionally to an on-premises environment. And the spoke virtual networks peer with the hub, while housing isolated Azure Databricks workspaces for different business units or segregated teams.
High-level view of art of the possible:
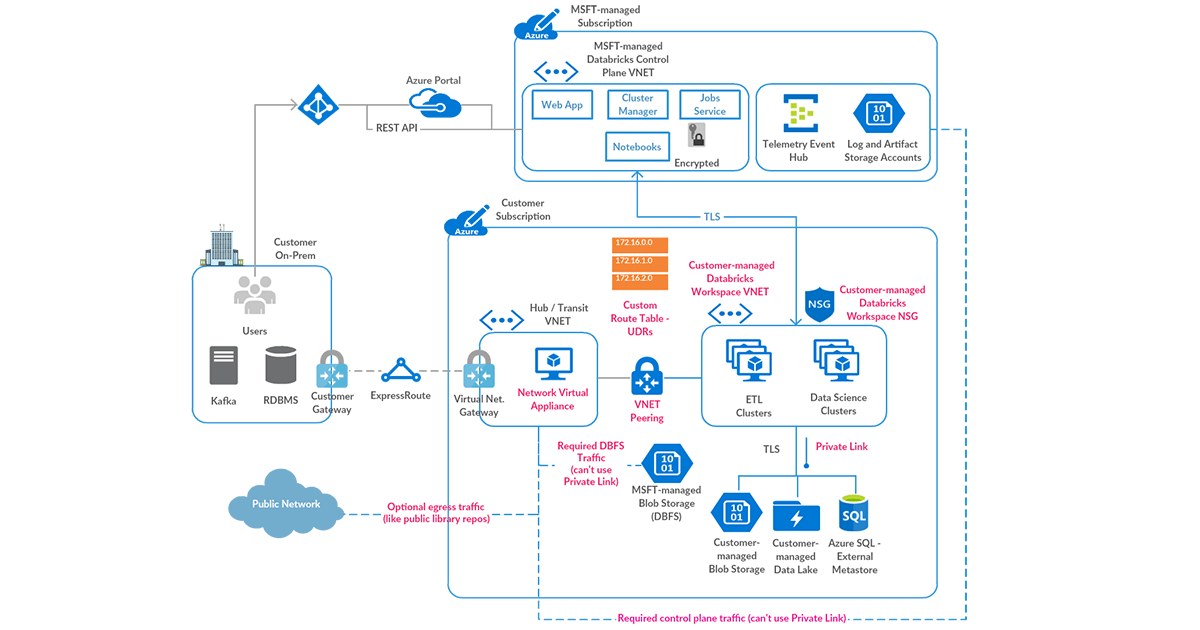
Following are high-level steps to set up a secure Azure Databricks deployment (see corresponding diagram below):
- Deploy Azure Databricks in a spoke virtual network using VNet injection (azuredatabricks-spoke-vnet in below diagram)
- Set up Private Link endpoints for your Azure Data Services in a separate subnet within the Azure Databricks spoke virtual network (privatelink-subnet in below diagram). This would ensure that all workload data is being accessed securely over Azure network backbone with default data exfiltration protection in place (see this for more). Also in general it’s completely fine to deploy these endpoints in another virtual network that’s peered to the one hosting the Azure Databricks workspace.
- Optionally, set up Azure SQL database as External Hive Metastore to override as the primary metastore for all clusters in the workspace. This is meant to override the configuration for consolidated metastore housed in the control plane.
- Deploy Azure Firewall (or other Network Virtual Appliance) in a hub virtual network (shared-infra-hub-vnet in below diagram). With Azure Firewall, you could configure:
• Application rules that define fully qualified domain names (FQDNs) that are accessible through the firewall. Some Azure Databricks required traffic could be whitelisted using the application rules.
• Network rules that define IP address, port and protocol for endpoints that can’t be configured using FQDNs. Some of the required Azure Databricks traffic needs to be whitelisted using the network rules.
Some of our customers prefer to use a third-party firewall appliance instead of Azure Firewall, which works generally fine. Though please note that each product has its own nuances and it’s better to engage relevant product support and network security teams to troubleshoot any pertinent issues.
• Set up Service Endpoint to Azure Storage for the Azure Firewall subnet, such that all traffic to whitelisted in-region or in-paired-region storage goes over the Azure network backbone (includes endpoints in Azure Databricks control plane if the customer data plane region is a match or paired).
- Create a user-defined route table with the following rules and attach it to Azure Databricks subnets.
| Name | Address | Next Hop | Purpose |
| to-databricks-control-plane-NAT | Based on the region where you’ve deployed Azure Databricks workspace, select control plane NAT IP from here | Internet | Required to provision Azure Databricks Clusters in your private network |
| to-firewall | 0.0.0.0/0 | Azure Firewall Private IP | Default quad-zero route for all other traffic |
- Configure virtual network peering between the Azure Databricks spoke and Azure Firewall hub virtual networks.
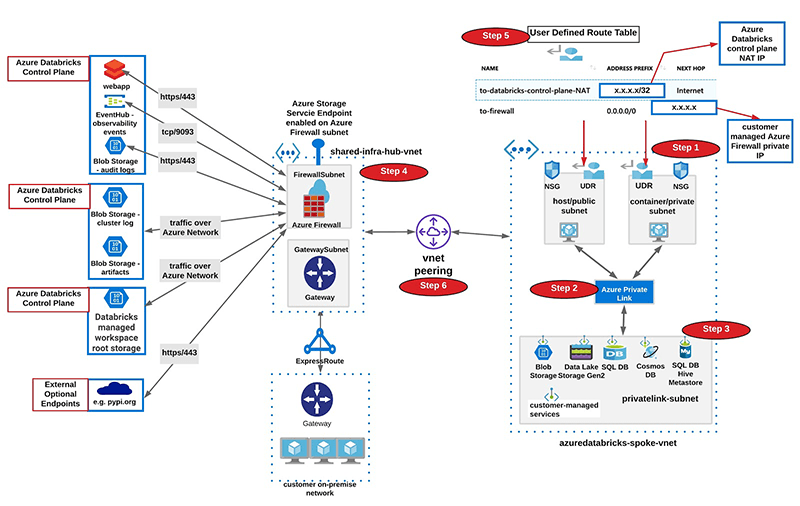
Such a hub-and-spoke architecture allows creating multiple spoke VNETs for different purposes and teams. Though we’ve seen some of our customers implement isolation by creating separate subnets for different teams within a large contiguous virtual network. In such instances, it’s totally possible to set up multiple isolated Azure Databricks workspaces in their own subnet pairs, and deploy Azure Firewall in another sister subnet within the same virtual network.
We’ll now discuss the above setup in more detail below.
Secure Azure Databricks Deployment Details
Prerequisites
Please take a note of Azure Databricks control plane endpoints for your workspace from here (map it based on region of your workspace). We’ll need these details to configure Azure Firewall rules later.
| Name | Source | Destination | Protocol:Port | Purpose |
| databricks-webapp | Azure Databricks workspace subnets | Region specific Webapp Endpoint | tcp:443 | Communication with Azure Databricks webapp |
| databricks-log-blob-storage | Azure Databricks workspace subnets | Region specific Log Blob Storage Endpoint | https:443 | To store Azure Databricks audit and cluster logs (anonymized / masked) for support and troubleshooting |
| databricks-artifact-blob-storage | Azure Databricks workspace subnets | Region specific Artifact Blob Storage Endpoint | https:443 | Stores Databricks Runtime images to be deployed on cluster nodes |
| databricks-observability-eventhub | Azure Databricks workspace subnets | Region specific Observability Event Hub Endpoint | tcp:9093 | Transit for Azure Databricks on-cluster service specific telemetry |
| databricks-dbfs | Azure Databricks workspace subnets | DBFS Blob Storage Endpoint | https:443 | Azure Databricks workspace root storage |
| databricks-sql-metastore (OPTIONAL – please see Step 3 for External Hive Metastore below) |
Azure Databricks workspace subnets | Region specific SQL Metastore Endpoint | tcp:3306 | Stores metadata for databases and child objects in a Azure Databricks workspace |
Step 1: Deploy Azure Databricks Workspace in your virtual network
The default deployment of Azure Databricks creates a new virtual network (with two subnets) in a resource group managed by Databricks. So as to make necessary customizations for a secure deployment, the workspace data plane should be deployed in your own virtual network. This quickstart shows how to do that in a few easy steps. Before that, you should create a virtual network named azuredatabricks-spoke-vnet with address space 10.2.1.0/24 in resource group adblabs-rg (names and address space are specific to this test setup).
Referring to Azure Databricks deployment documentation:
- From the Azure portal menu, select Create a resource. Then select Analytics > Databricks.
- Under Azure Databricks Service, apply the following settings:
| Setting | Suggested value | Description |
| Workspace name | adblabs-ws | Select a name for your Azure Databricks workspace. |
| Subscription | “Your subscription” | Select the Azure subscription that you want to use. |
| Resource group | adblabs-rg | Select the same resource group you used for the virtual network. |
| Location | Central US | Choose the same location as your virtual network. |
| Pricing Tier | Premium | For more information on pricing tiers, see the Azure Databricks pricing page. |
- Once you’ve finished entering basic settings, select Next: Networking > and apply the following settings:
| Setting | Value | Description |
| Deploy Azure Databricks workspace in your Virtual Network (VNet) | Yes | This setting allows you to deploy an Azure Databricks workspace in your virtual network. |
| Virtual Network | azuredatabricks-spoke-vnet | Select the virtual network you created earlier. |
| Public Subnet Name | public-subnet | Use the default public subnet name, you could use any name though. |
| Public Subnet CIDR Range | 10.2.1.64/26 | Use a CIDR range up to and including /26. |
| Private Subnet Name | private-subnet | Use the default private subnet name, you could use any name though. |
| Private Subnet CIDR Range | 10.2.1.128/26 | Use a CIDR range up to and including /26. |
Click Review and Create. Few things to note:
- The virtual network must include two subnets dedicated to each Azure Databricks workspace: a private subnet and public subnet (feel free to use a different nomenclature). The public subnet is the source of a private IP for each cluster node’s host VM. The private subnet is the source of a private IP for the Databricks Runtime container deployed on each cluster node. It indicates that each cluster node has two private IP addresses today.
- Each workspace subnet size is allowed to be anywhere from /18 to /26, and the actual sizing will be based on forecasting for the overall workloads per workspace. The address space could be arbitrary (including non RFC 1918 ones), but it must align with the enterprise on-premises plus cloud network strategy.
- Azure Databricks will create these subnets for you when you deploy the workspace using Azure portal and will perform subnet delegation to the Microsoft.Databricks/workspaces service. That allows Azure Databricks to create the required Network Security Group (NSG) rules. Azure Databricks will always give advance notice if we need to add or update the scope of an Azure Databricks-managed NSG rule. Please note that if these subnets already exist, the service will use those as such.
- There is a one-to-one relationship between these subnets and an Azure Databricks workspace. You cannot share multiple workspaces across the same subnet pair, and must use a new subnet pair for each different workspace.
- Notice the resource group and managed resource group in the Azure Databricks resource overview page on Azure portal. You cannot create any resources in the managed resource group, nor can you edit any existing ones.
Step 2: Set up Private Link Endpoints
As discussed in the Securely Accessing Azure Data Services blog, we’ll use Azure Private Link to securely connect previously created Azure Databricks workspace to your Azure Data Services. We do not recommend setting up access to such data services through a network virtual appliance / firewall, as that has a potential to adversely impact the performance of big data workloads and the intermediate infrastructure.
Please create a subnet privatelink-subnet with address space 10.2.1.0/26 in the virtual network azuredatabricks-spoke-vnet.
For the test setup, we’ll deploy a sample storage account and then create a Private Link endpoint for that. Referring to the setting up private link documentation:
- On the upper-left side of the screen in the Azure portal, select Create a resource > Storage > Storage account.
- In Create storage account – Basics, enter or select this information:
| Setting | Value |
| PROJECT DETAILS | |
| Subscription | Select your subscription. |
| Resource group | Select adblabs-rg. You created this in the previous section. |
| INSTANCE DETAILS | |
| Storage account name | Enter myteststorageaccount. If this name is taken, please provide a unique name. |
| Region | Select Central US (or the same region you used for Azure Databricks workspace and virtual network). |
| Performance | Leave the default Standard. |
| Replication | Select Read-access geo-redundant storage (RA-GRS). |
Select Next:Networking >
- In Create a storage account – Networking, connectivity method, select Private Endpoint.
- In Create a storage account – Networking, select Add Private Endpoint.
- In Create Private Endpoint, enter or select this information:
| Setting | Value |
| PROJECT DETAILS | |
| Subscription | Select your subscription. |
| Resource group | Select adblabs-rg. You created this in the previous section. |
| Location | Select Central US (or the same region you used for Azure Databricks workspace and virtual network). |
| Name | Enter myStoragePrivateEndpoint. |
| Storage sub-resource | Select dfs. |
| NETWORKING | |
| Virtual network | Select azuredatabricks-spoke-vnet from resource group adblabs-rg. |
| Subnet | Select privatelink-subnet. |
| PRIVATE DNS INTEGRATION | |
| Integrate with private DNS zone | Leave the default Yes. |
| Private DNS zone | Leave the default (New) privatelink.dfs.core.windows.net. |
Select OK.
- Select Review + create. You’re taken to the Review + create page where Azure validates your configuration.
- When you see the Validation passed message, select Create.
- Browse to the storage account resource that you just created.
It’s possible to create more than one Private Link endpoint for supported Azure Data Services. To configure such endpoints for additional services, please refer to the relevant Azure documentation.
Step 3: Set up External Hive Metastore
Provision Azure SQL database
This step is optional. By default the consolidated regional metastore is used for the Azure Databricks workspace. Please skip to the next step if you would like to avoid managing a Azure SQL database for this end-to-end deployment.
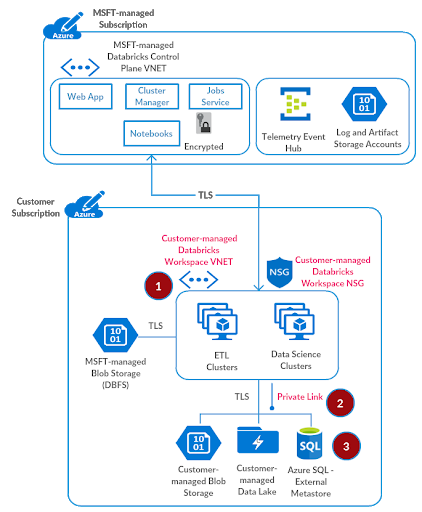
Referring to provisioning an Azure SQL database documentation, please provision an Azure SQL database which we will use as an external hive metastore for the Azure Databricks workspace.
- On the upper-left side of the screen in the Azure portal, select Create a resource > Databases > SQL database.
- In Create SQL database – Basics, enter or select this information:
| Setting | Value |
| DATABASE DETAILS | |
| Subscription | Select your subscription. |
| Resource group | Select adblabs-rg. You created this in the previous section. |
| INSTANCE DETAILS | |
| Database name | Enter myhivedatabase. If this name is taken, please provide a unique name. |
- In Server, select Create new.
- In New server, enter or select this information:
| Setting | Value |
| Server name | Enter mysqlserver. If this name is taken, please provide a unique name. |
| Server admin login | Enter an administrator name of your choice. |
| Password | Enter a password of your choice. The password must be at least 8 characters long and meet the defined requirements. |
| Location | Select Central US (or the same region you used for Azure Databricks workspace and virtual network). |
Select OK.
- Select Review + create. You’re taken to the Review + create page where Azure validates your configuration.
- When you see the Validation passed message, select Create.
Create a Private Link endpoint
In this section, you will add a Private Link endpoint for the Azure SQL database created above. Referring from this source
- On the upper-left side of the screen in the Azure portal, select Create a resource > Networking > Private Link Center.
- In Private Link Center – Overview, on the option to Build a private connection to a service, select Start.
- In Create a private endpoint – Basics, enter or select this information:
| Setting | Value |
| PROJECT DETAILS | |
| Subscription | Select your subscription. |
| Resource group | Select adblabs-rg. You created this in the previous section. |
| INSTANCE DETAILS | |
| Name | Enter mySqlDBPrivateEndpoint. If this name is taken, please provide a unique name. |
| Region | Select Central US (or the same region you used for Azure Databricks workspace and virtual network). |
| Select Next: Resource |
In Create a private endpoint – Resource, enter or select this information:
| Setting | Value |
| Connection method | Select connect to an Azure resource in my directory. |
| Subscription | Select your subscription. |
| Resource type | Select Microsoft.Sql/servers. |
| Resource | Select mysqlserver |
| Target sub-resource | Select sqlServer |
Select Next: Configuration
In Create a private endpoint – Configuration, enter or select this information:
| Setting | Value |
| NETWORKING | |
| Virtual network | Select azuredatabricks-spoke-vnet |
| Subnet | Select privatelink-subnet |
| PRIVATE DNS INTEGRATION | |
| Integrate with private DNS zone | Select Yes. |
| Private DNS Zone | Select (New)privatelink.database.windows.net |
- Select Review + create. You’re taken to the Review + create page where Azure validates your configuration.
- When you see the Validation passed message, select Create.
Configure External Hive Metastore
- From Azure Portal, search for the adblabs-rg resource group
- Go to Azure Databricks workspace resource
- Click Launch Workspace
- Please follow the instructions documented here to configure the Azure SQL database created above as an external hive metastore for the Azure Databricks workspace.
Step 4: Deploy Azure Firewall
We recommend Azure Firewall as a scalable cloud firewall to act as the filtering device for Azure Databricks control plane traffic, DBFS Storage, and any allowed public endpoints to be accessible from your Azure Databricks workspace.
Referring to the documentation for configuring an Azure Firewall, you could deploy Azure Firewall into a new virtual network. Please create the virtual network named hub-vnet with address space 10.3.1.0/24 in resource group adblabs-rg (names and address space are specific to this test setup). Also create a subnet named AzureFirewallSubnet with address space 10.3.1.0/26 in hub-vnet.
- On the Azure portal menu or from the Home page, select Create a resource.
- Type firewall in the search box and press Enter.
- Select Firewall and then select Create.
- On the Create a Firewall page, use the following table to configure the firewall:
| Setting | Value |
| Subscription | “your subscription” |
| Resource group | adblabs-rg |
| Name | firewall |
| Location | Select Central US (or the same region you used for Azure Databricks workspace and virtual network). |
| Choose a virtual network | Use existing: hub-vnet |
| Public IP address | Add new. The Public IP address must be the Standard SKU type. Name it fw-public-ip |
- Select Review + create.
- Review the summary, and then select Create to deploy the firewall.
- This will take a few minutes.
- After the deployment completes, go to the adblabs-rg resource group, and select the firewall
- Note the private IP address. You’ll use it later when you create the custom default route from Azure Databricks subnets.
Configure Azure Firewall Rules
With Azure Firewall, you can configure:
- Application rules that define fully qualified domain names (FQDNs) that can be accessed from a subnet.
- Network rules that define source address, protocol, destination port, and destination address.
- Network traffic is subjected to the configured firewall rules when you route your network traffic to the firewall as the subnet default gateway.
Configure Application Rule
We first need to configure application rules to allow outbound access to Log Blob Storage and Artifact Blob Storage endpoints in the Azure Databricks control plane plus the DBFS Root Blob Storage for the workspace.
- Go to the resource group adblabs-rg, and select the firewall.
- On the firewall page, under Settings, select Rules.
- Select the Application rule collection tab.
- Select Add application rule collection.
- For Name, type databricks-control-plane-services.
- For Priority, type 200.
- For Action, select Allow.
- Configure the following in Rules -> Target FQDNs
| Name | Source type | Source | Protocol:Port | Target FQDNs |
| databricks-spark-log-blob-storage | IP Address | Azure Databricks workspace subnets 10.2.1.128/26,10.2.1.64/26 |
https:443 | Refer notes from Prerequisites above (for Central US) |
| databricks-audit-log-blob-storage | IP Address | Azure Databricks workspace subnets 10.2.1.128/26,10.2.1.64/26 |
https:443 | Refer notes from Prerequisites above (for Central US)
This is separate log storage only for US regions today |
| databricks-artifact-blob-storage | IP Address | Azure Databricks workspace subnets 10.2.1.128/26,10.2.1.64/26 |
https:443 | Refer notes from Prerequisites above (for Central US) |
| databricks-dbfs | IP Address | Azure Databricks workspace subnets 10.2.1.128/26,10.2.1.64/26 |
https:443 | Refer notes from Prerequisites above |
| Public Repositories for Python and R Libraries
(OPTIONAL – if workspace users are allowed to install libraries from public repos) |
IP Address | 10.2.1.128/26,10.2.1.64/26 | https:443 | *pypi.org,*pythonhosted.org,cran.r-project.org
Add any other public repos as desired |
Configure Network Rule
Some endpoints can’t be configured as application rules using FQDNs. So we’ll set those up as network rules, namely the Observability Event Hub and Webapp.
- Open the resource group adblabs-rg, and select the firewall.
- On the firewall page, under Settings, select Rules.
- Select the Network rule collection tab.
- Select Add network rule collection.
- For Name, type databricks-control-plane-services.
- For Priority, type 200.
- For Action, select Allow.
- Configure the following in Rules -> IP Addresses.
| Name | Protocol | Source type | Source | Destination type | Destination Address | Destination Ports |
| databricks-webapp | TCP | IP Address | Azure Databricks workspace subnets 10.2.1.128/26,10.2.1.64/26 |
IP Address | Refer notes from Prerequisites above (for Central US) | 443 |
| databricks-observability-eventhub | TCP | IP Address | Azure Databricks workspace subnets 10.2.1.128/26,10.2.1.64/26 |
IP Address | Refer notes from Prerequisites above (for Central US) | 9093 |
| databricks-sql-metastore (OPTIONAL – please see Step 3 for External Hive Metastore above) |
TCP | IP Address | Azure Databricks workspace subnets 10.2.1.128/26,10.2.1.64/26 |
IP Address | Refer notes from Prerequisites above (for Central US) | 3306 |
Configure Virtual Network Service Endpoints
- On the hub-vnet page, click Service endpoints and then Add
- From Services select “Microsoft.Storage”
- In Subnets, select AzureFirewallSubnet
Service endpoint would allow traffic from AzureFirewallSubnet to Log Blob Storage, Artifact Blob Storage, and DBFS Storage to go over Azure network backbone, thus eliminating exposure to public networks.
If users are going to access Azure Storage using Service Principals, then we recommend creating an additional service endpoint from Azure Databricks workspace subnets to Microsoft.AzureActiveDirectory.
Step 5: Create User Defined Routes (UDRs)
At this point, the majority of the infrastructure setup for a secure, locked-down deployment has been completed. We now need to route appropriate traffic from Azure Databricks workspace subnets to the Control Plane NAT IP (see FAQ below) and Azure Firewall setup earlier.
Referring to the documentation for user defined routes:
- On the Azure portal menu, select All services and search for Route Tables. Go to that section.
- Select Add
- For Name, type firewall-route.
- For Subscription, select your subscription.
- For the Resource group, select adblabs-rg.
- For Location, select the same location that you used previously i.e. Central US
- Select Create.
- Select Refresh, and then select the firewall-route-table route table.
- Select Routes and then select Add.
- For Route name, add to-firewall.
- For Address prefix, add 0.0.0.0/0.
- For Next hop type, select Virtual appliance.
- For the Next hop address, add the Private IP address for the Azure Firewall that you noted earlier.
- Select OK.
Now add one more route for Azure Databricks Control Plane NAT.
- Select Routes and then select Add.
- For Route name, add to-central-us-databricks-control-plane.
- For Address prefix, add the Control Plane NAT IP address for Central US from here.
- For Next hop type, select Internet (why – see below in FAQ).
- Select OK.
The route table needs to be associated with both of the Azure Databricks workspace subnets.
- Go to the firewall-route-table.
- Select Subnets and then select Associate.
- Select Virtual network > azuredatabricks-spoke-vnet.
- For Subnet, select both workspace subnets.
- Select OK.
Step 6: Configure VNET Peering
We are now at the last step. The virtual network azuredatabricks-spoke-vnet and hub-vnet need to be peered so that the route table configured earlier could work properly.
Referring to the documentation for configuring VNET peering:
In the search box at the top of the Azure portal, enter virtual networks in the search box. When Virtual networks appear in the search results, select that view.
- Go to hub-vnet.
- Under Settings, select Peerings.
- Select Add, and enter or select values as follows:
| Name | Value |
| Name of the peering from hub-vnet to remote virtual network | from-hub-vnet-to-databricks-spoke-vnet |
| Virtual network deployment model | Resource Manager |
| Subscription | Select your subscription |
| Virtual Network | azuredatabricks-spoke-vnet or select the VNET where Azure Databricks is deployed |
| Name of the peering from remote virtual network to hub-vnet | from-databricks-spoke-vnet-to-hub-vnet |
- Leave rest of the default values as is and click OK
The setup is now complete.
Step 7: Validate Deployment
It’s time to put everything to test now:
- Go to the Azure Databricks workspace adblabs-ws that you’d created in Step 1, launch and create a cluster.
- Create a notebook and attach it to the cluster.
- Try and access the storage account myteststorageaccount that you created in Step 2 earlier.
If the data access worked without any issues, that means you’ve accomplished the optimum secure deployment for Azure Databricks in your subscription. This was quite a bit of manual work, but that was more for a one-time showcase. In practical terms, you would want to automate such a setup using a combination of ARM Templates, Azure CLI, Azure SDK etc.:
- Deploy Azure Databricks in your own managed VNET using ARM Template
- Create Private Endpoint using Azure CLI (or ARM Template)
- Deploy Azure SQL as External Metastore using ARM Template
- Deploy Azure Firewall using ARM Template (or Azure CLI)
- Deploy Route Table and Custom Routes using ARM Template
- Peer Virtual Networks using ARM Template
Common Questions with Data Exfiltration Protection Architecture
Can I use service endpoint policies to secure data egress to Azure Data Services?
Service Endpoint Policies allow you to filter virtual network traffic to only specific Azure Data Service instances over Service Endpoints. Endpoint policies can not be applied to Azure Databricks workspace subnets or other such managed Azure services that have resources in a management or control plane subscription. Hence we cannot use this feature.
Can I use Network Virtual Appliance (NVA) other than Azure Firewall?
Yes, you could use a third-party NVA as long as network traffic rules are configured as discussed in this article. Please note that we have tested this setup with Azure Firewall only, though some of our customers use other third-party appliances. It’s ideal to deploy the appliance on cloud rather than be on-premises.
Can I have a firewall subnet in the same virtual network as Azure Databricks?
Yes, you can. As per Azure reference architecture, it is advisable to use a hub-spoke virtual network topology to plan better for future. Should you choose to create the Azure Firewall subnet in the same virtual network as Azure Databricks workspace subnets, you wouldn’t need to configure virtual network peering as discussed in Step 6 above.
Can I filter Azure Databricks control plane NAT traffic through Azure Firewall?
To bootstrap Azure Databricks clusters, the control plane initiates the communication to the virtual machines in your subscription. If the control plane NAT traffic is configured to be sent through the firewall, the acknowledgement for the incoming TCP message will be sent via that route, which creates something called asymmetric routing and hence cluster bootstrap fails. Thus the control plane NAT traffic does need to be directly routed through the public network, as discussed in Step 5 above.
Can I analyze accepted or blocked traffic by Azure Firewall?
We recommend using Azure Firewall Logs and Metrics for that requirement.
Getting Started with Data Exfiltration Protection with Azure Databricks
We discussed utilizing cloud-native security control to implement data exfiltration protection for your Azure Databricks deployments, all of it which could be automated to enable data teams at scale. Some other things that you may want to consider and implement as part of this project:
- Enable meta controls to unlock true potential of your data lake
- Manage access to notebook features
- Access ADLS using Credential Passthrough
- Audit everything with Diagnostic Logs, Storage Access Logs and NSG Flow Logs (requires VNET Injection).
Please reach out to your Microsoft or Databricks account team for any questions.
--
Try Databricks for free. Get started today.
The post Data Exfiltration Protection with Azure Databricks appeared first on Databricks.